

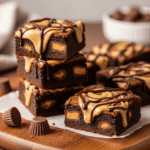
Get ready for the ultimate chocolate and peanut butter indulgence—these Peanut Butter Cup Brownies combine rich, fudgy homemade brownies with everyone’s favorite candy for a dessert that’s absolutely irresistible. Imagine biting into a dense, chocolatey brownie studded with chunks of peanut butter cups that get all melty and gooey in the oven. These easy peanut butter cup brownies are a chocolate-peanut butter lover’s dream come true, delivering that perfect sweet-and-salty combination in every single bite.
Whether you’re baking for a birthday party, potluck, bake sale, or just because you’re craving something seriously decadent, this peanut butter brownie recipe is guaranteed to disappear fast. They’re surprisingly simple to make from scratch—no box mix needed!—and they look incredibly impressive with those beautiful peanut butter cups baked right in. These fudgy brownies with peanut butter cups work for any occasion: school lunches, holiday cookie exchanges, game day treats, or those nights when only chocolate will do. The combination of homemade brownies and Reese’s peanut butter cups creates a dessert that’s somehow even better than the sum of its parts.
History / Background
The love affair between chocolate and peanut butter is a distinctly American tradition that has produced some of our most beloved treats. While brownies themselves date back to the late 1800s (with the first recipe appearing in the 1896 Boston Cooking-School Cook Book), the combination of brownies with peanut butter cups is a much more recent innovation born from America’s obsession with these two flavors together.
Reese’s Peanut Butter Cups, the star addition to these brownies, were created in 1928 by H.B. Reese, a former dairy farmer and shipping foreman for Milton S. Hershey. Reese started making candy in his basement and eventually developed the peanut butter cup—a simple combination of milk chocolate and peanut butter that would become one of America’s best-selling candies. The cups were originally sold as “penny cups” during the Great Depression, making them an affordable treat that quickly gained popularity.
The trend of incorporating candy bars into brownies emerged in the 1980s and 1990s as home bakers began experimenting with adding mix-ins to enhance classic recipes. As the “loaded brownie” trend took off—with versions featuring everything from caramel to nuts to cookie dough—peanut butter cups became an obvious and incredibly popular choice. The combination made perfect sense: brownies are already rich and fudgy, and peanut butter cups add creamy peanut butter filling and extra chocolate in convenient, pre-portioned pieces.
Peanut butter cup brownies gained massive popularity through food blogs, Pinterest, and recipe-sharing sites in the 2000s and 2010s. They became a go-to recipe for bake sales, potlucks, and home bakers looking to upgrade their brownie game with minimal effort. Today, they’re considered a modern American classic—a mashup dessert that perfectly captures our love of chocolate, peanut butter, and over-the-top indulgence.
What makes these brownies special is how they represent American baking creativity: taking something classic (brownies) and something iconic (Reese’s cups) and combining them into something even better. It’s simple, nostalgic, and utterly delicious.
Why You’ll Love This Recipe
These peanut butter cup brownies are about to become your new favorite dessert, and here’s exactly why they deserve a permanent spot in your baking rotation:
This recipe delivers everything you want in a brownie—fudgy texture, intense chocolate flavor, and that perfect crackly top—plus the incredible bonus of melted peanut butter cups throughout. They’re made completely from scratch with simple ingredients you probably have in your pantry, but they taste like they came from a gourmet bakery. The combination of homemade brownies and Reese’s cups creates layers of flavor and texture that boxed mixes simply can’t match.
- Ultimate Chocolate-PB Combo: Satisfies both chocolate and peanut butter cravings in one perfect dessert
- Fudgy, Not Cakey: Dense, moist, and ultra-chocolatey with that signature fudgy brownie texture
- Easy from Scratch: Simple recipe with no complicated techniques—just mix and bake!
- Crowd-Pleaser Guaranteed: I’ve never met anyone who doesn’t love these brownies
- Perfect for Any Occasion: Bake sales, potlucks, parties, gift-giving, or just because
- Customizable: Use different sizes of peanut butter cups or add extra toppings
- Budget-Friendly: Uses affordable ingredients to make a generous pan of brownies
- Kid-Approved: Children absolutely love finding peanut butter cups in their brownies
- Make-Ahead Friendly: Actually taste even better the next day when flavors have melded
- Freezer-Friendly: Make a batch and freeze for future chocolate emergencies
Ingredient Notes
Let’s break down what makes these peanut butter cup brownies so incredibly delicious:
Butter: Use unsalted butter for best results, which allows you to control the salt level. The butter should be melted and slightly cooled—not hot enough to cook the eggs when you add them. Butter creates richness and that dense, fudgy texture. You can substitute with coconut oil for a dairy-free version, though the flavor will be slightly different.
Granulated Sugar: Provides sweetness and affects the brownie’s texture. Sugar creates that beautiful crackly top and contributes to the fudgy interior. Don’t reduce the sugar too much or the brownies will be dense and dry. The amount here creates perfectly balanced sweetness.
Eggs: Bind the ingredients together and provide structure. Use large eggs at room temperature—they incorporate more easily into the batter. The eggs should be beaten before adding to create a smooth, emulsified batter. Don’t skip the beating step!
Vanilla Extract: Enhances the chocolate flavor and adds depth. Always use pure vanilla extract, never imitation—the quality difference is noticeable in brownies where vanilla plays a supporting role to the chocolate.
Unsweetened Cocoa Powder: Provides deep chocolate flavor. Use high-quality cocoa for best results—Dutch-process cocoa (like Hershey’s Special Dark or Ghirardelli) gives richer, darker color and more complex flavor, while natural cocoa is slightly more acidic and lighter in color. Either works beautifully, but Dutch-process is preferred for the most intense chocolate taste.
All-Purpose Flour: Provides structure but is used in a smaller amount than typical cakes, which is what makes these brownies fudgy rather than cakey. Measure flour correctly by spooning it into your measuring cup and leveling off—don’t pack it or scoop directly from the bag, which adds too much flour and creates dry brownies.
Salt: Essential for balancing sweetness and enhancing chocolate flavor. A pinch of salt makes chocolate taste more chocolatey and rounds out all the flavors. If using salted butter, reduce added salt slightly.
Baking Powder: Just a small amount helps the brownies rise slightly and creates a better texture. Don’t confuse with baking soda—they’re different!
Semi-Sweet Chocolate Chips (Optional but Recommended): Add extra chocolate pockets throughout the brownies. You can use milk chocolate, dark chocolate, or a combination. Mini chips distribute more evenly, while regular chips create bigger chocolate pockets.
Reese’s Peanut Butter Cups: The star ingredient! You’ll need about 16-20 regular-size peanut butter cups (or use minis for more even distribution). Buy the unwrapped variety to save time, or use the individually wrapped ones—either works. They can be chopped into chunks or left whole, pressed into the batter.
Equipment Needed
You don’t need any fancy equipment to make these amazing brownies! Here’s what you’ll need:
Essential Equipment:
- 9×13-inch Baking Pan: A metal or glass pan works—metal browns the edges more, while glass bakes more gently. For thicker brownies, use an 8×8 or 9×9-inch pan and increase baking time by 5-10 minutes.
- Parchment Paper or Aluminum Foil: Line your pan for easy removal and cutting. Leave overhang on two sides to lift the brownies out.
- Large Mixing Bowl: For mixing the batter by hand—no mixer needed!
- Whisk: For beating eggs and mixing the batter smooth.
- Rubber Spatula: For scraping the bowl and spreading batter in the pan.
- Measuring Cups and Spoons: For accurate measurements (critical in baking!).
- Medium Saucepan: For melting the butter (or use microwave).
- Toothpick or Cake Tester: For checking doneness.
Optional but Helpful:
- Cooling Rack: For cooling the brownies evenly.
- Sharp Knife: For clean cuts—plastic knives actually work great for brownies!
- Cooking Spray: For greasing the pan if not using parchment.
Peanut Butter Cup Brownies Recipe
- Total Time: 45 minutes
- Yield: 16 brownies 1x
- Diet: Vegetarian
Description
Ultra-fudgy homemade brownies loaded with chunks of Reese’s peanut butter cups! These easy peanut butter cup brownies are rich, decadent, and absolutely irresistible—perfect for chocolate and peanut butter lovers!
Ingredients
For the Brownie Batter:
- 1/2 cup (1 stick) unsalted butter
- 1 cup granulated sugar
- 2 large eggs, room temperature
- 1 teaspoon vanilla extract
- 1/3 cup unsweetened cocoa powder
- 1/2 cup all-purpose flour
- 1/4 teaspoon salt
- 1/4 teaspoon baking powder
- 1/2 cup semi-sweet chocolate chips (optional but recommended)
For the Peanut Butter Cup Topping:
- 16–20 regular Reese’s peanut butter cups (or 1 1/2 cups mini peanut butter cups)
- Additional peanut butter cups for topping (optional)
Instructions
- Preheat and Prep: Preheat your oven to 350°F (175°C). Line a 9×13-inch baking pan with parchment paper, leaving overhang on two sides for easy removal. Alternatively, grease the pan well with butter or cooking spray.
- Melt the Butter: In a medium saucepan over low heat, melt the butter completely. Remove from heat and let it cool slightly for 3-5 minutes so it’s warm but not hot. You can also melt butter in the microwave in 30-second intervals, stirring between each.
- Mix Sugar and Butter: Pour the melted butter into a large mixing bowl. Add the granulated sugar and whisk vigorously for about 1 minute until well combined and slightly lighter in color. This step incorporates air and helps create that shiny, crackly top on your brownies.
- Add Eggs and Vanilla: Add the eggs one at a time, whisking well after each addition until fully incorporated. The mixture should look smooth and glossy. Add the vanilla extract and whisk again. Don’t skip the whisking—it creates the perfect texture!
- Add Dry Ingredients: Sift the cocoa powder over the wet mixture (or whisk it in a separate bowl first to remove lumps). Add the flour, salt, and baking powder. Gently fold everything together with a rubber spatula just until no dry streaks remain. Don’t overmix—stop as soon as it’s combined. The batter will be thick and glossy.
- Add Chocolate Chips: If using, fold in the chocolate chips gently with your spatula. This adds extra pockets of melted chocolate throughout the brownies!
- Prepare Peanut Butter Cups: Roughly chop about 12-14 of the peanut butter cups into quarters or halves. Reserve the remaining whole peanut butter cups for topping.
- Combine Batter and Peanut Butter Cups: Gently fold the chopped peanut butter cups into the brownie batter, distributing them throughout. Reserve a handful of pieces to press into the top.
- Pour and Spread: Pour the batter into your prepared baking pan. Use a rubber spatula to spread it evenly into all corners. The batter is thick, so take your time to spread it smoothly.
- Top with More Peanut Butter Cups: Press the reserved chopped peanut butter cup pieces and whole or halved peanut butter cups into the top of the batter in a decorative pattern. They’ll sink slightly as they bake—this is perfect!
- Bake: Place in the preheated oven and bake for 30-35 minutes. The brownies are done when a toothpick inserted into the center comes out with a few moist crumbs (not wet batter, but not completely clean either). The edges should be set and pulling away slightly from the pan, but the center should still look slightly underdone. Remember, they continue cooking as they cool!
- Cool Completely: Remove from the oven and let the brownies cool completely in the pan on a wire rack—this takes about 1-2 hours. I know it’s hard to wait, but warm brownies are difficult to cut cleanly and the texture improves as they cool. For the cleanest cuts, refrigerate for 30 minutes before slicing.
- Cut and Serve: Use the parchment paper overhang to lift the entire brownie slab out of the pan onto a cutting board. Use a sharp knife (cleaned between cuts) to slice into 16 squares. For the cleanest cuts, wipe your knife with a damp paper towel between each slice.
Notes
- Don’t Overbake: Fudgy brownies should be slightly underdone in the center. They firm up as they cool. Overbaked brownies are dry and cakey.
- Room Temperature Eggs: Cold eggs don’t incorporate as smoothly. Set them out 30 minutes before baking, or place them in warm water for 5 minutes.
- Mini vs. Regular Peanut Butter Cups: Minis distribute more evenly, while regular-size cups create dramatic pockets of peanut butter. Use whichever you prefer!
- Chocolate Chips: While optional, they add extra chocolatey richness. Highly recommended!
- Storage: Store in an airtight container at room temperature for up to 4 days, or refrigerate for up to 1 week.
- Thicker Brownies: Use an 8×8 or 9×9-inch pan for thicker brownies, and add 5-10 minutes to baking time.
- Prep Time: 15 minutes
- Cook Time: 30 minutes
- Category: Dessert
- Method: Baking
- Cuisine: American
Nutrition
- Serving Size: 1 brownie (1/16 of recipe)
- Calories: 245
- Sugar: 24g
- Sodium: 95mg
- Fat: 13g
- Saturated Fat: 7g
- Unsaturated Fat: 5g
- Trans Fat: 0g
- Carbohydrates: 30g
- Fiber: 2g
- Protein: 4g
- Cholesterol: 40mg
Tips & Variations
Flavor Variations:
- Double Peanut Butter: Swirl 1/4 cup melted peanut butter into the batter before adding peanut butter cups
- White Chocolate PB: Use white chocolate peanut butter cups instead of regular for sweeter flavor
- Dark Chocolate Lover: Use dark chocolate cocoa powder and dark chocolate peanut butter cups
- Salted Caramel PB: Drizzle salted caramel sauce over the brownies and sprinkle with sea salt
- Peanut Butter Frosting: Top cooled brownies with creamy peanut butter frosting
- Triple Chocolate: Add 1/2 cup each of milk chocolate chips, dark chocolate chips, and white chocolate chips
- Nutty Crunch: Sprinkle chopped peanuts or pretzels on top before baking for extra crunch
- S’mores Style: Add mini marshmallows and graham cracker pieces along with peanut butter cups
- Brownie Sundae: Serve warm brownies with vanilla ice cream and hot fudge
Different Pan Sizes:
- 8×8-inch pan: Makes thicker brownies; bake 35-40 minutes
- 9×9-inch pan: Slightly thicker than 9×13; bake 32-38 minutes
- Muffin tin: Makes brownie cups; bake 18-22 minutes (perfect for parties!)
Dietary Modifications:
- Gluten-Free: Use 1:1 gluten-free flour blend in place of all-purpose flour
- Dairy-Free: Replace butter with coconut oil; use dairy-free chocolate chips and check peanut butter cup ingredients
- Lower Sugar: Reduce sugar to 3/4 cup (texture will be denser but still good)
Pro Chef Tips
Here are insider secrets to making the absolute best peanut butter cup brownies:
The Underbake Secret: The number one rule for fudgy brownies is to slightly underbake them. When you insert a toothpick into the center, it should come out with moist crumbs clinging to it—not clean, and not wet batter, but somewhere in between. The brownies continue cooking from residual heat as they cool, so what looks slightly underdone in the oven will be perfectly fudgy at room temperature. If you wait until the toothpick comes out completely clean, your brownies will be dry and cakey.
The Whisk-Then-Fold Technique: When you add the eggs, whisk vigorously for 30-60 seconds. This incorporates air and creates that beautiful shiny, crackly top that makes brownies look so appealing. However, once you add the flour and cocoa, switch to gentle folding with a spatula. Overmixing after adding flour develops gluten and creates tough, cakey brownies. The moment the dry ingredients are just incorporated, stop mixing!
Room Temperature Matters: Room temperature eggs mix into the batter much more smoothly than cold eggs, creating better texture. Cold eggs can cause the melted butter to seize up and create a grainy batter. Set your eggs out when you start preheating the oven, or place them in a bowl of warm water for 5-10 minutes. This small step makes a noticeable difference in final texture.
Cool Butter Slightly: After melting the butter, let it cool for 3-5 minutes before adding other ingredients. If the butter is too hot when you add eggs, it can partially cook them and create a scrambled texture. The butter should be warm and melted, but not steaming hot. You should be able to comfortably touch the bowl.
The Parchment Sling Method: Line your pan with parchment paper in both directions, creating a sling with overhang on all four sides. This makes lifting the entire brownie slab out of the pan incredibly easy, and you’ll get perfect edges on all sides when you cut. You can also use aluminum foil sprayed with cooking spray if you don’t have parchment.
Patience with Cooling: This is the hardest tip to follow, but it’s crucial! Let the brownies cool completely in the pan before cutting—ideally 1-2 hours at room temperature, or 30 minutes in the refrigerator. Warm brownies are impossible to cut cleanly and tend to crumble. Fully cooled (or even chilled) brownies cut into perfect, clean squares with defined edges. The texture also improves dramatically as they cool.
The Clean Cut Trick: For bakery-perfect squares, use a large, sharp knife and wipe it clean with a damp paper towel between each cut. Make long, continuous cuts rather than sawing back and forth. Some bakers even use unflavored dental floss or fishing line to make perfectly clean cuts through brownies—just press it straight down through the brownies!
Common Mistakes to Avoid
Mistake #1: Overbaking the Brownies
This is the most common mistake that ruins an otherwise perfect batch. Overbaked brownies are dry, crumbly, and cakey instead of fudgy and moist. Many bakers wait for a completely clean toothpick, but for fudgy brownies, you want moist crumbs clinging to the toothpick when you test them. The center should still look slightly wet and the edges should be just set. Remember, brownies continue baking from residual heat as they cool, so they’ll firm up perfectly. Set your timer for the minimum baking time and check early—you can always bake longer, but you can’t un-overbake!
Mistake #2: Overmixing the Batter
Once you add the flour and cocoa powder, your mixing technique changes completely. While you whisk vigorously when adding eggs (which is good), you should gently fold once flour is added. Overmixing at this stage develops gluten, which creates tough, cakey brownies with a bread-like texture instead of that dense, fudgy consistency you want. Mix just until you no longer see dry flour streaks—a few small lumps are fine and will bake out. Stop mixing the moment it looks combined!
Mistake #3: Using the Wrong Size Pan
Pan size dramatically affects baking time and texture. Using a different pan than specified can result in brownies that are too thin and overbaked, or too thick and underbaked in the center. If you must substitute, remember: larger pans make thinner brownies that bake faster, while smaller pans make thicker brownies that need more time. An 8×8 pan is not a good substitute for 9×13—the brownies will be twice as thick and require significantly more baking time. Stick to the recommended pan size for best results.
Mistake #4: Cutting Brownies Too Soon
I know the temptation is real—warm brownies smell amazing and you want to dig in immediately! But cutting warm brownies results in crumbly, messy squares that fall apart. The brownies need time to set and firm up as they cool. Warm brownies are too soft and gooey to hold their shape when cut. Wait until they’re at least room temperature (1-2 hours), or even better, refrigerate them for 30 minutes before cutting for the cleanest, most professional-looking squares. Your patience will be rewarded with bakery-perfect cuts!
Mistake #5: Not Lining the Pan
Baking brownies directly in a greased pan makes them very difficult to remove and cut neatly. The edges often stick, and you’re forced to cut them in the pan, which damages your pan and results in uneven, messy squares. Line your pan with parchment paper or aluminum foil with overhang on the sides, and you can lift the entire brownie slab out in one piece, set it on a cutting board, and slice perfect squares. This simple step transforms your brownies from homemade-looking to bakery-quality.
Storage & Meal Prep
Room Temperature Storage:
Store peanut butter cup brownies in an airtight container at room temperature for up to 4 days. Layer them with parchment paper between rows to prevent sticking. Keep the container sealed to maintain moisture and prevent the brownies from drying out. They actually taste even better on day two when the flavors have melded!
Refrigerator Storage:
For longer storage, keep brownies in an airtight container in the refrigerator for up to 1 week. Chilled brownies have a denser, fudgier texture that many people prefer. Let them come to room temperature for 15-20 minutes before serving for the best flavor, or enjoy them cold for an extra-fudgy experience.
Individual Wrapping:
For lunchboxes or grab-and-go treats, wrap individual brownies tightly in plastic wrap or place them in small sandwich bags. They’ll stay fresh for 3-4 days at room temperature or up to a week in the fridge. This makes them perfect for packing in school lunches or taking to work.
Preventing Drying Out:
The key to keeping brownies moist is minimizing air exposure. Always store them in an airtight container, never loosely covered or uncovered. If your container is much larger than needed, place a piece of plastic wrap directly on top of the brownies before sealing the container to reduce air space.
Make-Ahead & Freezer Notes
Baking in Advance:
Peanut butter cup brownies are perfect for making ahead! Bake them 1-2 days before you need them and store in an airtight container at room temperature. The texture and flavor actually improve after a day as everything settles and the flavors meld together. This makes them ideal for stress-free entertaining, bake sales, or holiday gatherings.
Freezing Whole Pan:
You can freeze the entire uncut brownie slab! Once completely cooled, wrap the whole thing (in the pan or lifted out) tightly in plastic wrap, then again in aluminum foil. Freeze for up to 3 months. To thaw, remove from freezer and let it sit at room temperature for 2-3 hours, or overnight in the refrigerator. Cut into squares after thawing.
Freezing Individual Brownies:
For ultimate convenience, cut the brownies into squares, then freeze them individually. Wrap each brownie in plastic wrap, then place all wrapped brownies in a large freezer bag with the air pressed out. Freeze for up to 3 months. To enjoy, remove individual brownies and thaw at room temperature for 30-60 minutes, or microwave on 50% power for 15-20 seconds for a warm, gooey treat.
Freezer-to-Table:
Frozen brownies can be eaten partially frozen for a dense, fudgy texture similar to brownie ice cream. Some people actually prefer them this way! Or warm frozen brownies in the microwave for 10-15 seconds for a fresh-from-the-oven experience.
Make-Ahead Components:
You can measure and combine the dry ingredients up to 1 week in advance and store in an airtight container. When ready to bake, just melt the butter, add wet ingredients, combine with the pre-measured dry ingredients, and bake. This saves time on busy baking days.
Serving Suggestions
Peanut butter cup brownies are delicious on their own, but here are ways to make them even more special:
Classic Presentation:
- Cut into neat squares and arrange on a serving platter
- Dust with powdered sugar for an elegant look
- Serve with cold milk for the perfect pairing
Dessert Upgrades:
- Brownie Sundae: Top warm brownies with vanilla ice cream, hot fudge, whipped cream, and extra chopped peanut butter cups
- Brownie à la Mode: Serve with a scoop of peanut butter ice cream or chocolate ice cream
- Drizzle Magic: Melt chocolate and peanut butter separately, drizzle over cooled brownies in a decorative pattern
- Whipped Topping: Add a dollop of whipped cream or Cool Whip for lighter contrast
- Salted Caramel: Drizzle with salted caramel sauce and sprinkle with flaky sea salt
Party Presentations:
- Cut into small bite-size pieces for dessert tables or buffets
- Serve on decorative paper plates or cupcake liners for easy grab-and-go at parties
- Stack 2-3 brownies on individual plates with garnishes for plated desserts
- Create a brownie bar with various toppings (sauces, ice cream, whipped cream, nuts) and let guests customize
Beverage Pairings:
- Cold Milk: The classic pairing that never fails
- Coffee: Hot coffee cuts through the richness beautifully
- Hot Chocolate: For the ultimate chocolate experience
- Peanut Butter Milkshake: Double down on the PB flavor
- Cold Brew Coffee: For sophisticated adult enjoyment
Holiday & Special Occasion Ideas:
- Valentine’s Day: Cut with heart-shaped cookie cutters
- Halloween: Add candy eyes or orange frosting for spooky treats
- Christmas: Drizzle with red and green melted candy melts
- Birthday Parties: Add candles and serve as brownie “cake”
- Bake Sales: Wrap individually in cellophane bags with ribbons
Portion Control Tips:
For rich desserts like these, smaller squares are often better. Cut a 9×13 pan into 24-32 small squares instead of 16 large ones for portion-controlled treats that let you enjoy the indulgence without overdoing it.
FAQs Section
Can I use a brownie mix instead of making from scratch?
Absolutely! If you want to save time, use a box brownie mix (for a 9×13 pan) and prepare according to package directions, then fold in chopped peanut butter cups before baking and press more on top. The homemade version has better flavor and texture, but the box mix shortcut still creates delicious brownies. Just be aware that different mixes have different textures—fudgy mixes work best.
Can I make these without peanut butter cups?
Yes! While peanut butter cups are what makes these special, you can create a similar effect by swirling 1/2 cup of peanut butter into the batter and adding chocolate chips. Or substitute with other candy: Snickers pieces, Milky Way chunks, Rolo candies, or M&Ms all work wonderfully. You can also make them as plain chocolate brownies by simply omitting the peanut butter cups.
Why are my brownies cakey instead of fudgy?
Several factors create cakey brownies: too much flour (measure correctly by spooning and leveling), overbaking (remove when center still looks slightly underdone), or overmixing the batter after adding flour (which develops gluten). For fudgy brownies, use the exact flour amount specified, don’t overbake, and mix gently once flour is added. Also, fudgy brownies have a higher ratio of fat and sugar to flour compared to cakey versions.
Can I double this recipe?
Yes! Double all ingredients and bake in two 9×13-inch pans, or use one very large pan (like an 18×13-inch half sheet pan). If using one large pan, you may need to adjust baking time—check around 30 minutes but be prepared to bake up to 40-45 minutes. Two separate pans is usually easier and more reliable than one giant pan.
My peanut butter cups melted completely and disappeared. What happened?
This happens when brownies are overbaked. The peanut butter cups melt and integrate into the batter, leaving pockets of peanut butter but no distinct chunks. While still delicious, they lose that fun “surprise” element. To prevent this, don’t overbake, and press some peanut butter cups into the top during the last 5 minutes of baking so they soften but don’t fully melt.
Can I use natural peanut butter instead of peanut butter cups?
You can create a swirl effect by dropping spoonfuls of natural peanut butter onto the batter and swirling with a knife, but it won’t provide the same candy-like sweetness and texture that peanut butter cups do. Peanut butter cups contain sugar and chocolate coating that regular peanut butter lacks. For best results, stick with actual Reese’s cups or another chocolate-coated peanut butter candy.
How do I know when brownies are done?
Insert a toothpick into the center (avoid hitting a peanut butter cup). For fudgy brownies, it should come out with moist crumbs clinging to it—not wet batter, but not completely clean. The edges should be set and pulling away slightly from the pan. The center will still look slightly soft and underdone, but it will firm up as it cools. If the toothpick comes out completely clean, the brownies are likely overbaked and will be dry.
Conclusion
There you have it—the ultimate guide to making irresistibly fudgy, decadent peanut butter cup brownies that will have everyone begging for the recipe! These homemade brownies prove that you don’t need a box mix to create bakery-quality desserts. With simple ingredients, straightforward techniques, and the magical addition of Reese’s peanut butter cups, you’ll have a showstopping dessert that looks impressive and tastes even better.
The beauty of these peanut butter brownies is their versatility. Bake them for special occasions, pack them in lunchboxes, bring them to potlucks, give them as gifts, or simply make them on a random Tuesday because life is short and chocolate-peanut butter brownies make everything better. They’re one of those recipes that becomes a go-to, the one you can make with your eyes closed because you’ve baked it so many times by request.
Whether you’re a experienced baker or just starting out, these brownies are virtually foolproof. Follow the tips about not overbaking, mixing gently, and cooling completely, and you’ll have perfect results every single time.