
Get ready to fall in love with these irresistibly soft, pillowy homemade cinnamon sugar pretzels! If you’ve ever enjoyed those heavenly cinnamon sugar pretzels from the mall or your favorite pretzel shop, you know exactly what magic we’re recreating here. These sweet pretzels combine the classic chewy texture of a soft pretzel with a generous coating of buttery cinnamon sugar that creates the most addictive sweet treat.
Perfect for weekend baking projects, after-school snacks, game day gatherings, or special breakfast treats, these cinnamon sugar pretzels are surprisingly easy to make from scratch. The aroma of freshly baked pretzels dusted with warm cinnamon and sugar will have everyone rushing to your kitchen! They’re wonderful served warm with a cup of coffee, hot chocolate, or a cold glass of milk.
Whether you’re looking for a fun baking activity with kids, want to impress guests with homemade bakery-style treats, or simply craving something sweet and satisfying, this cinnamon sugar pretzel recipe delivers every single time. The dough comes together quickly, and while there are a few steps involved, none of them are complicated. Trust me—once you taste that first warm, cinnamon-sugar-coated bite, you’ll understand why these homemade soft pretzels are worth every minute!
History / Background
The pretzel has a fascinating history that dates back over 1,400 years! Legend has it that pretzels were invented by Italian monks around 610 A.D. as a reward for children who learned their prayers. The distinctive twisted shape was designed to resemble arms crossed in prayer, and the three holes represented the Holy Trinity. The monks called them “pretiola,” meaning “little rewards” in Latin, which eventually evolved into the word “pretzel.”
Pretzels made their way to Germany and Austria, where they became deeply embedded in the culture. German immigrants brought pretzel-making traditions to America in the 1700s, settling primarily in Pennsylvania. The town of Lititz, Pennsylvania, is home to the first commercial pretzel bakery in America, established in 1861, and Pennsylvania remains the pretzel capital of the United States to this day.
For centuries, pretzels were primarily enjoyed as savory snacks—salted and served with beer or mustard. However, the sweet pretzel revolution began in the late 20th century when creative bakers and pretzel shops started experimenting with dessert-style variations. The cinnamon sugar pretzel, in particular, gained massive popularity in American malls during the 1980s and 1990s, thanks largely to chains like Auntie Anne’s, which opened their first location in 1988.
The genius of the cinnamon sugar pretzel lies in its perfect balance: the slight alkalinity from the baking soda bath gives the pretzel its signature chewy crust and deep brown color, while the sweet cinnamon-sugar coating transforms it into a dessert that appeals to all ages. Today, cinnamon sugar pretzels are an American favorite—a beloved treat that bridges the gap between bread, pastry, and pure comfort food. Making them at home brings that food court nostalgia right to your kitchen, and honestly, they taste even better fresh from your own oven!
Why You’ll Love This Recipe
These homemade cinnamon sugar pretzels are about to become your new favorite weekend baking project! There’s something magical about pulling warm, golden-brown pretzels from the oven, brushing them with melted butter, and coating them in that perfect cinnamon-sugar mixture. Every bite delivers that signature pretzel chewiness on the outside with a tender, slightly sweet interior that’s absolutely irresistible.
Here’s why this cinnamon sugar pretzel recipe will have you hooked:
- Bakery-Quality at Home – Tastes just like (or better than!) those famous mall pretzels, but made fresh in your own kitchen
- Surprisingly Simple – Despite looking impressive, the dough comes together easily and requires just basic baking skills
- Fun Family Activity – Kids love shaping the pretzel twists, making this a perfect weekend baking project everyone can enjoy
- Budget-Friendly – Uses simple pantry ingredients that cost a fraction of what you’d pay at a pretzel shop
- Customizable – Easy to adjust the cinnamon-sugar ratio or add fun variations like vanilla glaze or chocolate drizzle
- Make-Ahead Friendly – The dough can be prepared in advance, and baked pretzels freeze beautifully for quick treats later
- Perfect for Any Occasion – Works as breakfast, snack, dessert, party food, or homemade gifts
- No Special Equipment – You don’t need a stand mixer or any fancy tools (though they help!)
- Incredibly Satisfying – There’s something deeply rewarding about shaping your own pretzels and watching them transform in the oven
- Crowd-Pleaser Guarantee – I’ve never met anyone who doesn’t love a warm cinnamon sugar pretzel!
Whether you’re an experienced baker or just getting started, this recipe gives you all the tips and tricks you need to create professional-looking, delicious soft pretzels that’ll disappear within minutes of coming out of the oven!
Ingredient Notes
Let’s break down what goes into these amazing homemade cinnamon sugar pretzels. Each ingredient plays an important role in creating that perfect texture and flavor.
Warm Water – The foundation of your pretzel dough. It needs to be warm (about 110°F) but not hot, as temperatures above 120°F can kill the yeast. Think bathwater temperature—warm enough to be comfortable but not hot to the touch.
Active Dry Yeast – This is what makes your pretzels rise and develop that wonderful chewy texture. Make sure your yeast is fresh (check the expiration date!) for the best results. You can also use instant yeast if that’s what you have—it works the same way. Substitution: Instant yeast can replace active dry yeast in equal amounts; just mix it directly with the flour without proofing.
Granulated Sugar (for dough) – A small amount of sugar feeds the yeast, helping it activate and making the dough rise beautifully. It also adds a subtle sweetness to the pretzel itself that complements the cinnamon sugar coating.
Salt – Essential for flavor! Don’t skip this—it balances the sweetness and enhances the overall taste of the pretzel dough. Salt also strengthens the gluten structure, giving you that perfect chewy bite.
All-Purpose Flour – The main structure of your pretzels. All-purpose flour has the right protein content to create soft yet chewy pretzels. Bread flour can be substituted if you want an even chewier texture, but all-purpose works perfectly.
Baking Soda – This is the secret ingredient that gives pretzels their distinctive brown color and slightly tangy, alkaline flavor! The baking soda bath (boiling water with baking soda) creates that signature pretzel crust. Don’t skip this step—it’s what makes a pretzel a pretzel!
Unsalted Butter (melted) – You’ll brush this over the hot pretzels right after baking. It helps the cinnamon sugar stick and adds richness and flavor. Use unsalted so you can control the saltiness of the final product.
Cinnamon Sugar Coating:
- Granulated Sugar – The sweet component that coats your pretzels. White sugar gives you that classic look and sweet crunch.
- Ground Cinnamon – Warm, aromatic, and absolutely essential! Use fresh cinnamon for the best flavor. I recommend getting high-quality cinnamon if possible—it really makes a difference.
Optional: Coarse Sugar – Some bakers like to mix a tablespoon of coarse sugar (like sanding sugar or turbinado sugar) into the cinnamon-sugar mixture for extra crunch and sparkle. It’s not necessary, but it adds a nice textural element!
Equipment Needed
You don’t need any fancy equipment to make these pretzels, but having the right tools makes the process smooth and enjoyable:
- Large Mixing Bowl – For combining and kneading your pretzel dough.
- Measuring Cups and Spoons – Accurate measurements are important in baking!
- Wooden Spoon or Sturdy Spatula – For mixing the initial dough before kneading.
- Clean Work Surface – A clean countertop or large cutting board for kneading and shaping the dough.
- Kitchen Towel or Plastic Wrap – To cover the dough while it rises.
- Large Pot – For boiling the baking soda water bath. A 6-8 quart pot works great.
- Slotted Spoon or Spider Strainer – For safely lifting pretzels out of the boiling water.
- Two Large Baking Sheets – Lined with parchment paper or silicone baking mats.
- Parchment Paper or Silicone Baking Mats – Prevents sticking and makes cleanup easy.
- Pastry Brush – For brushing melted butter on the hot pretzels.
- Small Bowl – For mixing the cinnamon-sugar coating.
- Sharp Knife or Bench Scraper – For dividing the dough into equal portions.
- Timer – To keep track of rising, boiling, and baking times.
Optional but Helpful:
- Stand Mixer with Dough Hook – Makes kneading easier, though hand-kneading works perfectly fine!
- Kitchen Scale – For weighing dough portions to ensure evenly-sized pretzels.
- Instant-Read Thermometer – To check your water temperature for proofing the yeast.

Cinnamon Sugar Pretzel Recipe
- Total Time: 1 hour 35 minutes
- Yield: 8 large pretzels 1x
- Diet: Vegetarian
Description
These homemade cinnamon sugar pretzels are soft, chewy, and coated in sweet cinnamon-sugar perfection! With a tender interior and that signature pretzel crust, they taste just like the beloved mall pretzels but are made fresh in your own kitchen. Perfect for breakfast treats, afternoon snacks, or whenever you need something sweet and comforting!
Ingredients
For the Pretzel Dough:
- 1½ cups warm water (110°F)
- 2¼ teaspoons active dry yeast (1 standard packet)
- 2 tablespoons granulated sugar
- 1½ teaspoons salt
- 4½ cups all-purpose flour, plus more for kneading
- 4 tablespoons unsalted butter, melted
For the Baking Soda Bath:
- 10 cups water
- ⅔ cup baking soda
For the Cinnamon Sugar Coating:
- 6 tablespoons unsalted butter, melted
- ¾ cup granulated sugar
- 1½ tablespoons ground cinnamon
Instructions
Step 1: Proof the Yeast
In a large mixing bowl, combine the warm water (make sure it’s between 105-115°F), yeast, and sugar. Stir gently and let it sit for 5-7 minutes until the mixture becomes foamy and bubbly on top. This means your yeast is active and ready to go! If it doesn’t foam, your yeast may be dead or your water was too hot—start over with fresh yeast and properly-tempered water.
Step 2: Make the Dough
Add the salt and melted butter to the yeast mixture and stir to combine. Begin adding the flour one cup at a time, stirring with a wooden spoon after each addition. After about 3½ cups of flour, the dough will become too stiff to stir. At this point, turn it out onto a lightly floured surface and knead in the remaining flour by hand (or use a stand mixer with a dough hook). Knead for 5-7 minutes until the dough is smooth, elastic, and slightly tacky but not sticky. If it’s too sticky, add a tablespoon of flour at a time.
Step 3: First Rise
Lightly grease your mixing bowl with butter or oil. Form the dough into a ball and place it in the greased bowl, turning once to coat all sides. Cover with a clean kitchen towel or plastic wrap and let it rise in a warm, draft-free place for about 1 hour, or until doubled in size. A warm oven (turned off) or a sunny spot works great!
Step 4: Divide and Shape
Once risen, punch down the dough to release air bubbles. Turn it out onto your work surface and divide it into 8 equal pieces (each piece should weigh about 115-120 grams if you’re using a scale). Roll each piece into a rope about 20-22 inches long. To shape into a pretzel: form a U-shape, cross the ends over each other twice to create a twist, then bring the twisted ends down and press them onto the bottom curve of the U to form the classic pretzel shape. Place shaped pretzels on a parchment-lined baking sheet while you finish the rest.
Step 5: Prepare the Baking Soda Bath
Preheat your oven to 425°F. In a large pot, bring 10 cups of water to a boil. Once boiling, carefully add the baking soda (it will bubble up, so add it slowly!). Reduce heat to maintain a gentle boil.
Step 6: Boil the Pretzels
Working with 2-3 pretzels at a time, carefully place them in the boiling baking soda water using a slotted spoon or spider strainer. Boil for 30 seconds on each side (60 seconds total). Remove with the slotted spoon, letting excess water drip off, and place on a parchment-lined baking sheet. The pretzels should have a slightly shiny appearance after boiling. Repeat with remaining pretzels.
Step 7: Bake
Place the baking sheets in your preheated 425°F oven and bake for 12-15 minutes, or until the pretzels are deep golden brown. They should look beautifully caramelized with that signature pretzel color. If baking two sheets at once, rotate them halfway through for even browning.
Step 8: Add the Cinnamon Sugar
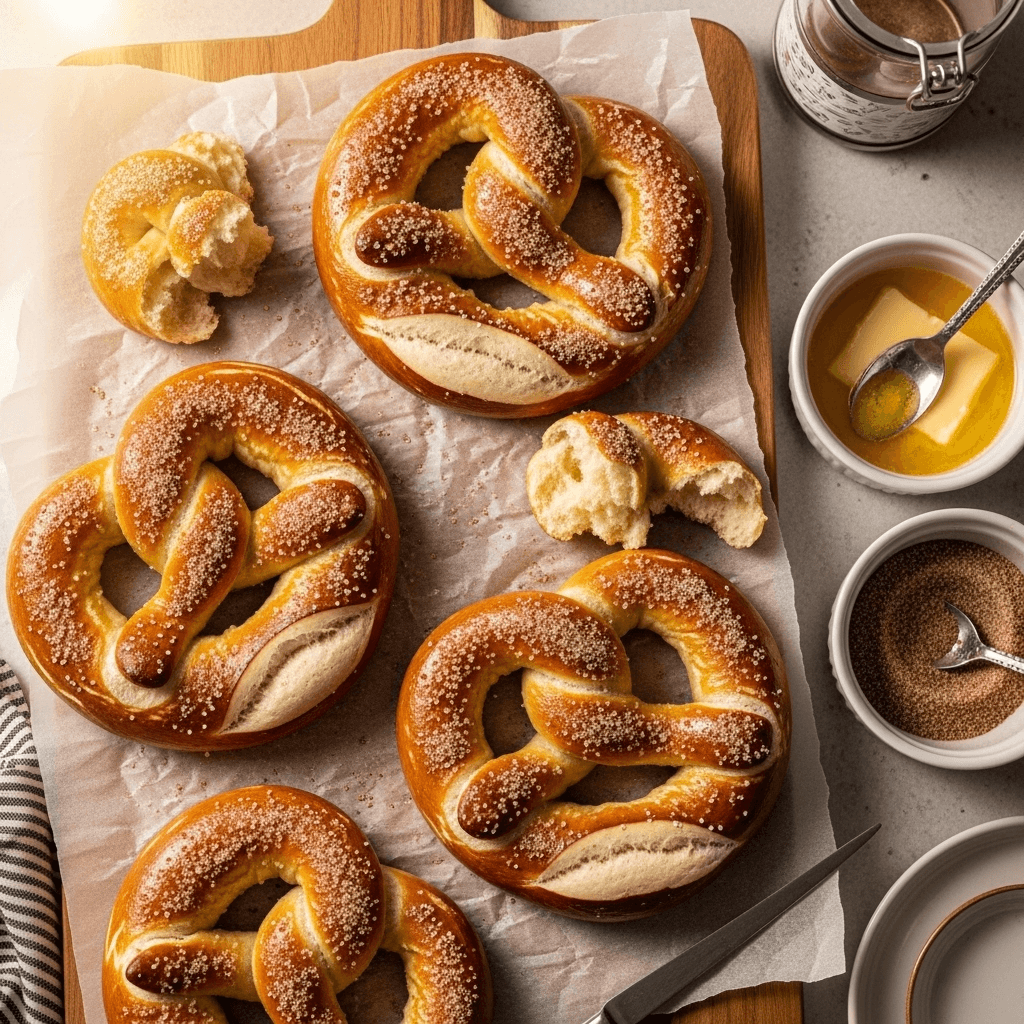
While the pretzels are still hot from the oven, immediately brush them generously with melted butter, making sure to coat all surfaces. In a shallow bowl, mix together the sugar and cinnamon. While the pretzels are still warm and buttery, dip both sides into the cinnamon-sugar mixture, pressing gently so it adheres well. You can also sprinkle the cinnamon sugar over the buttered pretzels if you prefer.
Step 9: Serve
Enjoy your cinnamon sugar pretzels while they’re still warm for the best texture and flavor! They’re absolutely heavenly fresh from the oven.
Notes
- Water Temperature: Using water that’s too hot will kill the yeast, while water that’s too cold won’t activate it properly. Aim for 110°F—it should feel warm but comfortable to the touch.
- Kneading: Proper kneading develops the gluten structure that gives pretzels their chewy texture. Don’t rush this step! The dough should be smooth and elastic, and when you poke it, it should slowly spring back.
- Baking Soda Bath: This is absolutely essential! Don’t skip it or substitute it with anything else. The alkaline bath is what gives pretzels their distinctive flavor, color, and texture. Be careful when adding baking soda to boiling water as it will bubble vigorously.
- Size Matters: Try to make your pretzel ropes as even as possible so they bake uniformly. If some are much thicker than others, the thin ones may overbake while the thick ones are still underdone.
- Butter Application: Apply the melted butter immediately after baking while the pretzels are piping hot—this helps it absorb and allows the cinnamon sugar to stick better.
- Serving Temperature: These pretzels are best enjoyed warm or at room temperature on the day they’re made. They’ll firm up as they cool, which is normal.
- Prep Time: 20 minutes (plus 1 hour rising time)
- Cook Time: 15 minutes
- Category: Dessert
- Method: Baking
- Cuisine: American
Nutrition
- Serving Size: 1 large pretzel
- Calories: 385
- Sugar: 24g
- Sodium: 620mg
- Fat: 12g
- Saturated Fat: 7g
- Unsaturated Fat: 4g
- Trans Fat: 0g
- Carbohydrates: 64g
- Fiber: 3g
- Protein: 7g
- Cholesterol: 31mg
Tips & Variations
Vanilla Glaze Version: Instead of cinnamon sugar, make a simple vanilla glaze by mixing 1 cup powdered sugar with 2-3 tablespoons milk and ½ teaspoon vanilla extract. Drizzle over warm pretzels for a sweet, bakery-style finish.
Chocolate Lover’s Dream: After coating with cinnamon sugar, drizzle melted chocolate or chocolate ganache over the pretzels. You can also add mini chocolate chips to the dough before shaping!
Cream Cheese Dipping Sauce: Mix 4 ounces softened cream cheese with 2 tablespoons butter, ½ cup powdered sugar, and ½ teaspoon vanilla for an amazing dipping sauce that takes these pretzels to the next level.
Brown Sugar Cinnamon: Replace half of the granulated sugar with brown sugar in your coating mixture for a deeper, more caramel-like flavor with hints of molasses.
Nutty Addition: Mix ¼ cup finely chopped pecans or walnuts into your cinnamon-sugar mixture for added crunch and nuttiness.
Pumpkin Spice Pretzels: During fall, replace the plain cinnamon with pumpkin pie spice for a seasonal twist that’s absolutely delicious!
Salted Caramel Pretzels: Drizzle warm pretzels with caramel sauce and sprinkle with flaky sea salt for a sweet-and-salty combination that’s addictive.
Mini Pretzel Bites: Instead of shaping into large pretzels, cut the dough into small nuggets, boil them briefly, and bake. These are perfect for kids or parties!
Savory Option: Skip the cinnamon sugar altogether and brush with butter, then sprinkle with coarse sea salt and garlic powder for traditional soft pretzels.
Pro Chef Tips
Temperature is Everything: The single most important factor in successful yeast dough is proper temperature. Invest in an instant-read thermometer to check your water temperature—it should be 110°F. Too hot kills the yeast; too cold won’t activate it properly. Also, make sure your rising environment is warm (75-80°F is ideal).
Don’t Rush the Rise: Proper rising time develops flavor and texture. While the recipe says about an hour, trust the visual cue more than the clock—your dough should actually double in size. In cooler kitchens, this might take 90 minutes. Be patient!
Uniform Rope Thickness: When rolling your dough into ropes, apply even pressure and roll from the center outward. This creates uniform thickness, which means even baking. If one end is thicker than the other, the thick parts will be underbaked while thin parts overcook.
Master the Baking Soda Bath: Professional pretzel bakers know this is the secret! The higher the pH (more alkaline), the darker and more flavorful your pretzels will be. Some professionals use lye for an even stronger effect, but baking soda is safer for home bakers and still produces excellent results. Don’t skimp on the boiling time—those 30 seconds per side create that signature crust.
Butter Immediately: The moment those pretzels come out of the oven, brush them with butter. The heat opens up the surface, allowing the butter to soak in rather than just sit on top. This also creates the perfect sticky surface for your cinnamon sugar to adhere to.
Press the Cinnamon Sugar: Don’t just sprinkle—actually press the pretzels into the cinnamon sugar mixture or pat it on firmly. This ensures maximum coating and prevents it from falling off when you bite into them.
Work Quickly: Once you start the baking soda bath step, work efficiently. Have your oven preheated, your baking sheets ready, and your butter melted so you can move through the final steps while the pretzels are at their best temperature for coating.
Common Mistakes to Avoid
Using Old or Expired Yeast: Yeast has a shelf life, and old yeast simply won’t work. If your yeast mixture doesn’t foam and bubble after 5-7 minutes, it’s dead. Always check expiration dates and store yeast in the refrigerator or freezer after opening to extend its life. When in doubt, proof your yeast first—if it doesn’t foam, start over with fresh yeast before wasting the rest of your ingredients.
Adding Too Much Flour Too Quickly: The most common mistake in bread-making! Add flour gradually and stop when the dough is just slightly tacky but doesn’t stick to your hands. Too much flour creates dense, tough pretzels instead of tender, chewy ones. Remember, you can always add more flour, but you can’t take it away. The dough should be soft and smooth, not stiff and dry.
Skipping or Rushing the Baking Soda Bath: Some people try to skip this step or barely dip the pretzels, thinking it won’t matter. Wrong! The baking soda bath is absolutely essential—it’s what gives pretzels their distinctive taste, color, and texture. Make sure to boil them for the full 30 seconds per side. Without this step, you’re just making bread rolls in a pretzel shape.
Overbaking or Underbaking: Pretzels should be deep golden brown, almost mahogany in color. Many people pull them out too early because they worry about burning them, but pretzels need that deep color to develop proper flavor and texture. However, if they go too dark, they’ll taste bitter. Watch them carefully in the last few minutes and look for that rich, caramelized brown color.
Applying Cinnamon Sugar to Cold Pretzels: If you let the pretzels cool before buttering and coating them, the butter won’t melt into the surface and the cinnamon sugar won’t stick properly. You’ll end up with most of the coating falling off onto your plate. Always butter and coat while the pretzels are steaming hot from the oven!
Not Sealing the Pretzel Shape Properly: When you press the twisted ends down onto the bottom curve to form the pretzel shape, really press them! If they’re not firmly attached, they’ll come apart during the boiling or baking process. Use a tiny bit of water as “glue” if needed—just dab some on the connection points before pressing.
Storage & Meal Prep
Room Temperature Storage: Homemade cinnamon sugar pretzels are best enjoyed the day they’re made, but you can store leftovers in an airtight container at room temperature for up to 2 days. They’ll lose some of their soft texture and become a bit firmer, but they’re still delicious! Just know that the cinnamon sugar coating may absorb some moisture and won’t be as crisp.
Refrigerator Storage: I don’t recommend refrigerating these pretzels as the cold temperature actually speeds up the staling process (called retrogradation), making them tough and dry faster than they would at room temperature.
Reheating for Best Results: To refresh day-old pretzels, wrap them in a damp paper towel and microwave for 15-20 seconds. Alternatively, wrap them in foil and warm in a 300°F oven for 5-7 minutes. They won’t be quite as good as fresh, but this brings back some of that soft texture. You can brush with a bit more melted butter and add fresh cinnamon sugar after reheating if desired.
Portioning for Meal Prep: If you’re making these for school lunches or weekly snacks, consider making smaller pretzel bites instead of large pretzels. They store better, reheat more evenly, and are perfect grab-and-go portions.
Make-Ahead & Freezer Notes
Freezing Unbaked Shaped Pretzels: After shaping the pretzels but before the baking soda bath, place them on a parchment-lined baking sheet and freeze until solid (about 2 hours). Transfer to a freezer bag and store for up to 1 month. When ready to bake, boil them directly from frozen (add about 15 seconds to each side), then bake as directed. This is perfect for making big batches!
Freezing Baked Pretzels: Let the baked and coated pretzels cool completely to room temperature. Wrap each pretzel individually in plastic wrap, then place them all in a freezer-safe bag or container. Freeze for up to 2 months. This locks in freshness and allows you to pull out just one or two at a time.
Thawing and Reheating Frozen Baked Pretzels: Remove from freezer and unwrap. Let thaw at room temperature for 30-60 minutes, or microwave from frozen for 30-45 seconds (start with 30 and add more time if needed). For the best texture, wrap in damp paper towel before microwaving, or reheat in a 300°F oven for 8-10 minutes wrapped in foil.
Make-Ahead Dough: You can prepare the pretzel dough through the first rise, then punch it down, wrap tightly in plastic wrap, and refrigerate for up to 24 hours. When ready to use, let it come to room temperature (about 30 minutes), then proceed with shaping, boiling, and baking. The cold fermentation actually develops even better flavor!
Cinnamon Sugar Mixture: Make a big batch of cinnamon sugar and store it in an airtight container for up to 6 months. It’s handy for toast, coffee, oatmeal, and of course, more pretzels!
Serving Suggestions
These cinnamon sugar pretzels are versatile treats that work for just about any occasion!
Breakfast or Brunch: Serve warm pretzels alongside scrambled eggs, fresh fruit salad, and crispy bacon for a special weekend brunch. The sweet pretzels balance beautifully with savory breakfast foods.
Beverage Pairings: These pretzels are absolutely heavenly with hot chocolate, chai tea, coffee, or cold milk. For adults, they’re also surprisingly good with spiced apple cider or even a pumpkin spice latte!
Dipping Sauces: While delicious on their own, these pretzels are next-level with dipping sauces:
- Cream cheese frosting or dip
- Vanilla or maple icing
- Chocolate ganache
- Caramel sauce
- Nutella or chocolate hazelnut spread
- Peanut butter or almond butter
- Marshmallow fluff
Party Platter: Arrange warm pretzels on a large wooden board with small bowls of various dipping sauces for a fun, interactive dessert station at parties or game day gatherings.
Ice Cream Sandwich: This might sound crazy, but trust me—slice a pretzel horizontally and fill it with vanilla ice cream or frozen yogurt. Press the cinnamon sugar sides together and enjoy a unique frozen treat!
With Soup or Chili: The sweetness of these pretzels creates an interesting sweet-savory contrast when served alongside tomato soup, butternut squash soup, or even a hearty chili.
After School Snack: Keep some frozen and reheat one or two when kids get home from school. Pair with apple slices and a glass of milk for a satisfying snack.
Gift Giving: Wrap cooled pretzels individually in cellophane bags tied with ribbon for homemade gifts that neighbors, teachers, and friends will absolutely love!
FAQs Section
Can I use instant yeast instead of active dry yeast?
Absolutely! Instant yeast and active dry yeast can be used interchangeably in this recipe with a slight modification. If using instant yeast, you can skip the proofing step and mix it directly with the flour. Add the warm water, sugar, salt, and melted butter to the flour-yeast mixture and proceed with mixing and kneading. Instant yeast actually works slightly faster, so your dough might rise a bit quicker. Both types will give you excellent results!
Why do I need to boil pretzels in baking soda water?
Great question! The baking soda bath is what makes a pretzel a pretzel. When you boil the dough in alkaline water, it gelatinizes the outside surface of the dough, creating that signature shiny, chewy crust. It also contributes to the deep brown color during baking (called the Maillard reaction) and gives pretzels that distinctive slightly tangy, almost nutty flavor you can’t get any other way. Without this step, you’d essentially have bread rolls shaped like pretzels. It’s non-negotiable for authentic texture and taste!
My pretzels came out tough and dense. What went wrong?
There are a few possible culprits: 1) You may have added too much flour, which is the most common issue. The dough should be slightly tacky but not sticky—err on the softer side. 2) You might have over-kneaded the dough. While kneading is important, going too long can overdevelop the gluten and make pretzels tough. 3) Overbaking can also cause a tough texture. Make sure to pull them when they’re deep golden brown, not darker. 4) Old yeast or water that’s too hot can prevent proper rising, resulting in dense pretzels.
Can I make these pretzels without a stand mixer?
Yes, definitely! This recipe is completely doable by hand. You’ll just need to knead the dough manually for about 7-8 minutes on a lightly floured surface. It’s actually a great arm workout! The dough should become smooth, elastic, and slightly tacky. If you’re not sure if you’ve kneaded enough, do the “windowpane test”—stretch a small piece of dough between your fingers. If it stretches thin enough to see light through without tearing, it’s ready.
How do I know if my yeast is still good?
The proofing step at the beginning of this recipe is actually a test for yeast viability! When you mix yeast with warm water and sugar, it should become foamy and bubbly within 5-7 minutes. If nothing happens or you only get a few sad bubbles, your yeast is dead or your water temperature was off. Yeast should be stored in the refrigerator or freezer after opening and used before the expiration date. When in doubt, buy fresh yeast—it’s inexpensive and makes all the difference!
Can I make pretzel bites instead of large pretzels?
Absolutely! Pretzel bites are fantastic and actually easier to shape. After the first rise, divide your dough into 8 pieces, roll each into a rope, then cut into 1-inch nuggets. Boil them in the baking soda water for about 20-25 seconds total (they’re smaller so they don’t need as long), then bake for 10-12 minutes at 425°F. Brush with butter and toss in cinnamon sugar. They’re perfect for parties, snacking, or serving with dipping sauces!
Why didn’t my cinnamon sugar stick well?
The key is timing and butter! You must brush the pretzels with melted butter immediately when they come out of the oven while they’re still very hot. The heat helps the butter soak in and creates a sticky surface for the cinnamon sugar. Then coat them in the cinnamon sugar while they’re still hot and buttery. If you wait until they cool, the butter won’t absorb and the coating will just fall off. Also, make sure you’re using enough butter—don’t be shy with it!
Conclusion
Congratulations—you now have everything you need to make incredible homemade cinnamon sugar pretzels that rival anything you’d find at a fancy pretzel shop! These soft, chewy, sweet treats are proof that some of the best comfort foods can be made right in your own kitchen with simple ingredients and a little bit of love.
From that first whiff of yeast and cinnamon to that final warm, sugar-coated bite, making these pretzels from scratch is an experience that’s as rewarding as it is delicious. Whether you’re baking them for a special breakfast, an after-school snack, a weekend family activity, or just because you’re craving something sweet and satisfying, these cinnamon sugar pretzels deliver every single time.
I absolutely love hearing from readers who’ve tried my recipes! Did your pretzels turn out beautifully? Did you try any fun variations? Are your kids begging you to make them again? Drop a comment below and let me know! And if you loved this recipe, please share it on Pinterest so other home bakers can discover the joy of homemade soft pretzels too. Your pins and shares help keep this blog going and inspire me to create more delicious recipes for you!