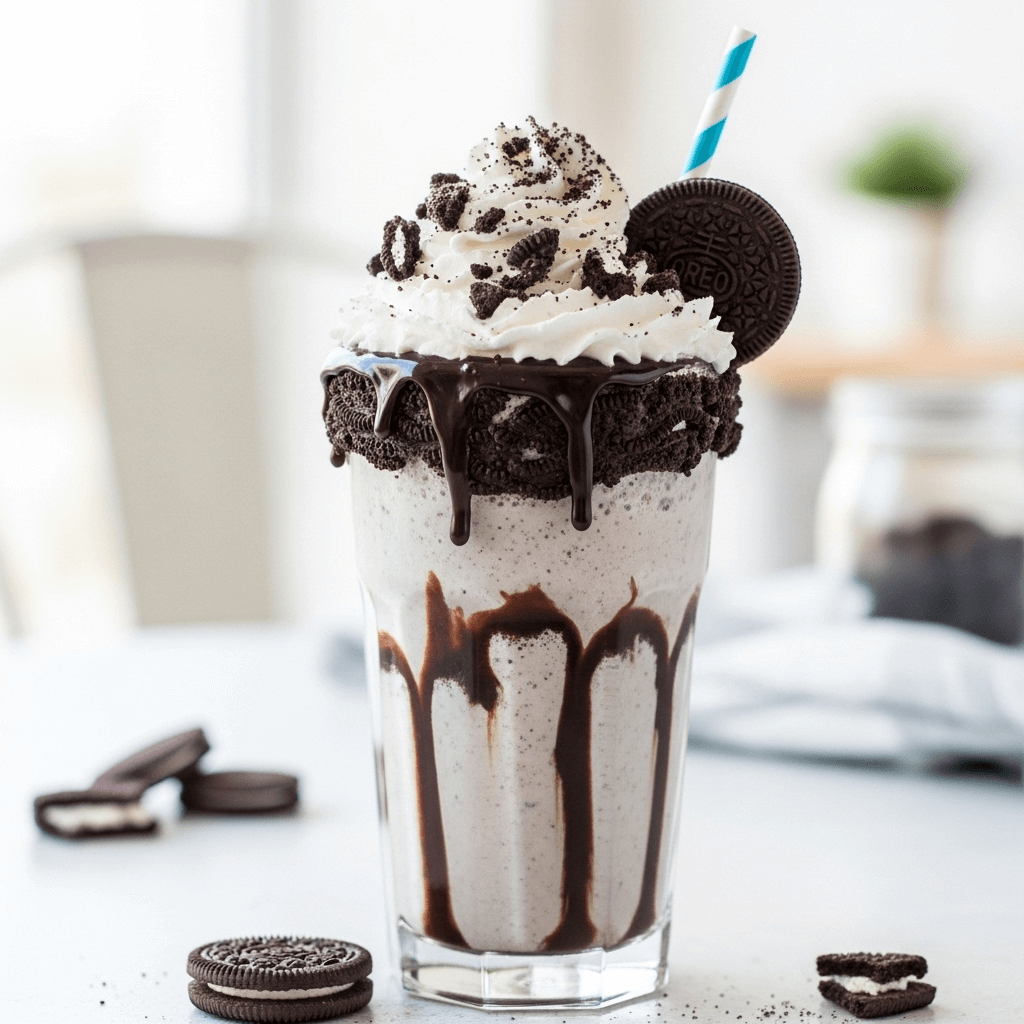

Is there anything more nostalgic and downright delicious than a thick, creamy Oreo milkshake? This homemade Oreo milkshake recipe takes America’s favorite cookie and transforms it into a dreamy, sippable dessert that’s somehow even better than what you’d get at a fancy ice cream shop. With chunks of cookies blended into creamy vanilla ice cream and topped with whipped cream and more Oreos, this treat is pure indulgence in a glass.
This easy Oreo milkshake comes together in just 5 minutes with only four simple ingredients you probably already have in your kitchen. It’s thick enough to need a spoon yet smooth enough to sip through a straw—that perfect milkshake consistency that makes every sip feel like a celebration. Whether you’re treating the kids on a hot summer afternoon, satisfying your own sweet tooth after a long day, or creating a fun dessert for a birthday party, this Oreo cookies and cream milkshake never disappoints.
The best part? You have complete control over the texture and flavor intensity. Want it thicker? Add more ice cream. Prefer more cookie chunks? Toss in extra Oreos. Craving that cookies and cream experience? This recipe is completely customizable to your personal preference, making it the ultimate crowd-pleaser for Oreo lovers of all ages.
History / Background
The Oreo cookie, first introduced by Nabisco in 1912, has been America’s beloved sandwich cookie for over a century. Originally called the “Oreo Biscuit,” this iconic black and white cookie started in a small bakery in New York City’s Chelsea neighborhood and has since become the world’s best-selling cookie, with over 500 billion Oreos sold since its creation.
The marriage of Oreos and milkshakes, however, is a more recent American innovation that gained popularity in the 1950s and 1960s during the golden age of diners and soda fountains. As milkshake machines became standard equipment in American restaurants and ice cream parlors, creative soda jerks began experimenting with mix-ins beyond the traditional chocolate, vanilla, and strawberry syrups. Cookies, candies, and other treats were crushed and blended into shakes, creating entirely new flavor experiences.
The Oreo milkshake specifically exploded in popularity during the 1980s and 1990s when chains like Dairy Queen, McDonald’s, and Sonic began featuring Oreo as a standard milkshake flavor on their menus. The introduction of cookies and cream ice cream during this same era only fueled the obsession, as people realized they could recreate these restaurant-style treats at home.
Today, the Oreo milkshake has become a staple of American dessert culture, representing the perfect intersection of convenience, nostalgia, and pure indulgence. It’s featured in countless diners, burger joints, and ice cream shops across the country, and homemade versions have become a rite of passage for anyone with a blender and a sweet tooth. The simplicity of its ingredients combined with its undeniably delicious flavor has cemented the Oreo milkshake as a timeless classic that transcends generations.
Why You’ll Love This Recipe
This isn’t just another milkshake recipe—it’s the Oreo milkshake recipe that will ruin you for all others. Once you taste how incredibly thick, creamy, and cookie-packed this homemade version is, you’ll wonder why you ever paid premium prices at ice cream shops.
Here’s why this Oreo milkshake recipe deserves a permanent spot in your dessert rotation:
- Ready in 5 minutes or less – Faster than driving to the ice cream shop and infinitely more satisfying
- Only 4 basic ingredients – Ice cream, milk, Oreos, and vanilla extract are all you need for milkshake perfection
- Perfectly customizable – Control the thickness, sweetness, and cookie-to-ice-cream ratio exactly how you like it
- Kid-approved every time – Children go absolutely wild for this treat, making it perfect for birthday parties, playdates, or special rewards
- Budget-friendly indulgence – Costs a fraction of what you’d pay at a restaurant while making multiple servings
- No special skills required – If you can press a button on a blender, you can make this incredible milkshake
- Crowd-pleaser guaranteed – Never met anyone who doesn’t love Oreos, and this takes them to the next level
- Endless variation possibilities – Add peanut butter, chocolate syrup, mint extract, or other cookies for fun twists
- Makes you the favorite parent/friend/host – Serve these at any gathering and watch everyone’s eyes light up
- Pure nostalgia in a glass – Tastes like childhood memories and carefree summer days
Ingredient Notes
The magic of this Oreo milkshake lies in its simplicity. With just a handful of quality ingredients, you’ll create something extraordinary. Here’s what you need and why each component matters.
Oreo Cookies – The star of the show! Regular Double Stuf Oreos work beautifully and give you the best cookie-to-cream ratio. You’ll need about 8-10 cookies per milkshake, depending on how cookie-intense you want it. Don’t remove the cream filling—it adds sweetness and helps create that signature cookies and cream flavor. Golden Oreos, Mint Oreos, Peanut Butter Oreos, or seasonal flavors all work too and create fun variations. Store-brand sandwich cookies can substitute in a pinch, though the flavor won’t be quite as iconic.
Vanilla Ice Cream – This creates the creamy, dreamy base. Use high-quality, premium vanilla ice cream for the best results—the kind with minimal air and maximum creaminess. Full-fat ice cream is essential here; low-fat versions will give you a thin, icy texture instead of that thick, spoon-requiring consistency we’re after. Let it soften at room temperature for 5-10 minutes before blending for easier mixing. If you want to go full cookies and cream mode, you can even use cookies and cream ice cream as your base, though vanilla lets the Oreo flavor shine more.
Milk – Whole milk creates the richest, creamiest texture, but 2% works well too. The milk thins the ice cream just enough to make it drinkable while maintaining that thick consistency. Start with less milk than you think you need—you can always add more to thin it out, but you can’t take it back once it’s too thin. For a richer shake, substitute half the milk with heavy cream. Dairy-free alternatives like oat milk or almond milk work for lactose-free versions, though the flavor will be slightly different.
Vanilla Extract – Just a splash enhances all the other flavors and adds depth. Pure vanilla extract is worth the investment over imitation vanilla. This small addition makes a noticeable difference in the overall flavor profile, rounding out the sweetness and adding complexity.
Optional Additions – Whipped cream for topping (homemade or store-bought), chocolate syrup for drizzling, extra Oreos for garnish, and a cherry on top for that classic diner-style presentation. These aren’t necessary for a delicious milkshake, but they certainly make it Instagram-worthy!
Equipment Needed
You don’t need fancy equipment to make an incredible Oreo milkshake, but having the right tools makes the process smooth and ensures the best texture.
- High-powered blender – This is your most important tool. A good blender (Vitamix, Ninja, Blendtec, or even a quality standard blender) will pulverize the cookies and create that perfectly smooth, creamy texture. Weaker blenders may struggle with the thick ice cream and leave you with chunks of unblended cookies, though this isn’t necessarily bad if you like texture.
- Measuring cups – For accurate ingredient measurements. A 1-cup measure for ice cream and a 1/4-cup measure for milk work perfectly.
- Ice cream scoop – Makes portioning ice cream much easier than using a spoon, and slightly softened ice cream scoops beautifully.
- Tall glasses – Classic milkshake glasses, mason jars, or any tall glass (12-16 oz capacity) works great. Chill them in the freezer for 15 minutes before serving for an extra-cold experience.
- Thick straws – Regular straws won’t cut it for this thick milkshake. Get those wide boba or smoothie straws, or embrace the spoon-and-straw combo approach.
- Rubber spatula – For scraping down the sides of the blender and ensuring everything gets mixed evenly.
- Piping bag or zip-top bag (optional) – If you’re getting fancy with whipped cream topping.
- Small knife or cutting board (optional) – For crushing extra Oreos to garnish, though you can also just break them by hand.
Oreo Milkshake Recipe
- Total Time: 5 minutes
- Yield: 2 large milkshakes (or 3 medium) 1x
- Diet: Vegetarian
Description
This thick and creamy homemade Oreo milkshake is the ultimate cookies and cream treat made with just 4 simple ingredients. Perfectly smooth with chunks of Oreo cookies throughout, it’s ready in 5 minutes and tastes even better than restaurant versions. The ideal ratio of ice cream to cookies creates a dessert drink that’s thick enough to eat with a spoon yet smooth enough to sip through a straw.
Ingredients
- 4 cups vanilla ice cream (about 1 pint), slightly softened
- 1/2 cup whole milk (or 2% milk)
- 10–12 Oreo cookies, roughly broken into pieces
- 1 teaspoon pure vanilla extract
- Whipped cream, for topping (optional)
- 2–3 extra Oreo cookies, for garnish (optional)
- Chocolate syrup, for drizzling (optional)
Instructions
- Soften the ice cream: Remove ice cream from the freezer and let it sit at room temperature for 5-10 minutes. It should be soft enough to scoop easily but not melted. This step is crucial for achieving the right consistency and making blending easier.
- Prepare the Oreos: Break 10-12 Oreos into rough quarters. You don’t need to be precise—just break them into chunks. Set aside 2-3 whole cookies if you plan to use them for garnish.
- Add ingredients to blender: Place the softened ice cream, milk, broken Oreo cookies, and vanilla extract into your blender. Start with the liquid ingredients on the bottom if your blender tends to struggle with thick mixtures.
- Blend on low first: Start blending on the lowest setting for 10-15 seconds to break up the ice cream and cookies. This prevents strain on your blender motor.
- Increase to high speed: Once ingredients are roughly combined, increase to high speed and blend for 20-30 seconds until smooth and creamy. You want some small Oreo chunks remaining for texture, so don’t over-blend into complete smoothness.
- Check consistency: Stop the blender and check the thickness. The milkshake should be thick enough that a spoon stands up in it, but pourable. If it’s too thick to blend, add 1-2 tablespoons more milk and pulse a few times. If it’s too thin, add 1/2 cup more ice cream and blend briefly.
- Scrape down sides: Use a rubber spatula to scrape any unmixed ice cream or cookie pieces from the sides of the blender. Give it one final 5-second pulse to incorporate everything.
- Prepare glasses: If you chilled glasses in the freezer, take them out now. If you want to get fancy, drizzle chocolate syrup around the inside of the glass before pouring.
- Pour and serve: Pour the thick milkshake into glasses. It should be thick and luxurious, not thin or runny. Use the spatula to get every last bit from the blender.
- Add toppings: Top with a generous swirl of whipped cream, crumble or place whole Oreos on top, drizzle with chocolate syrup if desired, and add a thick straw. Serve immediately for the best texture and temperature.
Notes
- Thickness control: The key to a perfect milkshake is the ice cream-to-milk ratio. Start with less milk and add more only if needed. It’s easier to thin it out than to thicken it back up.
- Cookie chunks: If you prefer a completely smooth milkshake without chunks, blend for an additional 10-15 seconds. For more texture, pulse just a few times and leave bigger cookie pieces.
- Blender issues: If your blender is struggling, add milk one tablespoon at a time and use the “pulse” function rather than continuous blending.
- Serving immediately: Milkshakes are best enjoyed right after making them. They will melt and thin out if left sitting, and they’ll become too hard if returned to the freezer.
- Make it extra special: For a restaurant-style presentation, rim the glass with chocolate syrup, roll it in crushed Oreos, then fill with milkshake.
- Scaling the recipe: This recipe easily doubles or triples. Just blend in batches if your blender can’t handle the volume.
- Prep Time: 5 minutes
- Cook Time: 0 minutes
- Category: Dessert
- Method: Blending
- Cuisine: American
Nutrition
- Serving Size: 1 large milkshake (1/2 of recipe)
- Calories: 685
- Sugar: 76g
- Sodium: 380mg
- Fat: 28g
- Saturated Fat: 16g
- Unsaturated Fat: 10g
- Trans Fat: 0g
- Carbohydrates: 98g
- Fiber: 2g
- Protein: 11g
- Cholesterol: 85mg
Tips & Variations
The beauty of this Oreo milkshake recipe is how wonderfully adaptable it is. Here are countless ways to customize it to your preferences or dietary needs.
Make it thicker: Add more ice cream (up to 5 cups total) or freeze the milkshake for 10-15 minutes after blending. You can also add 2-3 tablespoons of malted milk powder for that classic malt shop thickness and flavor.
Make it thinner: Add milk one tablespoon at a time until you reach desired consistency. Some people prefer a more drinkable shake, and that’s perfectly fine.
Chocolate Oreo milkshake: Add 2 tablespoons of chocolate syrup or 1/4 cup chocolate ice cream to the blend. This creates a richer, more intensely chocolatey version.
Peanut butter Oreo milkshake: Blend in 2-3 tablespoons of creamy peanut butter for an incredible cookies and peanut butter combo. You can also use Peanut Butter Oreos instead of regular ones.
Mint Oreo milkshake: Use Mint Oreos or add 1/4 teaspoon peppermint extract to regular Oreos for a refreshing twist that tastes like those Girl Scout cookies we all love.
Birthday cake milkshake: Use Golden Oreos and add 1 tablespoon of rainbow sprinkles plus 1/4 teaspoon almond extract. Top with more sprinkles and whipped cream.
Coffee Oreo milkshake: Add 1-2 tablespoons of instant espresso powder or 1/4 cup of cold brew coffee for a caffeinated treat that adults will adore.
Healthier version: Use low-fat frozen yogurt or light ice cream, reduce cookies to 6-8, and use skim or almond milk. It won’t be quite as indulgent, but it’ll still satisfy that Oreo craving.
Vegan Oreo milkshake: Oreos are actually vegan! Use dairy-free vanilla ice cream (coconut, oat, or almond-based) and plant-based milk for a completely vegan version.
Boozy adult version: Add 1-2 ounces of vodka, Irish cream liqueur, or coffee liqueur for a grown-up dessert cocktail.
Extra cookie chunks: Reserve a few crushed Oreos and stir them in after blending for extra texture and visual appeal.
Pro Chef Tips
These professional secrets will take your Oreo milkshake from good to absolutely phenomenal.
The softening trick: Never try to blend rock-hard ice cream. Let it sit at room temperature for 5-10 minutes until it’s softened to the point where a spoon can easily press into it. This protects your blender motor and creates a smoother consistency. If you forget to soften it, microwave for 10-15 seconds maximum.
Layer your ingredients strategically: Put liquids on the bottom of the blender, then ice cream, then cookies on top. This helps the blender blades engage properly and prevents the motor from straining. For particularly powerful blenders, reverse this order.
The pulse technique: Don’t just hit “blend” and walk away. Use short pulses initially to break everything down, then blend continuously. This prevents ice cream from coating the sides of the blender container where it won’t get incorporated.
Temperature matters: Everything should be cold when you serve it. Chill your glasses in the freezer for at least 15 minutes before serving. This keeps the milkshake colder longer and prevents it from melting too quickly.
The straw test: Want to know if your milkshake is the perfect consistency? A thick straw should stand straight up in it without falling over, but you should still be able to drink it (with some effort) through that straw.
Scrape thoroughly: Don’t waste any of that delicious milkshake. Use a rubber spatula to scrape every bit from the blender container. Those last few spoonfuls are often the best because they have the most cookie chunks.
Chocolate drizzle technique: For that professional look, drizzle chocolate syrup around the inside of the glass before pouring the milkshake. Let it drizzle down the sides naturally—it creates beautiful streaks and tastes amazing.
Whipped cream stability: If you’re topping with whipped cream and want it to last longer without melting, use stabilized whipped cream (add 1 tablespoon of powdered sugar per cup of heavy cream before whipping).
Serve with two straws: One thick straw for drinking and one spoon-straw combo for scooping up those cookie chunks at the bottom. Your guests will appreciate the options.
Common Mistakes to Avoid
Even with a simple recipe like this, there are a few pitfalls that can turn your dreamy milkshake into a disappointment. Here’s what to watch out for.
Using too much milk: This is the number one mistake people make. They think more liquid equals better blending, but it just creates a thin, runny milkshake that’s more like flavored milk. Start with less milk than you think you need—you can always add more. A proper milkshake should be thick and creamy, requiring some effort to drink through a straw.
Blending too long: Over-blending melts the ice cream and turns your thick, luxurious milkshake into a thin liquid. You want to blend just until the ingredients are combined with some cookie chunks remaining. The total blending time should be 30-40 seconds maximum, not several minutes.
Using low-quality ice cream: Cheap, low-fat, or “frozen dairy dessert” products have more air and less cream, resulting in an icy, less creamy milkshake. Invest in real, full-fat premium ice cream for the best results. The ingredient list should be short: cream, milk, sugar, vanilla. If it lists a bunch of gums and stabilizers, it won’t give you that rich texture you’re after.
Not breaking up the Oreos first: Tossing whole Oreos into the blender seems convenient, but it makes blending uneven. Some cookies remain whole while others turn to dust. Breaking them into quarters first ensures even distribution and consistent texture throughout your milkshake.
Letting it sit too long: Milkshakes are meant to be consumed immediately. If you let them sit for more than 5-10 minutes, they separate, melt, and lose that perfect consistency. Make them right before serving and enjoy them while they’re at their peak.
Using a weak blender: If your blender struggles with ice, it’s going to really struggle with thick ice cream and cookies. You’ll end up with an unevenly mixed, chunky mess. Use a high-powered blender or thin the mixture with a bit more milk if your blender is weaker.
Forgetting to taste and adjust: Everyone’s sweetness preference differs. After blending, taste your milkshake (before adding toppings). Too sweet? Add a pinch of salt to balance it. Not sweet enough? Drizzle in a little chocolate syrup and pulse again. Not enough Oreo flavor? Blend in two more cookies.
Storage & Meal Prep
Let’s be honest—milkshakes are not really make-ahead or meal-prep friendly. They’re at their absolute best when consumed within minutes of blending. However, here’s what you need to know about storage if you have leftovers or want to plan ahead.
Immediate consumption is ideal: Oreo milkshakes should be made and enjoyed immediately for optimal texture, temperature, and flavor. The thick, creamy consistency that makes them so special doesn’t hold up well over time.
Short-term holding: If you need to hold milkshakes for 10-15 minutes (like if you’re making multiple servings), pour them into glasses and place in the freezer. They’ll stay cold and thick. Any longer than this, and they’ll become too hard to drink.
Refrigerator storage: If you absolutely must refrigerate leftover milkshake, store it in an airtight container for up to 4-6 hours maximum. When you’re ready to drink it, it will have separated and thinned considerably. Give it a vigorous stir or quick re-blend to bring it back together, though it won’t be quite as thick as it was originally.
Freezer storage: Don’t pour leftover milkshake back into the freezer expecting to drink it later. It will freeze solid and won’t return to milkshake consistency when thawed. Instead, it becomes more like ice cream. If this happens, let it soften and re-blend with a splash of milk.
Pre-prepping ingredients: What you CAN do ahead is prep your ingredients. Measure out your ice cream into individual portions and keep them in containers in the freezer. Break up Oreos and store in zip-top bags. When milkshake craving hits, everything is ready to blend.
Leftover Oreos: If you have extra crushed Oreos, store them in an airtight container at room temperature. They’ll stay crisp for weeks and be ready for your next milkshake adventure.
Make-Ahead & Freezer Notes
While Oreo milkshakes are best enjoyed fresh, there are some strategies for planning ahead if you’re serving them at a party or event.
Can you make Oreo milkshakes ahead? Technically, yes, but practically, it’s not ideal. Milkshakes don’t maintain their perfect consistency when stored. However, if you’re serving a crowd and need to prepare in advance, here’s your best strategy.
The 30-minute-ahead method: Make your milkshakes up to 30 minutes before serving. Pour them into individual glasses and place in the freezer. They’ll stay perfectly thick and cold. Remove from freezer just before serving—no need to stir or re-blend.
The ice cream base method: For parties, pre-scoop ice cream into serving-sized portions (about 2 cups each) and freeze on a baking sheet. When guests arrive, transfer portions to the blender with milk, cookies, and vanilla, then blend to order. Each milkshake takes less than a minute, and they’re perfectly fresh.
Freezing milkshakes for later: This doesn’t work well. Frozen milkshakes become solid ice cream blocks. When thawed, they separate into liquid milk and ice cream chunks. If you end up with frozen milkshake, let it thaw halfway, break it into chunks, and re-blend with 2-3 tablespoons fresh milk.
Pre-mixed dry ingredients: Crush your Oreos and portion them into individual bags (8-10 cookies per bag). Label them and keep in the pantry. When milkshake time comes, you just need to grab a bag, ice cream, and milk.
Meal prep consideration: If you regularly enjoy milkshakes, keep a dedicated container of softened ice cream in the freezer. Every few days, let your ice cream soften, scoop into individual portions, refreeze in containers. This makes weeknight milkshakes incredibly quick.
The best approach: Honestly, the best “make-ahead” strategy is accepting that milkshakes take 5 minutes and making them fresh. The minimal time investment is absolutely worth it for the superior taste and texture.
Serving Suggestions
An Oreo milkshake is pretty spectacular on its own, but here are ideas for pairing it with other foods or making it part of a larger menu.
Classic diner style: Serve your Oreo milkshake alongside a juicy cheeseburger and crispy French fries for that authentic American diner experience. The cold, creamy sweetness perfectly contrasts with savory burger flavors.
Birthday party perfection: Set up a milkshake bar at birthday parties. Provide vanilla ice cream, various cookies (Oreos, Chips Ahoy, Nutter Butters), mix-ins (chocolate chips, peanut butter, chocolate syrup), and let kids create custom flavors. Have an adult handle the blending.
Movie night treat: Skip the store-bought ice cream and make thick Oreo milkshakes for movie night. Serve in tall glasses with long spoons for a fun, indulgent experience that beats any theater snack.
Summer BBQ dessert: After grilling burgers and hot dogs, surprise guests with made-to-order Oreo milkshakes. They’re more interactive and memorable than bringing out a cake or cookies.
Breakfast shake variation: Sounds crazy, but add a banana, tablespoon of peanut butter, and handful of oats to your Oreo milkshake for a decadent breakfast shake that feels like dessert but provides some nutrition.
With desserts: Pair a smaller serving of Oreo milkshake with warm brownies, chocolate chip cookies fresh from the oven, or a slice of chocolate cake. The cold milkshake against warm dessert is incredible.
Float variation: Pour your Oreo milkshake over a scoop of chocolate or vanilla ice cream in a tall glass for an ultra-indulgent Oreo float that’s over the top in the best way.
Toppings bar: Offer various toppings so everyone can customize: crushed Oreos, chocolate chips, mini marshmallows, sprinkles, chocolate syrup, caramel sauce, whipped cream, maraschino cherries, and chopped nuts.
Adult dessert cocktail: For grown-up gatherings, serve in fancy glasses with a shot of Baileys Irish Cream, Kahlúa, or vanilla vodka mixed in. Garnish with whipped cream and chocolate shavings.
FAQs Section
How do I make my Oreo milkshake thicker?
The secret to ultra-thick milkshakes is using more ice cream and less milk. Start with just 1/4 cup milk and add more only if your blender struggles. Use premium, full-fat ice cream rather than low-fat versions. Let the ice cream soften slightly before blending—this creates a thick, creamy consistency without needing extra milk. You can also add 2-3 tablespoons of malted milk powder or a handful of ice cubes if you want it even thicker. If you’ve already made it too thin, blend in an extra cup of ice cream to thicken it back up.
Can I make Oreo milkshakes without a blender?
While a blender gives the smoothest results, you can make a version without one. Let your ice cream soften until it’s almost melted. In a large bowl, use a whisk or electric mixer to whip the ice cream with milk until smooth. Crush Oreos in a zip-top bag with a rolling pin until they’re fine crumbs, then fold into the ice cream mixture. It won’t be quite as smooth as a blended version, but it’ll still taste delicious. Pour into glasses and enjoy immediately.
Why is my milkshake too thin and runny?
This usually happens because of too much milk, low-quality ice cream, or over-blending. Fix it by blending in more ice cream (1/2 to 1 cup at a time) until you reach the desired thickness. Next time, start with less milk—you can always add more, but you can’t take it back. Also, use real, full-fat premium ice cream, not low-fat or “frozen dairy dessert” products that have more air and less cream. Blend for less time (30-40 seconds maximum) to prevent melting.
Can I use cookies and cream ice cream instead of vanilla?
Absolutely! Using cookies and cream ice cream creates an even more intense Oreo flavor. You might want to reduce the number of whole Oreos you add (try 6-8 instead of 10-12) since the ice cream already contains cookie pieces. This is actually a brilliant shortcut if you want maximum Oreo flavor with minimal effort. The only downside is less control over cookie chunk size, but that’s hardly a problem.
How long does an Oreo milkshake last?
Oreo milkshakes are best consumed immediately after making them. They’ll start losing their perfect consistency within 10-15 minutes as the ice cream melts. If you must store leftovers, refrigerate in an airtight container for up to 6 hours, but expect the texture to thin and separate. You can re-blend briefly with a splash of milk to bring it back together, though it won’t be quite as thick as originally. Don’t try to re-freeze leftover milkshake—it becomes solid and won’t return to milkshake consistency.
Can I make this dairy-free or vegan?
Yes! Oreo cookies are actually vegan (they don’t contain dairy despite their creamy-looking filling). Use your favorite dairy-free vanilla ice cream—coconut, oat, cashew, or almond-based all work well. Coconut milk ice cream creates the creamiest texture. Use non-dairy milk like oat milk or almond milk. The flavor will be slightly different from traditional versions, but it’s still absolutely delicious. Many people can’t even tell the difference, especially when loaded with Oreo chunks.
What’s the best type of milk to use?
Whole milk creates the richest, creamiest milkshake and is the gold standard. However, 2% milk works well too with minimal difference in taste or texture. For an extra indulgent treat, use half milk and half heavy cream. Lower fat milks (skim or 1%) create thinner, less rich milkshakes. Non-dairy alternatives like oat milk work best among plant-based options because of their naturally creamy texture. Avoid watery options like skim milk or rice milk, which make the milkshake thin and icy.
Conclusion
There you have it—the ultimate guide to making thick, creamy, absolutely irresistible Oreo milkshakes at home! With just four simple ingredients and five minutes of effort, you can create a dessert that rivals anything you’d get at a fancy ice cream shop. The beauty of this homemade Oreo milkshake recipe is how perfectly customizable it is to your personal preferences, whether you like it thick as a spoon-requiring treat or slightly thinner for easy sipping.
From classic vanilla and Oreos to creative variations with peanut butter, mint, or coffee, this recipe is your foundation for endless delicious possibilities. The techniques and tips shared here ensure you’ll nail the perfect consistency every single time, avoiding the common pitfalls that lead to thin, disappointing milkshakes.
Whether you’re treating yourself after a long day, surprising the kids with a special dessert, hosting a summer party, or recreating nostalgic diner memories, this cookies and cream milkshake delivers pure happiness in a glass. It’s proof that some of the best recipes are also the simplest—no fancy techniques, no obscure ingredients, just good old-fashioned deliciousness.
Now it’s your turn to blend up some magic! Make this Oreo milkshake recipe this weekend and experience just how incredible homemade really is. I promise you’ll never look at restaurant milkshakes the same way again.
Pin this recipe to your Pinterest boards so you can find it whenever that milkshake craving hits! Trust me, it’ll hit more often than you think once you realize how easy this is to make. And when you try it, I’d absolutely love to see your creations—tag me in your photos and let me know what variations you tried. Did you add peanut butter? Go with mint Oreos? Make it extra thick? Drop a comment below and share your experience!
Go grab that blender and those Oreos—your perfect milkshake is just minutes away! 🥛🍪