

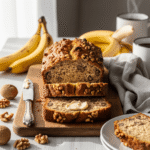
Is there anything more comforting than the aroma of freshly baked banana nut bread wafting through your kitchen? This classic homemade banana nut bread recipe is the ultimate way to use up those overripe bananas sitting on your counter while creating something absolutely delicious that the whole family will love.
This easy banana nut bread is incredibly moist, perfectly sweet, and loaded with crunchy walnuts in every bite. It’s the kind of recipe that becomes a household staple – perfect for breakfast with your morning coffee, as an afternoon snack, tucked into lunchboxes, or even served as a simple dessert. The best part? It comes together with basic pantry ingredients and requires just one bowl, making cleanup a breeze.
Whether you’re an experienced baker or just starting out, this foolproof banana bread recipe delivers consistent, bakery-quality results every single time. The natural sweetness from ripe bananas means you don’t need excessive sugar, and the addition of walnuts provides a delightful crunch and nutty flavor that takes this classic quick bread to the next level. Get ready to have your new favorite banana nut bread recipe that you’ll make again and again!
History / Background
Banana bread has a fascinating history that’s deeply intertwined with American ingenuity and resourcefulness. While bananas have been cultivated for thousands of years in tropical regions, they didn’t become widely available in the United States until the late 1800s when refrigerated shipping made it possible to transport them from Central and South America.
The invention of banana bread as we know it today coincided with two significant developments in the 1930s: the popularization of baking powder and baking soda as leavening agents, and the Great Depression, which encouraged home cooks to find creative ways to use every scrap of food without waste. Overripe bananas, which would otherwise be thrown away, became the star ingredient in this new quick bread.
The first banana bread recipes began appearing in American cookbooks around 1933, with Pillsbury publishing one of the earliest versions. The timing was perfect – the Great Depression had made frugality necessary, and housewives embraced this economical recipe that transformed inexpensive, browning bananas into something delicious. The recipe gained even more popularity during World War II when rationing made it important to use every ingredient wisely.
The addition of nuts, particularly walnuts, became standard in banana bread recipes by the 1940s and 1950s. Walnuts were relatively affordable and added texture, protein, and a sophisticated flavor to the humble quick bread. Some food historians believe the nut addition was influenced by European coffee cake traditions that American home bakers adapted to their own creations.
Today, banana nut bread remains one of America’s most beloved baked goods. It’s often the first recipe new bakers try, passed down through generations, and has spawned countless variations. Despite food trends coming and going, this classic comfort food has remained a constant in American kitchens for nearly a century, a testament to its simple perfection.
Why You’ll Love This Recipe
This homemade banana nut bread recipe is everything you could want in a quick bread and more. It strikes that perfect balance between being incredibly easy to make while delivering the kind of moist, flavorful results that rival any bakery.
Here’s why this banana bread will become your go-to recipe:
- Uses Overripe Bananas – Finally, a delicious solution for those brown bananas on your counter
- One Bowl Wonder – Minimal dishes to wash means easy cleanup and less hassle
- Ready in Under 90 Minutes – From mixing to slicing, you’ll have warm banana bread in no time
- Perfectly Moist Every Time – Special techniques ensure it never turns out dry or dense
- Not Too Sweet – Natural banana sweetness means it’s not overly sugary like many recipes
- Crunchy Walnut Texture – Toasted nuts add delightful contrast to the tender crumb
- Freezer-Friendly – Makes two loaves, so you can freeze one for later or gift to friends
- Budget-Friendly – Uses simple pantry staples and inexpensive ingredients
- Versatile Treat – Perfect for breakfast, snacks, dessert, or gifts
- Beginner-Friendly – So easy that even kids can help make it
- Customizable – Easily adapt with chocolate chips, different nuts, or add-ins you love
Ingredient Notes
Let’s break down each ingredient in this moist banana nut bread so you understand exactly what role it plays and what substitutions you can make.
Overripe Bananas – The star of the show! You want bananas that are heavily spotted or even completely brown – the riper, the better. Overripe bananas are sweeter, more aromatic, and mash easily. They provide moisture, natural sweetness, and that signature banana flavor. You’ll need about 3-4 medium bananas (or 1½ cups mashed). If your bananas aren’t ripe enough, you can speed up ripening by placing them in a paper bag or baking unpeeled bananas at 300°F for 15-20 minutes until the skins turn black.
All-Purpose Flour – Provides structure to the bread. I recommend spooning flour into your measuring cup and leveling it off rather than scooping directly from the bag, which can pack too much flour and create a dense loaf. You can substitute up to half the flour with whole wheat flour for a heartier version, though the texture will be denser.
Granulated Sugar – Adds sweetness and helps create a tender crumb. You can reduce the sugar slightly if your bananas are very ripe, or substitute with brown sugar for a deeper, more caramel-like flavor. Coconut sugar also works well as a 1:1 substitute.
Eggs – Provide structure, moisture, and richness. Room temperature eggs incorporate better into the batter. For an egg-free version, you can use flax eggs (1 tablespoon ground flaxseed mixed with 3 tablespoons water per egg, let sit 5 minutes).
Butter – Adds rich flavor and creates a tender texture. Use unsalted butter so you can control the salt level. The butter should be melted and slightly cooled. You can substitute with vegetable oil, coconut oil, or even Greek yogurt for a lighter version, though the flavor will differ slightly.
Vanilla Extract – Enhances all the other flavors and adds warmth. Always use pure vanilla extract rather than imitation for the best flavor.
Baking Soda – The leavening agent that makes the bread rise. Baking soda reacts with the natural acidity in bananas to create a light, fluffy texture. Make sure your baking soda is fresh (less than 6 months old) for best results.
Salt – A small amount enhances all the sweet flavors and balances the taste. Don’t skip it!
Walnuts – Add a wonderful crunch and nutty flavor. Toasting the walnuts before adding them to the batter intensifies their flavor significantly. You can substitute with pecans, almonds, or omit nuts entirely if you have allergies. Roughly chopped walnuts (about ½-inch pieces) distribute best throughout the bread.
Optional Add-Ins – Cinnamon (½ teaspoon adds warmth), chocolate chips (½ cup for a sweeter version), or a tablespoon of sour cream or Greek yogurt (for extra moisture).
Equipment Needed
You’ll need basic baking equipment that most home kitchens already have:
- 9×5-inch Loaf Pan – Standard size for banana bread. Metal, glass, or ceramic all work fine
- Large Mixing Bowl – For combining all ingredients
- Medium Bowl – For mashing bananas
- Measuring Cups and Spoons – For accurate measurements
- Fork or Potato Masher – To mash the bananas
- Whisk or Wooden Spoon – For mixing the batter
- Rubber Spatula – To scrape down the bowl and spread batter evenly
- Toothpick or Cake Tester – To check doneness
- Cooling Rack – To cool the bread properly
- Parchment Paper (Optional) – Makes removing bread from pan easier
- Small Skillet (Optional) – For toasting walnuts
Banana Nut Bread Recipe
- Total Time: 1 hour 20 minutes
- Yield: 1 loaf (10-12 slices) 1x
- Diet: Vegetarian
Description
This classic homemade banana nut bread is incredibly moist, perfectly sweet, and loaded with crunchy walnuts. Made in one bowl with simple ingredients, it’s the best way to use overripe bananas and create a delicious treat the whole family will love!
Ingredients
Dry Ingredients:
- 2 cups all-purpose flour
- 1 teaspoon baking soda
- ½ teaspoon salt
- ½ teaspoon ground cinnamon (optional)
Wet Ingredients:
- 3–4 overripe bananas (about 1½ cups mashed)
- ¾ cup granulated sugar
- ½ cup (1 stick) unsalted butter, melted and slightly cooled
- 2 large eggs, room temperature
- 1 teaspoon pure vanilla extract
- ¼ cup sour cream or Greek yogurt (optional, for extra moisture)
Mix-Ins:
- 1 cup walnuts, roughly chopped and toasted
Instructions
Step 1: Preheat and Prepare
Preheat your oven to 350°F (175°C). Grease a 9×5-inch loaf pan generously with butter or non-stick spray, or line it with parchment paper, leaving overhang on the sides for easy removal. Set aside.
Step 2: Toast the Walnuts
While the oven preheats, place chopped walnuts in a dry skillet over medium heat. Toast for 3-5 minutes, stirring frequently, until fragrant and lightly golden. Watch carefully as they can burn quickly. Remove from heat and set aside to cool. This step is optional but highly recommended for maximum flavor.
Step 3: Mash the Bananas
Peel the overripe bananas and place them in a large mixing bowl. Using a fork or potato masher, mash until mostly smooth with just a few small lumps remaining. You should have about 1½ cups of mashed banana. A few small chunks are fine and actually add nice texture.
Step 4: Mix Wet Ingredients
Add the melted butter to the mashed bananas and stir until combined. Add the sugar and mix well until the mixture looks smooth and slightly glossy. Add the eggs one at a time, mixing well after each addition. Stir in the vanilla extract and sour cream if using. Mix until everything is well combined and smooth.
Step 5: Add Dry Ingredients
In a small bowl, whisk together the flour, baking soda, salt, and cinnamon if using. Add the dry ingredients to the wet ingredients all at once. Using a wooden spoon or rubber spatula, gently fold the dry ingredients into the wet ingredients just until no white streaks of flour remain. Be careful not to overmix – the batter should look thick and somewhat lumpy. Overmixing develops gluten and creates tough, dense bread.
Step 6: Fold in Walnuts
Gently fold in the toasted walnuts, reserving a small handful to sprinkle on top if desired. The batter will be thick – this is normal and exactly what you want.
Step 7: Transfer to Pan
Pour the batter into the prepared loaf pan and spread it evenly with a spatula. Tap the pan gently on the counter a couple times to remove any air bubbles. If desired, sprinkle the reserved walnuts on top and gently press them into the batter.
Step 8: Bake
Bake in the preheated oven for 60-65 minutes. The bread is done when the top is deeply golden brown, a toothpick inserted into the center comes out clean or with just a few moist crumbs (not wet batter), and the internal temperature reaches 200-205°F. If the top is browning too quickly after 45 minutes, tent loosely with aluminum foil for the remaining baking time.
Step 9: Cool and Serve
Remove from the oven and let the bread cool in the pan on a wire rack for 10-15 minutes. This cooling period is crucial – it allows the bread to set and makes it easier to remove from the pan. After 15 minutes, carefully remove the bread from the pan (use the parchment overhang if you used it) and let it cool completely on the wire rack before slicing, about 30-45 minutes. For the cleanest slices, wait until completely cool, though warm banana bread is absolutely irresistible!
Notes
- Very ripe bananas are key – the more brown spots, the better the flavor
- Don’t overmix the batter once you add the flour, or the bread will be tough
- Oven temperatures vary – start checking at 55 minutes to prevent overbaking
- The bread will seem soft when first removed from the oven but firms up as it cools
- For even baking, place the loaf pan in the center of the oven
- Wrapping warm bread creates condensation and makes it soggy – always cool completely first
- This recipe can be doubled to make two loaves – freeze one for later!
- Prep Time: 15 minutes
- Cook Time: 60-65 minutes
- Category: Breakfast
- Method: Baking
- Cuisine: American
Nutrition
- Serving Size: 1 slice (based on 12 slices)
- Calories: 245
- Sugar: 15g
- Sodium: 180mg
- Fat: 11g
- Saturated Fat: 4g
- Unsaturated Fat: 6g
- Trans Fat: 0g
- Carbohydrates: 34g
- Fiber: 2g
- Protein: 4g
- Cholesterol: 45mg
Tips & Variations
This banana nut bread recipe is wonderfully versatile. Here are some delicious ways to customize it:
Flavor Variations:
- Chocolate Chip Banana Bread: Add 1 cup of semi-sweet or dark chocolate chips along with or instead of walnuts
- Double Chocolate: Add ¼ cup cocoa powder to the dry ingredients and fold in chocolate chips
- Peanut Butter Banana Bread: Swirl ⅓ cup peanut butter through the batter before baking
- Coconut Banana Bread: Add ½ cup shredded coconut and substitute coconut oil for butter
- Blueberry Banana Bread: Gently fold in 1 cup fresh or frozen blueberries
Nut Alternatives:
- Swap walnuts for pecans, almonds, hazelnuts, or macadamia nuts
- Use a mixture of different nuts for varied texture
- Toast any nuts you use for enhanced flavor
- Omit nuts entirely for a nut-free version
Healthier Options:
- Replace half the all-purpose flour with whole wheat flour
- Use coconut sugar or maple syrup instead of granulated sugar
- Substitute Greek yogurt or applesauce for half the butter
- Add ground flaxseed or chia seeds for extra fiber
- Reduce sugar to ½ cup if your bananas are very ripe
Add-In Ideas:
- Swirl in Nutella or caramel sauce before baking
- Add dried fruit like raisins, cranberries, or chopped dates
- Mix in ½ teaspoon of cardamom or nutmeg for warm spice
- Top with a cream cheese frosting for an indulgent dessert
- Sprinkle raw sugar on top before baking for a crunchy crust
Mini Loaves or Muffins:
- Divide batter among 4 mini loaf pans and bake for 35-40 minutes
- Make muffins in a lined muffin tin and bake for 18-22 minutes
- Perfect for gifts or portion control
Pro Chef Tips
Want bakery-quality banana nut bread every time? Here are professional secrets that make all the difference:
Use Very Ripe Bananas: This is the single most important factor in great banana bread. The bananas should be heavily spotted or completely brown. At this stage, the starches have converted to sugars, making them sweeter and more flavorful. The softer texture also means they incorporate more smoothly into the batter. If you need to speed up ripening, place bananas in a 300°F oven for 15-20 minutes until the peels turn black.
Don’t Overmix the Batter: Once you add the flour, mix just until you no longer see white streaks. Overmixing develops gluten, which creates a tough, dense, bread-like texture rather than the tender, cake-like crumb you want. It’s okay if the batter looks lumpy – that’s perfect! Fold gently with a spatula using broad strokes rather than vigorous stirring.
Room Temperature Ingredients: Using room temperature eggs and slightly cooled (not hot) melted butter helps everything incorporate smoothly without lumps. Cold eggs can cause the melted butter to solidify into small clumps. If you forget to bring eggs to room temperature, place them in a bowl of warm water for 5-10 minutes.
Proper Pan Preparation: Grease your pan thoroughly, including the corners and edges. Better yet, line it with parchment paper with overhang on two sides, which makes removing the bread foolproof. Glass pans bake slower than metal, so if using glass, you may need to add 5-10 minutes to the baking time.
The Toothpick Test: A toothpick should come out clean or with a few moist crumbs, but not wet batter. Test in several spots, not just the center, since some areas bake faster. The internal temperature should reach 200-205°F for perfectly done bread that’s moist but not underbaked.
Don’t Skip the Cooling Time: This is crucial! Banana bread needs to cool in the pan for 10-15 minutes, then be removed and cooled on a rack. If you try to slice it while hot, it will fall apart and seem gummy. Fully cooled bread slices cleanly and has the proper texture. I know it’s hard to wait, but patience pays off!
Toast Those Nuts: Toasting walnuts for just 3-5 minutes in a dry skillet transforms their flavor from bland to rich and complex. This small step makes a noticeable difference in the final bread. Just watch them carefully as nuts can burn quickly.
Common Mistakes to Avoid
Even a straightforward recipe like banana bread can go wrong. Here’s how to avoid the most common pitfalls:
Using Bananas That Aren’t Ripe Enough – Underripe or just-yellow bananas don’t have enough sweetness or flavor, and they’re harder to mash, creating lumpy batter. Your bananas should be very spotty or completely brown. If they’re not ripe enough, your bread will taste bland and may have an odd, starchy texture. Don’t rush this step!
Overmixing the Batter – This is the number one cause of dense, tough banana bread. Once you add the flour, mix gently and only until combined. You should still see a few small lumps. Think of it like muffin batter – gentle folding motions, not vigorous stirring. Overmixing develops gluten strands that create a bread-like texture instead of the tender, cake-like crumb you want.
Incorrect Oven Temperature – If your oven runs hot, the outside will brown too quickly while the inside stays raw. If it runs cool, the bread takes forever and can dry out. Invest in an oven thermometer to verify your actual temperature. If your bread browns too fast, tent it with foil for the last 15-20 minutes of baking.
Opening the Oven Too Early – Resist the temptation to check on your bread before 50 minutes. Opening the oven door releases heat and can cause the bread to sink in the middle. The bread needs steady heat to rise properly. Only open to check doneness after the minimum baking time.
Not Letting It Cool Properly – I know warm banana bread smells incredible, but slicing it before it’s cooled for at least 15 minutes in the pan (then 30 more minutes on a rack) creates a gummy, mushy texture. The cooling process allows the structure to set. Hot bread also crumbles and falls apart when sliced. Practice patience here!
Storage & Meal Prep
Properly stored banana nut bread stays moist and delicious for days. Here’s how to store it right:
Room Temperature Storage: Once completely cooled, wrap the banana bread tightly in plastic wrap or aluminum foil, or store in an airtight container. It will stay fresh at room temperature for 3-4 days. The bread actually tastes even better the next day as the flavors meld together. Store in a cool, dry place away from direct sunlight.
Refrigerator Storage: While not necessary, you can refrigerate banana bread if your kitchen is very warm or humid. Wrap tightly in plastic wrap and store for up to 1 week. Let it come to room temperature before serving, or warm slices briefly. Note that refrigeration can slightly dry out the bread, so room temperature storage is preferred if your environment allows.
Slicing for Storage: You can slice the entire loaf before storing and place parchment or wax paper between slices. This makes it easy to grab individual slices for quick breakfasts or snacks. Wrap the sliced loaf tightly in plastic wrap.
Reviving Day-Old Bread: If your banana bread has dried out slightly, toast slices lightly and spread with butter, or warm individual slices in the microwave for 10-15 seconds. A slice of bread or apple stored in the container can also help maintain moisture.
Make-Ahead & Freezer Notes
Banana nut bread is one of the most freezer-friendly baked goods, making it perfect for meal prep and gifting!
Freezing Baked Bread: Let the bread cool completely to room temperature. Wrap tightly in plastic wrap, then wrap again in aluminum foil or place in a freezer-safe zip-top bag, removing as much air as possible. Label with the date. Freeze for up to 3 months. For best results, slice before freezing so you can remove individual slices as needed without thawing the entire loaf.
Thawing Instructions: For whole loaves, thaw overnight in the refrigerator, still wrapped. Or leave at room temperature for 2-3 hours. For individual slices, thaw at room temperature for 30-45 minutes, or microwave for 20-30 seconds. You can also toast frozen slices directly from the freezer.
Freezing Unbaked Batter: You can freeze the raw batter in a greased and lined loaf pan, wrapped tightly. Freeze until solid (about 2 hours), then pop out and wrap well. Store for up to 2 months. Thaw overnight in the refrigerator, return to the pan, and bake as directed, adding 5-10 extra minutes to the baking time.
Make-Ahead Baking: Banana bread is perfect for baking ahead since it stays moist and actually improves in flavor after a day. Bake 1-2 days before you need it, wrap well, and store at room temperature. This makes it ideal for gifting, brunch gatherings, or preparing weekend treats during the week.
Gifting Tip: Banana nut bread makes a wonderful gift! Bake in disposable aluminum loaf pans, let cool completely, wrap in plastic wrap, then tie with a ribbon or place in a cellophane bag. Include reheating instructions on a gift tag.
Serving Suggestions
Banana nut bread is delicious on its own, but here are some ways to take it to the next level:
Breakfast Ideas:
- Serve warm with a pat of salted butter melting on top
- Toast slices and spread with peanut butter, almond butter, or cream cheese
- Top with Greek yogurt and fresh berries for a balanced breakfast
- Drizzle with honey or maple syrup
- Serve alongside scrambled eggs and fresh fruit
Snack Options:
- Pack slices in lunchboxes with some cheese and apple slices
- Enjoy with afternoon coffee or tea
- Spread with Nutella for an indulgent treat
- Make banana bread French toast for a special weekend brunch
Dessert Presentations:
- Serve warm with a scoop of vanilla ice cream
- Drizzle with caramel sauce or chocolate ganache
- Top with whipped cream and toasted nuts
- Create a banana bread trifle with layers of whipped cream and sliced bananas
- Make banana bread pudding with cubed day-old bread
Beverage Pairings:
- Coffee (especially a latte or cappuccino)
- Hot tea (black tea or chai pairs beautifully)
- Cold milk (classic combination)
- Hot chocolate for a cozy treat
- Smoothies for a complete breakfast
Upgrade Ideas:
- Cream cheese frosting on top transforms it into a dessert
- Streusel topping before baking adds crunchy sweetness
- Vanilla glaze drizzled over the cooled loaf
- Serve with flavored butter (cinnamon honey butter or maple butter)
FAQs Section
Q: Why is my banana bread dry?
A: Dry banana bread usually happens from overbaking or using too much flour. Check your bread at the minimum baking time and remove when a toothpick has just a few moist crumbs. Also, measure flour correctly by spooning into the measuring cup and leveling off – scooping directly packs too much flour. Make sure your bananas are very ripe, as underripe bananas don’t provide enough moisture. Adding sour cream or Greek yogurt to the batter helps ensure a moist result.
Q: Can I make banana bread without eggs?
A: Yes! You can substitute each egg with a flax egg (1 tablespoon ground flaxseed mixed with 3 tablespoons water, let sit 5 minutes until gel-like), or use ¼ cup unsweetened applesauce per egg. Commercial egg replacers also work well. The texture will be slightly different but still delicious. Vegan banana bread can also use mashed banana in place of one egg, though this makes the bread even more banana-forward in flavor.
Q: Why did my banana bread sink in the middle?
A: A sunken center typically means the bread was underbaked (still too wet in the middle when removed), the oven door was opened too early during baking, too much leavening was used, or the oven temperature was too low. Make sure your oven is properly preheated to 350°F, don’t open the door until at least 50 minutes of baking, and test with a toothpick in multiple spots to ensure it’s fully baked through.
Q: How ripe should bananas be for banana bread?
A: The riper, the better! Ideal bananas for banana bread are heavily spotted or completely brown, even black. At this stage, they’re very sweet, aromatic, and mash easily. If your bananas aren’t ripe enough, place them in a paper bag for 1-2 days, leave them on the counter for several days, or bake unpeeled bananas at 300°F for 15-20 minutes until the skins turn black and the insides are soft.
Q: Can I add other mix-ins besides walnuts?
A: Absolutely! Banana bread is incredibly versatile. Popular additions include chocolate chips, pecans, almonds, dried cranberries, raisins, shredded coconut, peanut butter chips, or white chocolate chips. You can also add blueberries or diced apples. Just keep total mix-ins to about 1 to 1½ cups so the bread still has proper structure. If using wet additions like fresh fruit, toss them in a bit of flour first to prevent sinking.
Q: Why does banana bread take so long to bake?
A: Quick breads baked in loaf pans require longer baking times because the batter is dense and the pan is deep, so heat takes longer to reach the center. The typical 60-65 minutes is normal for a 9×5-inch loaf pan. If you want faster baking, divide the batter into mini loaf pans (35-40 minutes) or make muffins (18-22 minutes). Always test doneness with a toothpick rather than relying solely on time.
Q: Can I use frozen bananas?
A: Yes! Frozen bananas actually work great for banana bread. Thaw them completely (they’ll be very soft and watery), then drain off the excess liquid before mashing. The texture might be slightly more watery than fresh overripe bananas, but the flavor is excellent. Many bakers intentionally freeze overripe bananas to save for future baking. Just peel them before freezing for easier use later.
Conclusion
And there you have it – the ultimate recipe for moist, delicious, perfectly sweet banana nut bread that will fill your home with the most incredible aroma and have everyone asking for seconds! This classic homemade banana bread is proof that the simplest recipes are often the best. With just one bowl, basic pantry ingredients, and those overripe bananas you were about to toss, you can create something truly special.
Whether you’re baking this easy banana bread for a cozy weekend breakfast, packing slices for lunchboxes, gifting to neighbors, or simply satisfying a craving for comfort food, this recipe delivers every single time. The combination of naturally sweet banana flavor with crunchy toasted walnuts creates a texture and taste that’s absolutely irresistible. And knowing you’ve turned food that might have been wasted into something so delicious? That’s just the cherry on top!
This is the kind of recipe that becomes part of your regular rotation – the one you turn to when you need something easy but impressive, comforting but special. It’s the recipe you’ll pass down to your kids and share with friends. Once you make this banana nut bread, I have a feeling it’ll become your go-to version forever.
Now it’s your turn to get baking! Grab those brown bananas and give this recipe a try. I promise you’ll be amazed at how easy it is and how absolutely delicious the results are.
I’d love to hear how your banana bread turns out! Leave a comment below sharing your results, any fun variations you tried, or questions you have. And if this becomes your new favorite banana bread recipe (I’m betting it will!), please share it on Pinterest so other home bakers can discover it too. Pin it to your recipe boards and help spread the joy of homemade banana bread!
Happy baking, friends! May your kitchen always smell like freshly baked banana bread!