

Get ready to make the most incredible crispy fried shrimp you’ve ever tasted! This restaurant-style fried shrimp recipe delivers perfectly golden, crunchy shrimp with tender, juicy interiors that’ll have everyone asking for seconds. Each shrimp is coated in a seasoned breading that creates an impossibly crispy shell while keeping the shrimp succulent and flavorful inside.
Whether you’re planning a casual weeknight dinner, hosting a seafood feast, preparing game day appetizers, or creating an impressive dinner party main course, these crispy fried shrimp are always a hit. They’re incredibly versatile – serve them as finger food with cocktail sauce, pile them high in a po’ boy sandwich, toss them over a fresh salad, or plate them elegantly with lemon wedges and tartar sauce for a classic seafood dinner.
What makes this recipe truly special is the double-coating technique that creates extra-crispy results every single time. The buttermilk marinade keeps the shrimp tender and adds a subtle tang, while the perfectly seasoned flour and panko coating provides that satisfying crunch that makes fried shrimp absolutely irresistible. And the best part? You can make restaurant-quality fried shrimp right in your own kitchen in under 30 minutes!
History / Background
Fried shrimp holds a beloved place in American culinary history, particularly along the Gulf Coast and in Southern coastal states where fresh shrimp has been abundant for centuries. Native American tribes were harvesting shrimp from coastal waters long before European settlers arrived, but it was the combination of African, French, Spanish, and Caribbean cooking traditions that truly elevated fried shrimp to the iconic dish we know today.
The technique of coating seafood in seasoned breading and frying it became popular in the American South during the 18th and 19th centuries, influenced heavily by West African frying traditions brought over during the slave trade. Shrimpers in Louisiana, Mississippi, Alabama, and the Carolinas would bring in their daily catch and fry up fresh shrimp in cast iron skillets, creating a simple yet delicious meal that showcased the sweet, delicate flavor of Gulf shrimp.
The commercialization of fried shrimp really took off in the mid-20th century when restaurants along the Gulf Coast began serving it as a signature dish. Places like Pascagoula, Mississippi, and coastal Louisiana became famous for their fried seafood platters featuring mountains of golden shrimp. The rise of casual seafood restaurants and shrimp shacks turned fried shrimp into an American classic, accessible to everyone from dock workers to tourists.
Fried shrimp also became deeply associated with Southern soul food and Low Country cuisine, where it’s often served at fish fries – community gatherings where large batches of seafood are fried outdoors for celebrations and social events. Today, fried shrimp appears on menus everywhere from high-end restaurants to food trucks, but the best versions still pay homage to those simple Southern preparations that let quality shrimp shine through a perfectly seasoned, crispy coating.
The beauty of fried shrimp is its versatility – it’s fancy enough for special occasions yet casual enough for everyday enjoyment. It represents the best of American coastal cooking: simple techniques, fresh ingredients, and flavors that bring people together.
Why You’ll Love This Recipe
This crispy fried shrimp recipe is about to become your go-to seafood dish, and here’s why. The combination of a buttermilk marinade and double coating creates shrimp that are restaurant-quality crispy on the outside while remaining incredibly tender and juicy inside. Unlike rubbery, overcooked shrimp you might have experienced, these are perfectly cooked every single time when you follow the simple techniques I’ll share.
Here’s why this recipe will become a family favorite:
- Ultra-crispy texture – The double coating with flour and panko creates an incredibly crunchy shell that stays crispy even after sitting
- Quick and easy – From start to finish in just 25 minutes, perfect for busy weeknights
- Restaurant-quality results – Impress your family and friends with professional-level fried shrimp at home
- Perfectly seasoned – Every bite is flavorful with a well-balanced blend of spices
- Versatile serving options – Enjoy as appetizers, main dishes, in sandwiches, over salads, or in tacos
- Budget-friendly – Much more affordable than ordering fried shrimp at restaurants
- Kid-approved – Even picky eaters love crispy fried shrimp
- Crowd-pleaser – Perfect for parties, game days, or family gatherings
- Customizable heat level – Easily adjust the spice to suit your preferences
- Foolproof technique – Clear instructions ensure success even for beginners
The buttermilk marinade is a game-changer, tenderizing the shrimp while adding a subtle tangy flavor that complements the sweetness of the seafood. Combined with the golden, crunchy coating, you get texture and flavor in every bite that’ll make you wonder why you ever ordered takeout!
Ingredient Notes
Let’s talk about what makes this crispy fried shrimp recipe so delicious. Understanding your ingredients helps you make the best choices and know when substitutions will work.
Large Shrimp – I recommend using 21-25 count shrimp (large size), which gives you a nice meaty texture and is easy to work with. Make sure they’re peeled and deveined with tails on or off based on preference. Fresh is ideal, but good quality frozen shrimp works perfectly – just thaw them properly in the refrigerator overnight.
Buttermilk – The secret ingredient! Buttermilk’s acidity tenderizes the shrimp and helps the coating stick beautifully. It also adds a subtle tangy flavor that enhances the overall taste. If you don’t have buttermilk, make your own by adding 1 tablespoon of lemon juice or white vinegar to 1 cup of regular milk and letting it sit for 5 minutes.
All-Purpose Flour – Creates the first coating layer that helps everything else adhere. The flour mixture is seasoned generously so every layer adds flavor. Don’t substitute with other flours as they won’t provide the same texture.
Panko Breadcrumbs – Japanese-style breadcrumbs are key to achieving maximum crispiness. They’re larger and flakier than regular breadcrumbs, creating more surface area and a lighter, crunchier coating. Don’t substitute with regular breadcrumbs or you’ll lose that signature crunch.
Eggs – Act as the glue between the flour and panko layers, ensuring everything sticks together and creates that sealed coating that keeps shrimp juicy inside.
Paprika – Adds beautiful color and a mild, sweet peppery flavor. Use regular paprika or smoked paprika for a deeper, smokier taste.
Garlic Powder – Provides savory depth without the moisture of fresh garlic, which could make the coating soggy.
Onion Powder – Adds sweet, aromatic flavor that complements the shrimp perfectly.
Cayenne Pepper – Brings a gentle heat that can be adjusted to taste. Start with less if you’re sensitive to spice or increase for heat lovers.
Salt and Black Pepper – Essential for bringing out all the other flavors. Season generously – shrimp can handle it.
Vegetable Oil – For frying. Choose a neutral oil with a high smoke point like vegetable, canola, or peanut oil. You’ll need enough to fill your pan about 2 inches deep.
Equipment Needed
Having the right tools makes frying shrimp easier and safer. Here’s what you’ll need:
- Large bowl – For marinating shrimp in buttermilk
- Three shallow bowls or pie plates – For setting up your breading station (flour, egg, panko)
- Heavy-bottomed pot or Dutch oven – For frying. You need something deep enough to hold 2-3 inches of oil safely
- Candy/deep-fry thermometer – Crucial for maintaining the correct oil temperature
- Tongs or spider strainer – For safely adding and removing shrimp from hot oil
- Wire cooling rack – Set over a baking sheet to drain fried shrimp while keeping them crispy
- Paper towels – For initial oil drainage
- Measuring cups and spoons – For accurate ingredient measurements
- Large plate or baking sheet – For holding breaded shrimp before frying
- Mixing spoon or whisk – For combining seasonings
- Colander – For draining and rinsing shrimp
Crispy Fried Shrimp Recipe
- Total Time: 25 minutes
- Yield: 4 servings (about 6-8 shrimp per person) 1x
- Diet: Gluten Free
Description
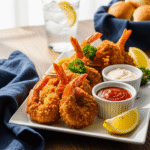
Incredibly crispy fried shrimp with a golden, crunchy coating and tender, juicy interior. This easy recipe uses a buttermilk marinade and double-coating technique for restaurant-quality results at home. Perfect for dinner, appetizers, or po’ boy sandwiches!
Ingredients
For the Shrimp:
- 1 ½ pounds large shrimp (21–25 count), peeled and deveined
- 1 cup buttermilk
- 1 teaspoon hot sauce (optional)
For the Breading:
- 1 cup all-purpose flour
- 1 ½ cups panko breadcrumbs
- 2 large eggs
- 2 tablespoons water
- 2 teaspoons paprika
- 1 ½ teaspoons garlic powder
- 1 ½ teaspoons onion powder
- 1 teaspoon salt
- 1 teaspoon black pepper
- ½ teaspoon cayenne pepper (adjust to taste)
- ¼ teaspoon dried oregano
For Frying:
- Vegetable oil for frying (about 4-6 cups depending on pan size)
For Serving:
- Lemon wedges
- Cocktail sauce, tartar sauce, or remoulade
Instructions
- Marinate the shrimp: Place the cleaned and deveined shrimp in a large bowl. Pour buttermilk over them and add hot sauce if using. Toss to coat evenly, cover, and refrigerate for 15 minutes while you prepare the breading stations. This step helps tenderize the shrimp and helps the coating adhere better.
- Set up your breading station: Arrange three shallow bowls in a row. In the first bowl, combine flour, 1 teaspoon paprika, ¾ teaspoon garlic powder, ¾ teaspoon onion powder, ½ teaspoon salt, ½ teaspoon black pepper, and ¼ teaspoon cayenne. In the second bowl, whisk together eggs and water until smooth. In the third bowl, mix panko breadcrumbs with the remaining seasonings (1 teaspoon paprika, ¾ teaspoon garlic powder, ¾ teaspoon onion powder, ½ teaspoon salt, ½ teaspoon pepper, ¼ teaspoon cayenne, and oregano).
- Bread the shrimp: Remove shrimp from buttermilk, letting excess drip off. Working with one shrimp at a time, coat it in seasoned flour, shaking off excess. Dip into egg mixture, letting excess drip off. Finally, press into panko mixture, coating thoroughly and pressing gently so crumbs adhere. Place breaded shrimp on a plate or baking sheet. Repeat with all shrimp.
- Heat the oil: Pour oil into your heavy pot to a depth of 2-3 inches. Heat over medium-high heat until temperature reaches 350-375°F on your thermometer. This temperature is crucial for crispy, non-greasy shrimp.
- Fry the shrimp: Working in batches of 4-6 shrimp (don’t overcrowd), carefully add shrimp to hot oil. Fry for 2-3 minutes, flipping halfway through, until deep golden brown and cooked through. Shrimp should float and be crispy. Internal temperature should reach 120°F.
- Drain and rest: Using tongs or a spider strainer, remove fried shrimp and place on a wire rack set over a baking sheet (or on paper towels). This allows excess oil to drip away while keeping the coating crispy. Let the oil return to proper temperature between batches.
- Serve immediately: Transfer crispy fried shrimp to a serving platter. Serve hot with lemon wedges and your choice of dipping sauces. Enjoy while crispy!
Notes
- Don’t skip the buttermilk marinade – it makes a huge difference in tenderness and flavor.
- Maintain oil temperature between 350-375°F throughout frying. Too cool and shrimp absorb oil and become greasy; too hot and they burn outside while staying raw inside.
- Panko breadcrumbs are essential for maximum crispiness – regular breadcrumbs won’t give the same results.
- For extra-large shrimp (16-20 count), increase cooking time to 3-4 minutes.
- Let oil come back to temperature between batches for consistent results.
- These are best served immediately but can be kept warm in a 200°F oven for up to 15 minutes if needed.
- Prep Time: 15 minutes
- Cook Time: 10 minutes
- Category: Dinner
- Method: Frying
- Cuisine: American
Nutrition
- Serving Size: About 6-8 shrimp (approximately 6 oz)
- Calories: 385
- Sugar: 3g
- Sodium: 890mg
- Fat: 18g
- Saturated Fat: 2g
- Unsaturated Fat: 15g
- Trans Fat: 0g
- Carbohydrates: 28g
- Fiber: 1g
- Protein: 28g
- Cholesterol: 245mg
Tips & Variations
Spicy Cajun Shrimp: Add 2-3 teaspoons of Cajun seasoning to the flour mixture for a bold, spicy kick with tons of flavor.
Coconut Shrimp Twist: Replace half the panko with sweetened shredded coconut for tropical coconut shrimp. Serve with sweet chili sauce or mango dipping sauce.
Extra Crispy Version: Do a double dip – after the first full coating, dip back in egg wash and panko one more time for an ultra-thick, crunchy shell.
Baked Option: For a healthier version, arrange breaded shrimp on a greased baking sheet, spray with cooking oil, and bake at 425°F for 10-12 minutes, flipping halfway. They won’t be quite as crispy but still delicious.
Asian-Inspired: Add ginger powder and five-spice to the flour mixture, and serve with sweet and sour sauce or sriracha mayo.
Lemon Pepper Shrimp: Add 2 teaspoons of lemon zest and extra black pepper to the breading for bright, zesty flavor.
Gluten-Free Version: Use gluten-free flour blend and gluten-free panko or crushed rice cereal for the coating.
Buffalo Shrimp: After frying, toss hot shrimp in melted butter mixed with buffalo sauce. Serve with blue cheese dressing and celery sticks.
Parmesan Crusted: Add ½ cup finely grated Parmesan cheese to the panko mixture for extra savory flavor and richness.
Air Fryer Method: Bread as directed, spray generously with oil, and air fry at 400°F for 8-10 minutes, flipping halfway through.
Pro Chef Tips
Pat shrimp completely dry before marinating: Excess moisture prevents the breading from adhering properly. Use paper towels to thoroughly dry shrimp after rinsing, then add to buttermilk.
Use one hand for wet, one for dry: Keep one hand designated for handling shrimp in wet ingredients and the other for dry ingredients. This prevents your hands from becoming coated in breading, which is frustrating and wasteful.
Don’t skip the resting time: After breading, let shrimp rest for 5-10 minutes before frying. This allows the coating to set and adhere better, reducing the chance of it falling off during frying.
Season every layer: Notice how this recipe seasons both the flour AND the panko? This ensures every bite is flavorful, not just the outer coating. Many recipes only season one layer, resulting in bland spots.
Maintain consistent oil temperature: The most critical factor in perfect fried shrimp is temperature control. Invest in a good thermometer and don’t rush. Let oil recover between batches. The ideal range is 350-375°F.
Don’t overcrowd the pan: Adding too many shrimp at once drops the oil temperature dramatically, resulting in greasy, soggy coating. Fry in small batches even though it takes longer.
Look for the float: When shrimp are done, they’ll float to the surface and turn deep golden brown. This visual cue is more reliable than timing, as shrimp size varies.
Use fresh oil: Old or reused oil that’s been heated multiple times can taste off and won’t fry as well. Use fresh oil for the best flavor and crispiest results.
Size matters: Try to use similar-sized shrimp in each batch so they all cook at the same rate. Mixing sizes leads to some being overcooked while others are underdone.
Common Mistakes to Avoid
Mistake 1: Using shrimp that’s too wet. This is the number one cause of breading that falls off during frying. Always pat shrimp completely dry before the buttermilk marinade, and let excess buttermilk drip off well before breading. Wet shrimp creates a barrier that prevents coating adhesion.
Mistake 2: Breading too far in advance. If you bread shrimp more than 15-20 minutes before frying, the coating can become soggy from moisture released by the shrimp. Bread just before you’re ready to fry for the crispiest results.
Mistake 3: Frying at the wrong temperature. This cannot be stressed enough – temperature is everything! Too low (below 340°F) and shrimp absorb excess oil becoming greasy and heavy. Too high (above 385°F) and the coating burns before shrimp cook through. Use a thermometer and adjust heat as needed.
Mistake 4: Overcooking the shrimp. Shrimp cook incredibly fast – usually just 2-3 minutes total. Overcooked shrimp become rubbery and tough. Look for an opaque appearance and slight curl. The moment they turn golden brown and float, they’re done.
Mistake 5: Not letting the coating set. After breading, give shrimp at least 5 minutes to rest before frying. This allows the coating to adhere properly and creates a better seal. Frying immediately often results in coating that slides off.
Mistake 6: Skipping the buttermilk marinade. Some people try to skip this step to save time, but the buttermilk serves multiple purposes: tenderizing the shrimp, adding flavor, and helping the coating stick. Don’t skip it!
Mistake 7: Reusing dirty oil. If breading falls off during frying and burns in the oil, strain it out before the next batch. Burnt bits will stick to your shrimp and create bitter, acrid flavors.
Storage & Meal Prep
Room Temperature: Fried shrimp should not be left at room temperature for more than 2 hours due to food safety concerns. Serve immediately for best quality.
Refrigerator Storage: Store leftover fried shrimp in an airtight container in the refrigerator for up to 2 days. Keep in mind they’ll lose their crispiness but still taste good. Place paper towels in the container to absorb excess moisture.
Reheating for Best Results: The oven method is best for restoring some crispiness. Preheat your oven to 375°F, place shrimp on a wire rack over a baking sheet, and heat for 8-10 minutes until warmed through and crisped up. Avoid the microwave as it makes the coating soggy and rubbery.
Air Fryer Reheating: This is actually the best reheating method! Place leftover shrimp in a single layer in your air fryer basket and heat at 350°F for 3-5 minutes. They’ll crisp back up beautifully.
Make-Ahead Prep: You can clean, peel, and devein shrimp up to 24 hours in advance. Store in the refrigerator until ready to marinate and bread. You can also mix all your dry coating ingredients ahead and store in airtight containers.
Buttermilk Marinade: Shrimp can marinate in buttermilk for up to 2 hours in the refrigerator (not longer or they can become mushy). The ideal time is 15-30 minutes.
Make-Ahead & Freezer Notes
Freezing Breaded Uncooked Shrimp: This is the best make-ahead method! Bread shrimp completely, place on a parchment-lined baking sheet in a single layer, and freeze for 2 hours until solid. Transfer to freezer bags or containers where they’ll keep for up to 2 months. When ready to cook, fry from frozen (add 1-2 extra minutes to cooking time) or thaw in refrigerator for 2 hours first.
Freezing Cooked Fried Shrimp: While possible, I don’t recommend freezing already-fried shrimp as the texture suffers significantly. If you must, freeze in airtight containers for up to 1 month, but expect them to be less crispy when reheated.
Best Practice for Advance Prep: For a party or gathering, bread all your shrimp in the morning, arrange on baking sheets, cover with plastic wrap, and refrigerate. Fry fresh just before serving for the best texture. Alternatively, freeze breaded shrimp weeks ahead and fry straight from frozen when needed.
Thawing Frozen Raw Shrimp: If you bought frozen shrimp, thaw them safely in the refrigerator overnight or place in a sealed bag and submerge in cold water for 30-45 minutes. Never thaw at room temperature.
Quick Freezing Tips: When freezing breaded shrimp, make sure they’re not touching on the baking sheet initially. Once frozen solid, you can pack them closer together in bags. This prevents them from sticking together in one solid mass.
Sauce Prep: All dipping sauces can be made 3-4 days ahead and refrigerated. This actually improves flavors as they meld together. Bring to room temperature before serving.
Serving Suggestions
Crispy fried shrimp are incredibly versatile! Here are delicious ways to serve them:
Classic Seafood Dinner: Serve with french fries or crispy potato wedges, coleslaw, hush puppies, and lemon wedges for an authentic Southern fish fry experience.
Po’ Boy Sandwiches: Pile fried shrimp on toasted French bread or hoagie rolls with shredded lettuce, sliced tomatoes, pickles, and remoulade sauce for iconic New Orleans-style sandwiches.
Shrimp Tacos: Serve in warm corn or flour tortillas with cabbage slaw, avocado, cilantro, lime juice, and chipotle mayo for amazing shrimp tacos.
Over Salad: Top a fresh garden salad or Caesar salad with warm fried shrimp for a satisfying meal with crunch and protein.
Appetizer Platter: Arrange on a large platter with multiple dipping sauces – cocktail sauce, tartar sauce, remoulade, honey mustard, and sriracha mayo. Add lemon wedges and fresh parsley garnish.
Shrimp and Grits: Serve over creamy cheese grits with bacon and scallions for a Southern comfort food feast.
With Rice: Plate over coconut rice, fried rice, or Spanish rice with steamed vegetables on the side.
Dipping Sauce Ideas:
- Classic cocktail sauce
- Homemade tartar sauce
- Spicy remoulade
- Honey mustard
- Sweet chili sauce
- Bang bang sauce (mayo, sweet chili, sriracha)
- Garlic aioli
- Lemon herb butter
Side Dish Pairings:
- Crispy french fries or sweet potato fries
- Creamy coleslaw or broccoli slaw
- Corn on the cob or Mexican street corn
- Hush puppies or cornbread
- Mac and cheese
- Roasted vegetables
- Garden salad with vinaigrette
- Baked beans
Beverage Pairings: Serve with iced tea, lemonade, beer, white wine, or a crisp Sauvignon Blanc or Pinot Grigio.
FAQs Section
Q: Can I use frozen shrimp for this recipe?
A: Absolutely! Frozen shrimp works perfectly well. Just make sure to thaw them properly – overnight in the refrigerator is best, or in a sealed bag submerged in cold water for 30-45 minutes. Pat them very dry with paper towels before marinating, as frozen shrimp tend to release more moisture. Buy good quality frozen shrimp that are individually quick frozen (IQF) without added sodium solutions.
Q: Should I leave the tails on or remove them?
A: It’s entirely up to you and how you plan to serve them! Tails on looks prettier for presentation and gives you something to hold onto when eating as finger food. Tails off is more practical for po’ boy sandwiches, tacos, or salads where you don’t want people dealing with shells. I usually leave tails on for appetizers and remove them for main dishes.
Q: Why is my breading falling off during frying?
A: This is usually caused by one of several issues: shrimp being too wet when breaded, not pressing the breading firmly enough onto the shrimp, frying shrimp immediately after breading without letting the coating set, or oil temperature being too low. Make sure to pat shrimp very dry, press coating on firmly, let them rest 5-10 minutes after breading, and maintain oil temperature at 350-375°F.
Q: What’s the difference between regular breadcrumbs and panko?
A: Panko are Japanese-style breadcrumbs that are larger, flakier, and create a much crunchier, lighter coating than regular breadcrumbs. Regular breadcrumbs are finely ground and create a denser, less crispy coating. For this recipe, panko is really essential to achieving that restaurant-quality crunch. You can find panko in the Asian or international aisle of most grocery stores, or near regular breadcrumbs.
Q: How do I know when the oil is hot enough without a thermometer?
A: While I strongly recommend using a thermometer for consistent results, you can test oil by dropping a small piece of bread or a pinch of flour into it. If it sizzles immediately and rises to the surface within 2-3 seconds, your oil is ready. If it sinks and slowly bubbles, it’s too cool. If it browns instantly, it’s too hot. That said, thermometers are inexpensive and make frying so much easier!
Q: Can I make these in an air fryer?
A: Yes! Bread the shrimp as directed, arrange in a single layer in your air fryer basket without touching, spray generously with cooking oil spray, and cook at 400°F for 8-10 minutes, flipping halfway through and spraying the other side. They won’t be quite as crispy as deep-fried but still delicious and much healthier with less oil.
Q: My shrimp turned out tough and rubbery. What happened?
A: Overcooked shrimp become rubbery and tough – they cook very quickly, usually in just 2-3 minutes total. The moment they turn opaque, curl slightly, and the coating is golden brown, they’re done. Remove them immediately. Shrimp continue cooking slightly after removal from heat, so don’t wait for them to be “super done.” Also ensure you’re not using tiny shrimp which overcook even faster.
Q: What size shrimp is best for frying?
A: Large shrimp (21-25 count per pound) or extra-large (16-20 count per pound) work best. They’re big enough to stay juicy during frying and are easy to work with when breading. Smaller shrimp overcook too quickly and are harder to bread. Jumbo shrimp work too but may need an extra minute of cooking time. The “count” refers to how many shrimp per pound – lower numbers mean bigger shrimp.
Conclusion
There you have it – everything you need to know to make absolutely perfect crispy fried shrimp at home! These golden, crunchy beauties with their tender, juicy centers are so much better than anything you’ll get from a restaurant, and now you have all the tips and tricks to nail them every single time.
I know the idea of frying at home can seem intimidating if you’ve never done it before, but trust me – with a good thermometer and these clear instructions, you’ll be amazed at how easy it actually is. The first time you bite into one of these perfectly crispy shrimp with that satisfying crunch giving way to sweet, tender shrimp inside, you’ll be so proud of what you’ve created!
Whether you’re making these for a weeknight dinner, a game day spread, a special seafood feast, or packing them into delicious po’ boy sandwiches, this recipe delivers restaurant-quality results that’ll have everyone asking for your secret. And the best part? It’s ready in less than 30 minutes from start to finish!
I’d absolutely love to hear how your crispy fried shrimp turn out! Drop a comment below and tell me how you served them – did you go classic with cocktail sauce? Make amazing tacos? Try the coconut variation? Share your photos and experiences so we can all learn from each other and celebrate our cooking wins!
If you loved this recipe, please pin it to your favorite Pinterest board so you can find it easily next time that seafood craving hits. Share it with friends and family who love good food – there’s nothing better than spreading delicious recipes around! Your support means everything and helps me keep creating detailed, tested recipes that actually work.
Now grab that shrimp, heat up that oil, and get ready to make some magic in your kitchen. Happy frying, my friends – you’re about to impress yourself and everyone around you!