
If you’ve ever wanted to make impressive, restaurant-quality cheesecakes without the stress of a full-size version, these mini cheesecakes are about to become your new favorite dessert! This easy mini cheesecake recipe delivers all the creamy, dreamy decadence of classic New York-style cheesecake in perfectly portioned individual servings. With a buttery graham cracker crust, silky cream cheese filling, and endless topping possibilities, these bite-sized beauties are foolproof, customizable, and absolutely irresistible. Whether you’re a baking novice or a seasoned pro, you’ll love how simple it is to create these adorable, Instagram-worthy treats that taste like they came from a fancy bakery.
Introduction of Recipe
Mini cheesecakes are individual-sized cheesecakes typically baked in muffin tins or small ramekins, featuring a graham cracker crust base and a rich, creamy filling made from cream cheese, sugar, eggs, and vanilla. What makes these little gems so special is their perfect portion control, faster baking time compared to full-size cheesecakes, and the fact that everyone gets their own personal dessert—no slicing required, no arguments over who got the bigger piece!
These individual cheesecakes are incredibly versatile and work for virtually any occasion. Serve them at dinner parties where elegant presentation matters, holiday gatherings when you need to feed a crowd, birthday celebrations for a fun twist on traditional cake, bridal or baby showers for pretty, feminine desserts, potlucks where individual servings are convenient, or simply as a weekend baking project with the kids. They’re also perfect for meal prep—make a batch on Sunday and enjoy cheesecake all week long!
The beauty of this mini cheesecake recipe is its adaptability. You can keep them classic and simple, or go wild with toppings like fresh berries, chocolate ganache, caramel sauce, fruit compotes, or cookie crumbles. Each person can even customize their own, making these ideal for serving guests with different preferences. Plus, they’re so much more forgiving than full-size cheesecakes—no worrying about cracks (and if one does crack, it’s easily hidden with toppings!).
History / Background
Cheesecake’s history stretches back thousands of years, making it one of the world’s oldest desserts. Ancient Greeks served a form of cheesecake to athletes during the first Olympic games in 776 BC, believing it provided good energy. The earliest recipe on record dates to the Greek writer Athenaeus in 230 AD. When Romans conquered Greece, they adapted the recipe, adding eggs and baking it under a hot brick, creating something closer to what we recognize today.
The cheesecake we know and love—creamy, rich, and made with cream cheese—is actually an American invention. In 1872, William Lawrence, a dairyman in Chester, New York, accidentally created cream cheese while trying to recreate French Neufchâtel. This revolutionary ingredient transformed cheesecake forever. By the early 1900s, New York-style cheesecake had emerged as the gold standard, characterized by its dense, smooth texture achieved through the use of cream cheese rather than ricotta or cottage cheese.
The concept of individual-sized desserts gained popularity in the late 20th century as restaurants sought to control portions and create elegant plating. Mini cheesecakes followed this trend, offering all the luxury of traditional cheesecake in a perfectly portioned format. The rise of cupcake culture in the 2000s further propelled the popularity of individual desserts, and mini cheesecakes rode that wave beautifully.
Today’s mini cheesecakes reflect our modern desire for both indulgence and portion control. They satisfy our craving for something decadent while keeping serving sizes reasonable. They’re also perfectly suited to our social media age—individual desserts photograph beautifully and are ideal for sharing on Pinterest and Instagram. The mini format has made cheesecake more accessible too, since they’re less intimidating to bake than full-size versions and require no special springform pans or water baths.
Why You’ll Love This Recipe
These easy mini cheesecakes are about to revolutionize your dessert game, and here’s exactly why they deserve a permanent spot in your recipe collection:
Imagine serving a dessert that looks professionally made, tastes absolutely divine, and took you less time and stress than making a regular cake. That’s the magic of mini cheesecakes! Each adorable little cheesecake is a perfect bite of creamy heaven, and the best part? They’re surprisingly foolproof.
- No-fail recipe: Much easier than full-size cheesecakes with no water baths, no springform pans, and less worry about cracks
- Perfect portions: Built-in portion control means everyone gets their own cheesecake—no fighting over slices!
- Faster baking time: Ready in about 20 minutes instead of the hour or more required for full-size cheesecakes
- Beginner-friendly: If you can mix ingredients and use a muffin tin, you can make these successfully
- Endless customization: Top with literally anything you love—berries, chocolate, caramel, cookies, you name it
- Make-ahead marvel: Prepare days in advance and store in the fridge until serving time
- Crowd-pleaser guarantee: Everyone loves cheesecake, and the cute individual size makes them even more appealing
- Freezer-friendly: Make massive batches and freeze for whenever you need a quick dessert
- No special equipment: Just a standard muffin tin and cupcake liners—you probably have everything already
- Great for gifting: Package a few in a pretty box for a homemade gift that actually impresses
- Kid-friendly project: Simple enough that children can help make them (with supervision)
- Gluten-free adaptable: Easy to make gluten-free by using gluten-free graham crackers or cookie crumbs
Ingredient Notes
Let’s break down what makes these mini cheesecakes so incredibly delicious:
For the Crust:
Graham Cracker Crumbs: The classic cheesecake crust base provides a slightly sweet, lightly spiced foundation that complements the tangy filling perfectly. You can buy pre-made crumbs or crush whole graham crackers in a food processor or zip-top bag with a rolling pin. For gluten-free versions, use gluten-free graham crackers. You can also substitute with vanilla wafer cookies, Oreo cookies (remove the filling or leave it in for cookies and cream version), gingersnap cookies for spicy warmth, or digestive biscuits for a British twist.
Butter: Melted butter binds the crumbs together to form a crust. Use unsalted butter so you can control salt levels. The butter must be fully melted and mixed thoroughly with crumbs for proper cohesion. Some recipes use coconut oil as a dairy-free alternative.
Sugar: Just a touch of sugar in the crust adds sweetness and helps it hold together. You can reduce or omit this if using sweeter cookies like vanilla wafers.
For the Filling:
Cream Cheese: The star of the show! Use full-fat cream cheese (not reduced-fat or whipped) for the richest, creamiest texture. The cream cheese MUST be at room temperature—cold cream cheese creates lumps that won’t mix out. Leave it out for at least an hour before baking, or microwave briefly in short bursts to soften. Brand does matter here—Philadelphia is the gold standard for smooth texture and tangy flavor.
Granulated Sugar: Sweetens the filling and balances the tanginess of cream cheese. The amount is perfect for classic sweetness, but you can reduce by a tablespoon or two if you prefer less sweet desserts.
Sour Cream: Adds tanginess, creates extra creaminess, and helps prevent cracks by adding moisture. Some recipes use heavy cream or Greek yogurt instead. Each creates slightly different flavor and texture—sour cream gives the most authentic New York cheesecake taste.
Eggs: Provide structure and richness. You’ll only need 1-2 eggs depending on batch size, and they should also be at room temperature for smooth mixing. Cold eggs don’t incorporate as smoothly and can create lumps.
Vanilla Extract: Pure vanilla extract (not imitation) adds warmth and rounds out all the other flavors. This is one place where quality makes a difference—good vanilla elevates the entire dessert.
All-Purpose Flour (optional): Just 1 tablespoon helps stabilize the filling and prevent cracks. Some bakers swear by it; others omit it. Your choice!
Salt: Just a pinch enhances sweetness and balances flavors. Don’t skip it even though it seems minor.
Equipment Needed
You won’t need any special equipment for these easy mini cheesecakes:
- 12-cup muffin tin (standard size)
- Paper cupcake liners or silicone muffin liners
- Medium mixing bowl (for crust)
- Large mixing bowl or stand mixer (for filling)
- Electric hand mixer or stand mixer (paddle attachment)
- Rubber spatula (for scraping bowls)
- Measuring cups and spoons
- Small spoon or small cookie scoop (for portioning crust)
- Fork (for pressing down crust)
- Cooling rack
- Food processor (optional, for making graham cracker crumbs)

Mini Cheesecake Recipe
- Total Time: 2 hours 33 minutes (including cooling and chilling)
- Yield: 12 mini cheesecakes 1x
- Diet: Vegetarian
Description
These easy mini cheesecakes feature a buttery graham cracker crust and ultra-creamy filling baked to perfection in a muffin tin. With foolproof instructions and endless topping options, this simple recipe creates impressive individual desserts perfect for any occasion. No water bath required, no springform pan needed—just delicious, perfectly portioned cheesecakes every time!
Ingredients
For the Crust:
- 1 cup graham cracker crumbs (about 8 full graham crackers)
- 2 tablespoons granulated sugar
- 3 tablespoons unsalted butter, melted
For the Cheesecake Filling:
- 16 oz (two 8-oz blocks) cream cheese, softened to room temperature
- ½ cup granulated sugar
- 2 large eggs, room temperature
- ⅓ cup sour cream, room temperature
- 1 teaspoon pure vanilla extract
- 1 tablespoon all-purpose flour (optional, helps prevent cracks)
- Pinch of salt
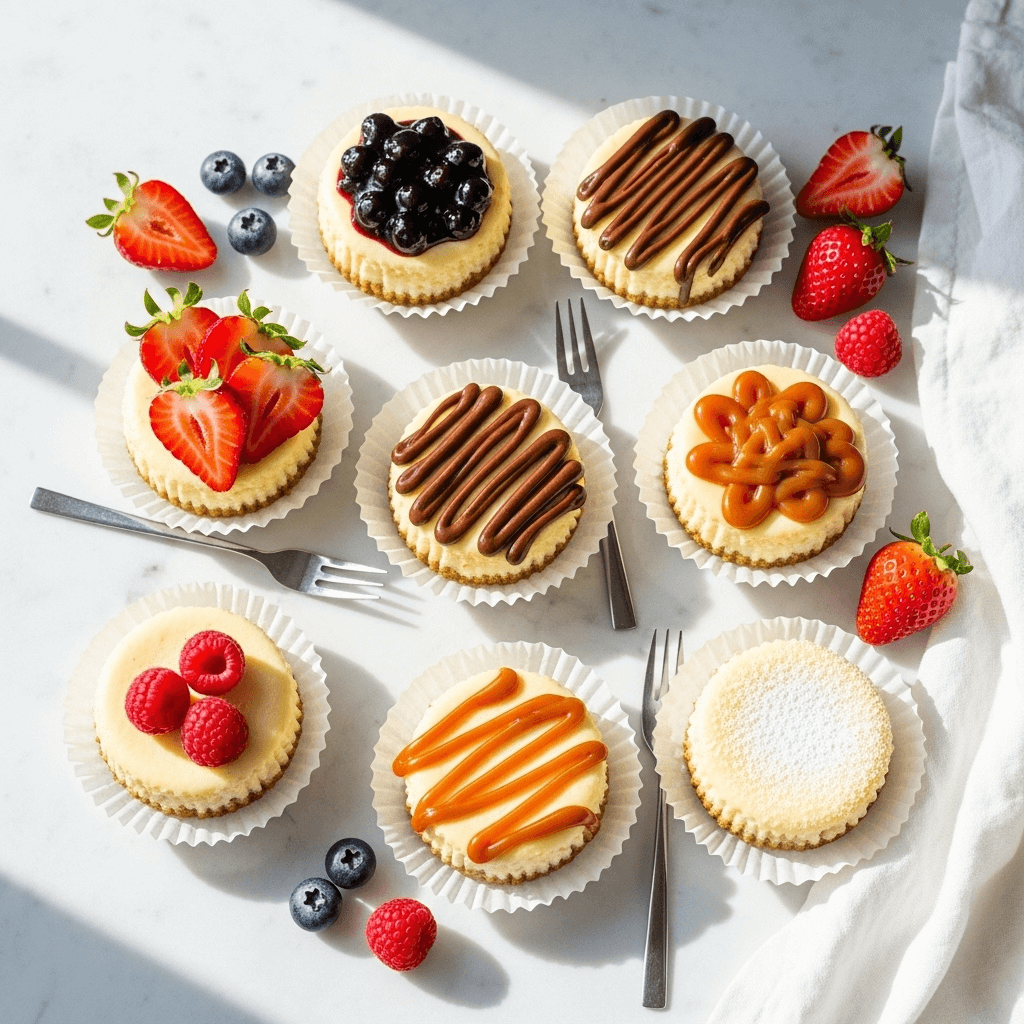
For Topping (Optional):
- Fresh berries (strawberries, blueberries, raspberries)
- Fruit compote or pie filling
- Chocolate ganache or chocolate chips
- Caramel sauce
- Whipped cream
- Cookie crumbles
- Chopped nuts
Instructions
Step 1: Prepare Your Muffin Tin
Preheat your oven to 325°F (163°C). Line a 12-cup muffin tin with paper cupcake liners. While you can skip liners and grease the tin directly, paper liners make removal much easier and cleaner. Don’t skip this step unless you want to wrestle mini cheesecakes out of the tin later!
Step 2: Make the Crust
In a medium bowl, combine graham cracker crumbs, 2 tablespoons sugar, and melted butter. Mix with a fork until the mixture resembles wet sand and holds together when pressed. The texture should be like damp sand at the beach—if it’s too dry, add a tiny bit more melted butter. Spoon about 1 tablespoon of the crumb mixture into each cupcake liner. Use the back of a spoon or your fingers to press it down firmly into an even layer on the bottom. You want it well-compacted so it doesn’t crumble apart later. Don’t bring the crust up the sides—just press it flat on the bottom.
Step 3: Make the Cheesecake Filling
In a large bowl using an electric hand mixer (or in a stand mixer with paddle attachment), beat the softened cream cheese on medium speed for 2-3 minutes until completely smooth and creamy with no lumps. Stop and scrape down the bowl several times. Add the sugar and beat for another minute until well combined and fluffy. Add the eggs one at a time, mixing on low speed just until each egg is incorporated. Don’t overmix after adding eggs, as this incorporates too much air and can cause cracks. Add the sour cream, vanilla, flour (if using), and salt. Mix on low speed just until combined and smooth. The batter should be thick but pourable, silky smooth, and pale yellow.
Step 4: Fill the Muffin Cups
Pour or spoon the cheesecake batter over the crusts, filling each cup almost to the top—about ¾ to ⅞ full. The cheesecakes don’t rise much, so you can fill them fairly high. Gently tap the muffin tin on the counter a few times to release any air bubbles trapped in the batter. This helps create a smoother texture.
Step 5: Bake the Cheesecakes
Bake in the preheated 325°F oven for 18-20 minutes. The mini cheesecakes are done when the edges are set but the centers still jiggle slightly when you gently shake the pan—like barely-set Jell-O. They should not look wet or liquid, but they shouldn’t be completely firm either. A tiny jiggle in the center is perfect! They’ll continue to set as they cool. Overbaking creates dry, cracked cheesecakes, so err on the side of slightly underdone. The centers will firm up during cooling.
Step 6: Cool Completely
Remove the muffin tin from the oven and place it on a wire cooling rack. Let the mini cheesecakes cool in the tin at room temperature for 1 hour. They’ll sink slightly in the centers as they cool—this is completely normal and creates perfect little wells for toppings! After they’ve cooled to room temperature, transfer the entire muffin tin to the refrigerator and chill for at least 2 hours or overnight. Cheesecakes must be completely cold before serving for the best texture.
Step 7: Remove and Top
Once thoroughly chilled, carefully remove the mini cheesecakes from the muffin tin by lifting the paper liners. If you have any stubborn ones, run a butter knife around the edges to loosen. Peel away the paper liners or leave them on for easy serving. Top with your favorite toppings just before serving—fresh berries, fruit compote, chocolate sauce, caramel drizzle, whipped cream, or enjoy them plain. The possibilities are endless!
Notes
- Room Temperature Ingredients: This is crucial! Cold cream cheese creates lumps. Leave cream cheese, eggs, and sour cream at room temperature for at least 1 hour before starting.
- Don’t Overmix: Once eggs are added, mix just until combined. Overmixing incorporates too much air, which can cause cracks and uneven texture.
- The Jiggle Test: Centers should jiggle like Jell-O when done. They’ll firm up completely during cooling.
- Prevent Cracks: Baking at lower temperature (325°F), not overmixing, and not overbaking all help prevent cracks. The optional tablespoon of flour also helps.
- Cooling is Essential: Don’t skip the cooling and chilling time. Cheesecakes need to be completely cold for proper texture.
- Liner Options: Paper liners work great for easy removal. Foil liners also work but can sometimes stick. Silicone liners are reusable but make removal slightly trickier.
- Storage: Store covered in the refrigerator. They’re best within 3-5 days but remain safe to eat for up to a week.
- Prep Time: 15 minutes
- Cook Time: 18 minutes
- Category: Dessert
- Method: Baking
- Cuisine: American
Nutrition
- Serving Size: 1 mini cheesecake
- Calories: 215 kcal
- Sugar: 15g
- Sodium: 155mg
- Fat: 15g
- Saturated Fat: 9g
- Unsaturated Fat: 5g
- Trans Fat: 0g
- Carbohydrates: 18g
- Fiber: 0g
- Protein: 4g
- Cholesterol: 75mg
Tips & Variations
Let’s explore the many ways you can customize these mini cheesecakes:
Chocolate Mini Cheesecakes: Add ¼ cup cocoa powder to the filling and reduce flour by 1 tablespoon. Use chocolate cookie crumbs (like Oreos) for the crust. Top with chocolate ganache or chocolate chips.
Strawberry Mini Cheesecakes: Top each cooled cheesecake with fresh strawberry slices and a drizzle of strawberry sauce. Or swirl strawberry jam into the batter before baking for marbled effect.
Lemon Mini Cheesecakes: Add 2 tablespoons fresh lemon juice and 1 tablespoon lemon zest to the filling. Top with lemon curd after cooling for bright, citrusy flavor.
Pumpkin Mini Cheesecakes: Replace ⅓ cup of the cream cheese with pumpkin puree and add 1 teaspoon pumpkin pie spice. Use gingersnap cookie crumbs for the crust. Perfect for fall!
Oreo Mini Cheesecakes: Use crushed Oreos (filling and all) for the crust. Press one additional Oreo piece into the top of each cheesecake before baking. Kids go crazy for these!
Caramel Pecan Mini Cheesecakes: Use graham cracker crust, top cooled cheesecakes with caramel sauce and toasted pecans. Decadent and delicious!
Red Velvet Mini Cheesecakes: Replace 2 tablespoons of cream cheese with cocoa powder and add red food coloring to the batter. Top with cream cheese frosting.
Peanut Butter Mini Cheesecakes: Add ⅓ cup creamy peanut butter to the filling. Use chocolate cookie crust. Top with chocolate sauce and chopped peanut butter cups.
Berry Swirl Mini Cheesecakes: Drop small spoonfuls of berry jam (raspberry, blueberry, strawberry) onto the batter and swirl with a toothpick before baking for beautiful marbled effects.
No-Bake Mini Cheesecakes: Make a no-bake version by using the same crust, then mixing cream cheese, powdered sugar, vanilla, and whipped cream for the filling. Chill until set. No oven required!
Keto/Low-Carb Version: Use almond flour crust and substitute the sugar with erythritol or monk fruit sweetener in both crust and filling.
Vegan Mini Cheesecakes: Use vegan cream cheese, coconut cream instead of sour cream, and replace eggs with silken tofu blended smooth. Results vary by brand but can be quite good!
Pro Chef Tips
Want bakery-quality mini cheesecakes? These professional secrets make all the difference:
Room Temperature is Non-Negotiable: This is the single most important tip. Cold cream cheese won’t blend smoothly no matter how long you mix it. Plan ahead and leave all dairy and eggs on the counter for at least an hour. In a hurry? Microwave cream cheese in 10-second bursts until softened (but not melted!).
Mix in Stages: Beat cream cheese alone first until fluffy, then add sugar and beat again, then add each egg individually. This staged mixing creates the smoothest possible texture. Scrape down the bowl between each addition.
Low Speed After Eggs: Once eggs go in, switch to low speed and mix just until incorporated. High-speed mixing after adding eggs whips in air bubbles that expand during baking and collapse during cooling, creating cracks and uneven texture.
The Tap Test: After filling the muffin cups, firmly tap the tin on the counter 5-10 times. This releases trapped air bubbles that can create holes or uneven texture. You’d be surprised how many bubbles come up!
Use an Oven Thermometer: Many ovens run hot or cold. An oven thermometer ensures accurate temperature, which is crucial for cheesecake. Even 25°F off can mean the difference between perfect and overbaked.
Don’t Open the Oven Door: Resist the urge to check on them constantly. Opening the oven door releases heat and creates temperature fluctuations that can cause cracks. Check once toward the end of baking time, that’s it.
The Toothpick Test Doesn’t Work: Unlike cakes, you don’t want a clean toothpick with cheesecake. Use the jiggle test instead—the centers should wobble like Jell-O but not look liquid.
Cool Gradually: Sudden temperature changes cause cracks. Cool at room temperature first, then refrigerate. Some bakers even turn off the oven and leave cheesecakes inside with the door cracked for 30 minutes before removing—this ultra-gradual cooling prevents cracks.
Add Toppings Just Before Serving: Fresh fruit and sauces can make cheesecakes soggy if added too far in advance. Top them within an hour or two of serving for best texture and appearance.
Use Quality Vanilla: Imitation vanilla has an artificial taste that’s especially noticeable in simple recipes like cheesecake. Spend the extra money on pure vanilla extract—it makes a real difference.
Common Mistakes to Avoid
Even simple recipes have pitfalls. Here’s what to watch out for:
Using Cold Ingredients: This is the #1 mistake that ruins cheesecakes. Cold cream cheese creates lumps that never fully smooth out, no matter how long you mix. Cold eggs don’t incorporate properly. Everything must be room temperature—plan ahead and leave ingredients out for at least an hour.
Overmixing After Adding Eggs: Once eggs go into the batter, you should mix on low speed and only until just combined. Overmixing incorporates air that expands during baking and collapses during cooling, creating cracks, sinking, and uneven texture. Mix eggs in gently and briefly.
Overbaking: The centers should still jiggle slightly when you remove them from the oven. Many bakers overbake because they expect cheesecake to be completely firm, but it continues setting during cooling. Overbaked cheesecakes are dry and cracked. Trust the jiggle!
Not Pressing the Crust Firmly: A loosely packed crust crumbles apart when you eat the cheesecake. Press that crust down firmly and evenly with the back of a spoon or your fingers until it’s well-compacted. It should feel solid, not loose.
Skipping the Cooling Time: Cutting into warm cheesecake creates a mess—the filling will be too soft and won’t slice cleanly. Cheesecakes need at least 2 hours of refrigeration (overnight is even better) to achieve proper texture. Be patient!
Opening the Oven Door Repeatedly: Every time you open the oven, the temperature drops dramatically. This causes uneven baking and can lead to cracks. Check only once near the end of baking time, and do it quickly.
Not Using Liners: While you technically can make these without liners by greasing the tin well, removal becomes much more difficult and messy. Paper cupcake liners cost pennies and save so much hassle. Use them!
Storage & Meal Prep
These mini cheesecakes store beautifully, making them perfect for advance preparation:
Refrigerator Storage: Store mini cheesecakes in an airtight container in the refrigerator for up to 5-7 days. They actually taste better after a day or two as flavors meld and develop. Keep them in their paper liners or arrange them in a single layer in a covered container. If stacking, place parchment paper between layers to prevent sticking.
Preventing Absorption of Odors: Cheesecake readily absorbs refrigerator odors, so make sure they’re well-covered. Use an airtight container or wrap tightly with plastic wrap. Store away from strong-smelling foods like onions or leftover curry.
When to Add Toppings: For best results, add fresh fruit, whipped cream, or sauces just before serving. These toppings can make cheesecakes soggy or cause fruit to oxidize if added too far in advance. For make-ahead convenience, you can prepare toppings separately and add them when ready to serve.
Bringing to Room Temperature: Some people prefer cheesecake slightly less cold than straight from the fridge. Let them sit at room temperature for 15-20 minutes before serving for softer, creamier texture. Personal preference varies, so experiment!
Meal Prep Strategy: Make a batch on Sunday and enjoy a mini cheesecake treat throughout the week. They’re perfect for portion-controlled desserts or quick sweet snacks. Package them individually in small containers for grab-and-go convenience.
Make-Ahead & Freezer Notes
One of the best things about mini cheesecakes is how well they prepare in advance:
Make-Ahead Timeline: You can make these mini cheesecakes up to 3 days ahead. In fact, they’re often better on day two or three as flavors deepen and texture becomes even creamier. Store covered in the refrigerator. Add toppings just before serving.
Freezing Baked Cheesecakes: Mini cheesecakes freeze beautifully! Let them cool completely, then freeze them in their paper liners. Arrange in a single layer on a baking sheet and freeze until solid (about 2 hours), then transfer to freezer bags or an airtight container. They’ll keep frozen for up to 2 months.
Freezing with Toppings: Plain cheesecakes freeze best. If you want to freeze topped versions, stick with stable toppings like chocolate ganache or caramel sauce. Don’t freeze with fresh fruit, whipped cream, or delicate toppings that don’t freeze well.
Thawing: Transfer frozen mini cheesecakes to the refrigerator and thaw overnight (about 6-8 hours). Don’t thaw at room temperature or in the microwave—this creates condensation and affects texture. For quicker thawing, leave at room temperature for 2-3 hours, but refrigerator thawing is gentler and better.
Freezing Unbaked: You can freeze the prepared crusts in the muffin tin, wrapped tightly. When ready to bake, make fresh filling, pour over frozen crusts, and bake as directed (may need 1-2 extra minutes).
Batch Baking for the Freezer: Make a double or triple batch and freeze extras. You’ll always have homemade dessert ready for unexpected guests, last-minute potlucks, or when sweet cravings strike. This is especially smart during busy holiday seasons.
Serving Suggestions
Mini cheesecakes are incredibly versatile. Here’s how to serve them:
Classic Presentation: Serve on small dessert plates with a dollop of whipped cream and fresh berries. Dust with powdered sugar just before serving for elegant presentation.
Dessert Platter: Arrange an assortment of different-topped mini cheesecakes on a large platter for parties. Variety lets guests choose their favorite and looks stunning.
Coffee/Tea Pairing: Serve alongside coffee or tea for afternoon tea parties, brunches, or casual dessert gatherings. The richness pairs beautifully with bold coffee or black tea.
Wine Pairing: Mini cheesecakes pair wonderfully with dessert wines like Moscato, late-harvest Riesling, or even champagne for celebrations. The bubbles cut through the richness beautifully.
Dessert Bar: Set up a mini cheesecake bar with plain cheesecakes and various toppings in bowls. Let guests customize their own—fruit sauces, whipped cream, chocolate chips, nuts, caramel sauce, cookie crumbles. This is especially fun for parties!
Holiday Presentation: For Christmas, top with cranberry sauce and white chocolate shavings. For Valentine’s Day, use strawberries and raspberry sauce. For Easter, use pastel-colored sprinkles or coconut “grass” with jelly beans.
Individual Dessert Boxes: For gifts or party favors, place one or two mini cheesecakes in small bakery boxes with a ribbon. Much more thoughtful than store-bought treats!
Brunch Addition: Serve mini cheesecakes as part of a brunch spread alongside fresh fruit, pastries, and other sweet options. Their individual size makes them perfect for buffet-style serving.
Kids’ Parties: Let children decorate their own mini cheesecakes with colorful sprinkles, candy, and fruit. It’s an activity and dessert in one!
FAQs Section
Can I make these without a muffin tin?
Yes! You can use small ramekins, silicone molds, or even make one large cheesecake in a springform pan (adjust baking time to 40-50 minutes). Mini springform pans also work beautifully if you want removable sides. Just adjust baking time based on size—smaller portions bake faster.
Why did my cheesecakes crack?
Common causes include: overmixing after adding eggs (incorporates too much air), overbaking (centers should still jiggle slightly), temperature fluctuations from opening the oven door, or cooling too quickly. While cracks don’t affect taste, you can prevent them by mixing gently, baking at lower temperature, and cooling gradually. Good news: toppings hide any cracks perfectly!
Can I use low-fat cream cheese?
Technically yes, but full-fat cream cheese creates the richest, creamiest texture and best flavor. Low-fat versions contain more moisture and less fat, which can result in a less creamy texture and potentially affect setting. If you must use reduced-fat, look for “Neufchâtel” rather than fat-free (which doesn’t work well at all).
Do I need to use a water bath?
No! That’s one of the great advantages of mini cheesecakes—they’re small enough that they bake evenly and stay moist without a water bath. Water baths are primarily used for large cheesecakes to prevent cracking and ensure even baking. These mini versions don’t need that extra step.
Can I make these gluten-free?
Absolutely! Simply use gluten-free graham crackers or cookies for the crust. Many brands taste just as good as regular ones. The filling is naturally gluten-free (though check that your flour is certified gluten-free if using it, or simply omit the tablespoon of flour—it’s optional anyway).
Why are my cheesecakes too soft/won’t set?
This usually means they were underbaked. While you want a slight jiggle in the center when removing from oven, they shouldn’t look liquid. They need at least 18 minutes in a properly preheated oven. Also ensure you’ve chilled them for at least 2 hours—they won’t fully set until completely cold.
Can I double this recipe?
Yes! Double all ingredients and use two 12-cup muffin tins. You may need to bake them in batches depending on your oven size, or place both tins in the oven at once (they’ll bake just fine together). Make sure to rotate the tins halfway through for even baking.
Conclusion
There you have it—everything you need to create perfect, creamy, utterly delicious mini cheesecakes that will make you look like a baking superstar! This easy mini cheesecake recipe proves that impressive desserts don’t have to be complicated or time-consuming. With simple ingredients, basic equipment, and foolproof techniques, you can create individual portions of cheesecake perfection that rival anything from a bakery.
The beauty of these little gems is their versatility. Make them plain and elegant, or go wild with creative toppings and flavor combinations. Serve them at fancy dinner parties or casual family gatherings. Make them on Sunday for weeklong treats, or prepare batches to freeze for future celebrations. However you choose to make and serve them, these mini cheesecakes are guaranteed to disappear quickly and earn you rave reviews.
Ready to make these easy mini cheesecakes? I’d love to hear about your favorite topping combinations! Leave a comment below sharing how yours turned out, what flavors you tried, or any questions you have. If you love this recipe, please share it on Pinterest so other home bakers can discover how simple homemade cheesecake can be. And don’t forget to take a photo of your beautiful creations—tag me so I can see your mini cheesecake masterpieces! Happy baking!