
If you’re looking for a foolproof way to make juicy, crispy chicken drumsticks in the oven, you’ve come to the right place! These baked chicken drumsticks deliver everything you want: golden, crispy skin on the outside and tender, fall-off-the-bone meat on the inside. No deep fryer needed, no complicated techniques – just simple ingredients and your oven doing all the work.
Baked chicken drumsticks are a weeknight dinner hero that the whole family will love. They’re budget-friendly, endlessly customizable, and perfect for busy parents who want to serve a home-cooked meal without spending hours in the kitchen. Whether you’re packing them for school lunches, serving them at a backyard barbecue, or making a quick Tuesday night dinner, these crispy oven baked chicken legs never disappoint.
What makes this recipe truly special is its versatility. You can keep the seasoning simple with just salt, pepper, and garlic powder, or jazz them up with your favorite spice blends. They’re equally at home on a casual dinner plate with mashed potatoes or as finger food at your next game day gathering. And the best part? They taste just as good (if not better!) the next day, making them ideal for meal prep.
History / Background
Chicken drumsticks have been a beloved part of American home cooking for generations, though their popularity surged dramatically in the mid-20th century when chicken farming became more industrialized and affordable. Before this period, chicken was actually considered a luxury meat, often reserved for Sunday dinners and special occasions.
The tradition of baking chicken in the oven became widespread in American households during the 1950s and 1960s as modern electric and gas ovens became standard kitchen appliances. Homemakers discovered that baking was a hands-off cooking method that produced consistent results without the mess and attention required for frying. This was revolutionary for busy families looking for convenient yet delicious meal options.
Drumsticks specifically became popular because they’re economical, portion-perfect (especially for kids), and have a built-in handle that makes them fun to eat. They’re also more forgiving than chicken breasts – the dark meat stays juicy and tender even if slightly overcooked, and the bone actually adds flavor during cooking.
In Southern cooking traditions, baked chicken legs often featured heavily spiced coatings and buttermilk marinades, techniques that have influenced modern recipes. Meanwhile, international influences brought flavors from around the world – Caribbean jerk seasoning, Asian-inspired soy and ginger marinades, and Mediterranean herb blends all found their way onto American dinner tables.
Today, baked chicken drumsticks represent the perfect intersection of comfort food tradition and modern convenience. They honor the classic Sunday dinner tradition while fitting seamlessly into contemporary meal prep culture. This recipe captures that timeless appeal while ensuring foolproof results that rival any restaurant or takeout option.
Why You’ll Love This Recipe
These crispy baked chicken drumsticks are about to become your go-to chicken recipe, and for good reason. This isn’t just another chicken recipe – it’s the one you’ll turn to again and again because it simply works. The method I’m sharing produces restaurant-quality results with minimal effort, and the flavor payoff is absolutely incredible.
Here’s why this easy baked chicken drumsticks recipe will become a family favorite:
- Incredibly budget-friendly – Drumsticks are one of the most economical cuts of chicken, often on sale, making this perfect for feeding a family without breaking the bank
- Minimal prep time – Just 10 minutes of hands-on work, then the oven does everything else while you handle homework, relax, or prep side dishes
- Kid-approved finger food – The built-in handle makes these perfect for little hands, and kids love the fun of eating with their fingers
- Foolproof technique – This recipe guarantees crispy skin and juicy meat every single time, even for beginner cooks
- Healthier than fried – Get that satisfying crunch without deep frying, using just a fraction of the oil
- Meal prep champion – Makes excellent leftovers that actually taste great cold, perfect for packed lunches and quick snacks
- Endlessly customizable – Use this base recipe with any seasoning blend you love, from mild to wild
- One-pan wonder – Minimal cleanup means more time enjoying dinner and less time doing dishes
- Naturally gluten-free and keto-friendly – Works for various dietary preferences without modifications
- Scales easily – Double or triple the recipe for meal prep or feeding a crowd without any extra effort
Ingredient Notes
Let’s break down what makes these baked chicken legs so irresistibly good. Each ingredient plays a specific role in creating that perfect combination of crispy skin and juicy meat.
Chicken Drumsticks: Look for drumsticks that are similar in size for even cooking. I recommend 6-8 drumsticks (about 2-2.5 pounds) for a family of four. You can absolutely use this recipe for a larger batch – just make sure they’re arranged in a single layer with space between them. Don’t worry if they still have some skin attached; that’s actually what gets crispy! Pat them very dry with paper towels before seasoning – this is crucial for crispy skin.
Baking Powder: This is the secret ingredient that transforms ordinary baked chicken into extra-crispy perfection. Baking powder (not baking soda!) raises the pH of the chicken skin, allowing it to brown more effectively and become incredibly crispy. Make sure you’re using aluminum-free baking powder if you’re sensitive to the metallic taste some brands can have. This isn’t optional if you want truly crispy skin!
Olive Oil or Melted Butter: A light coating of fat helps the seasonings stick and promotes browning. Olive oil is my go-to for its flavor and health benefits, but melted butter adds richness. You could also use avocado oil for its high smoke point. You don’t need much – just 2-3 tablespoons to lightly coat the chicken.
Paprika: Adds beautiful color and a subtle sweet, smoky flavor. I use regular paprika, but smoked paprika takes it to another level with a campfire-like depth. Hungarian sweet paprika is another excellent option for more complex flavor.
Garlic Powder: Provides that essential savory backbone. Always use garlic powder rather than fresh garlic for baked chicken – fresh garlic burns at high temperatures and turns bitter. Garlic powder distributes evenly and caramelizes beautifully.
Onion Powder: Works alongside garlic powder to build savory depth. It adds a subtle sweetness and complexity that makes the flavor profile more rounded and satisfying.
Salt and Black Pepper: The foundation of all good seasoning. I prefer kosher salt for its clean taste and easy-to-control texture. Freshly ground black pepper has more vibrant flavor than pre-ground. Be generous with your salt – chicken needs adequate seasoning to taste its best.
Optional additions: Cayenne pepper for heat, Italian seasoning for herbs, dried thyme for earthiness, or your favorite spice blend. The beauty of this recipe is that it’s a blank canvas for whatever flavors you’re craving.
Equipment Needed
Having the right tools makes this recipe even easier:
- Large rimmed baking sheet – A half-sheet pan (18×13 inches) works perfectly for 6-8 drumsticks with proper spacing
- Wire cooling rack – This is optional but highly recommended for the crispiest results, as it allows air circulation all around the chicken
- Aluminum foil or parchment paper – For easy cleanup (line your baking sheet before placing the rack)
- Paper towels – Essential for patting the chicken completely dry
- Large mixing bowl – For tossing the chicken with oil and seasonings
- Small bowl – For mixing your spice blend
- Measuring spoons – For accurate seasoning proportions
- Tongs – For turning the chicken if desired, though it’s not necessary
- Instant-read meat thermometer – Takes the guesswork out of knowing when the chicken is perfectly done (should read 175-180°F for drumsticks)
- Oven mitts – For safely handling hot pans

Crispy Baked Chicken Drumsticks Recipe
- Total Time: 50-55 minutes
- Yield: 4 servings (6-8 drumsticks) 1x
- Diet: Gluten Free
Description
These crispy baked chicken drumsticks are perfectly seasoned, incredibly juicy, and feature golden, crunchy skin that rivals fried chicken. Made with simple pantry spices and baked to perfection in the oven, this easy recipe delivers restaurant-quality results with minimal effort. Perfect for weeknight dinners, meal prep, or feeding a crowd!
Ingredients
- 6–8 chicken drumsticks (about 2–2.5 pounds)
- 2 tablespoons olive oil or melted butter
- 1 tablespoon baking powder (aluminum-free)
- 2 teaspoons paprika (or smoked paprika)
- 1½ teaspoons garlic powder
- 1 teaspoon onion powder
- 1 teaspoon kosher salt (or ¾ teaspoon table salt)
- ½ teaspoon black pepper, freshly ground
- ¼ teaspoon cayenne pepper (optional, for heat)
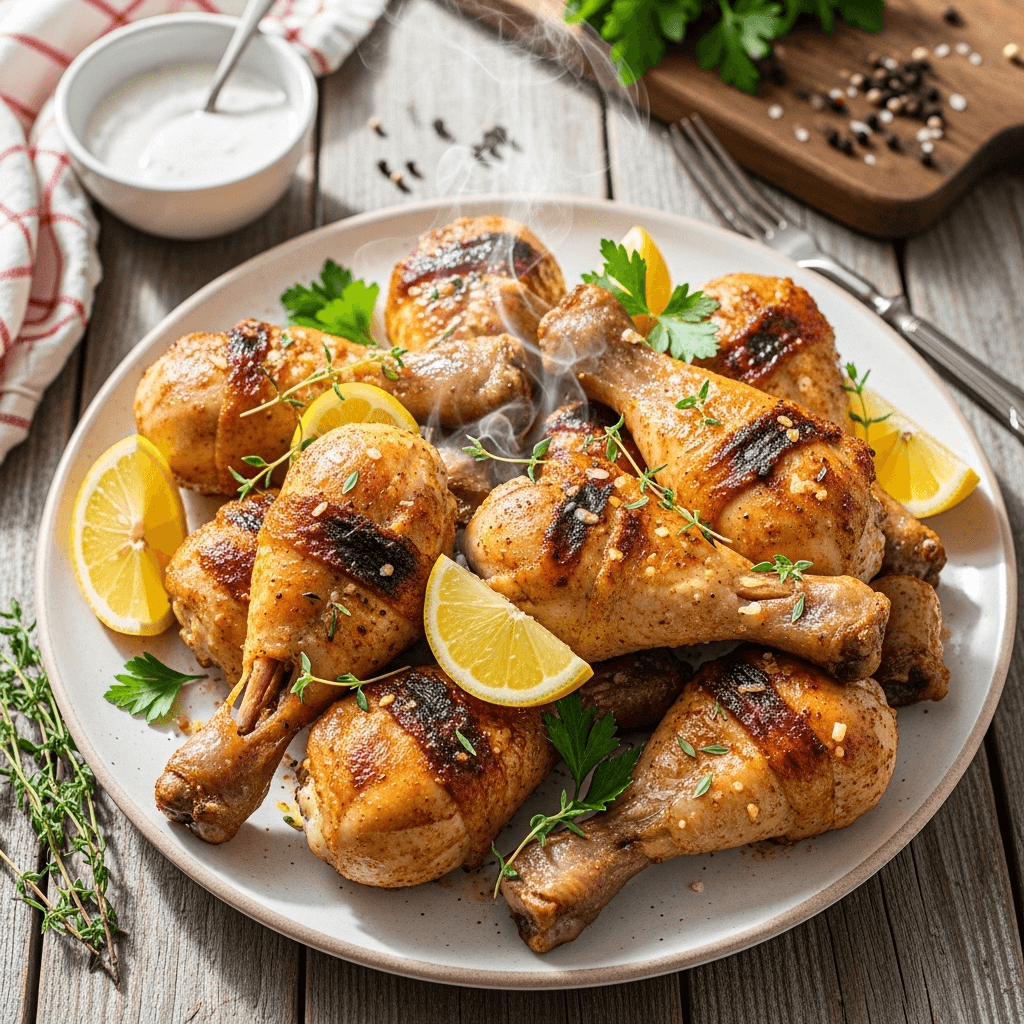
- Fresh parsley, chopped (for garnish, optional)
- Lemon wedges (for serving, optional)
Instructions
- Preheat and prepare: Preheat your oven to 425°F (220°C). Line a large rimmed baking sheet with aluminum foil for easy cleanup. If you have a wire cooling rack, place it on top of the foil-lined baking sheet. This step is optional but highly recommended for maximum crispiness.
- Dry the chicken thoroughly: Remove the drumsticks from their packaging and pat them completely dry with paper towels. This is absolutely crucial – any moisture on the surface will create steam instead of crispy skin. Pat them dry, then pat them again. Really get in there! Set the dried drumsticks aside.
- Mix the seasoning blend: In a small bowl, combine the baking powder, paprika, garlic powder, onion powder, salt, black pepper, and cayenne pepper (if using). Mix thoroughly with a fork or small whisk until everything is evenly distributed. The baking powder is your secret weapon for crispy skin, so don’t skip it!
- Coat the chicken: Place the dried drumsticks in a large mixing bowl. Drizzle the olive oil or melted butter over them, then use your hands to massage the oil into the chicken, coating each piece evenly. Sprinkle the seasoning mixture over the drumsticks, then toss and rub to ensure every surface is well-coated. Get messy – your hands work better than any utensil for this step!
- Arrange on the baking sheet: Place the seasoned drumsticks on the prepared baking sheet (on the wire rack if using). Space them out so they’re not touching – proper air circulation is key to crispy skin. If they’re crowded, use two baking sheets. Arrange them with the meatier end down if possible.
- Bake until golden and crispy: Place the baking sheet on the middle rack of your preheated oven. Bake for 40-45 minutes without opening the oven door. The chicken is done when the skin is deep golden brown and crispy, and an instant-read thermometer inserted into the thickest part (without touching bone) registers 175-180°F. Drumsticks can handle slightly higher temps than breasts and will be more tender at 180°F.
- Optional crisping step: If you want even crispier skin, turn your broiler to high for the final 2-3 minutes of cooking. Watch carefully to prevent burning – you want deep golden brown, not black! This step creates restaurant-quality crispy skin.
- Rest before serving: Remove the chicken from the oven and let it rest for 5 minutes. This allows the juices to redistribute, ensuring tender, juicy meat. The skin will actually get slightly crispier as it rests.
- Garnish and serve: Transfer the drumsticks to a serving platter. Garnish with fresh chopped parsley if desired, and serve with lemon wedges on the side for squeezing over the chicken. Serve hot and enjoy!
Notes
- Size matters: Try to select drumsticks that are similar in size so they cook evenly. If you have a few larger ones, position them toward the center of the pan where heat is most intense.
- Baking powder vs. baking soda: Make absolutely sure you’re using baking powder, NOT baking soda. They’re different! Baking soda will make your chicken taste soapy and unpleasant.
- Don’t skip drying: This is the #1 mistake people make. Wet chicken = soggy skin. Dry chicken = crispy skin. It’s that simple!
- Temperature accuracy: Every oven is different. Use an instant-read thermometer for perfect results. Dark meat is safe at 165°F but more tender and juicy at 175-180°F.
- Rack vs. no rack: Using a wire rack elevates the chicken, allowing hot air to circulate all around for crispier skin. Without a rack, you’ll need to flip the drumsticks halfway through cooking.
- Scaling up: This recipe doubles or triples easily. Just make sure not to crowd the pan – use multiple baking sheets if needed.
- Prep Time: 10 minutes
- Cook Time: 40-45 minutes
- Category: Dinner
- Method: Baking
- Cuisine: American
Nutrition
- Serving Size: 2 drumsticks (approximately)
- Calories: 285
- Sugar: 0g
- Sodium: 520mg
- Fat: 18g
- Saturated Fat: 4g
- Unsaturated Fat: 12g
- Trans Fat: 0g
- Carbohydrates: 1g
- Fiber: 0g
- Protein: 28g
- Cholesterol: 115mg
Tips & Variations
Spicy Buffalo Style: Toss the baked drumsticks in melted butter mixed with hot sauce (Frank’s RedHot works great) immediately after they come out of the oven. Serve with ranch or blue cheese dressing and celery sticks for authentic buffalo wing vibes.
BBQ Glazed: Brush your favorite barbecue sauce on the drumsticks during the last 10 minutes of baking. The sauce will caramelize into a sticky, delicious coating. Just watch carefully to prevent burning.
Honey Garlic: Mix together honey, soy sauce, minced garlic, and a splash of rice vinegar. Brush on during the last 15 minutes of cooking, applying multiple coats for a gorgeous glaze.
Lemon Herb: Add dried thyme, rosemary, and oregano to your spice mix, and finish with fresh lemon juice and zest after baking. Light, bright, and perfect for spring and summer.
Asian-Inspired: Use a blend of garlic powder, ground ginger, five-spice powder, and a touch of sesame oil. Garnish with sliced green onions and sesame seeds.
Ranch Seasoned: Mix in a packet of ranch seasoning mix (or homemade ranch spices) with the baking powder for kid-friendly flavor that everyone loves.
Cajun Spiced: Swap the regular paprika for Cajun seasoning or create your own blend with extra cayenne, oregano, and thyme for Southern flair.
Skin-off option: While I love the crispy skin, you can absolutely make this recipe with skinless drumsticks if you prefer. Reduce the baking powder to 1 teaspoon and expect slightly less crispy results. They’ll still be juicy and delicious!
Air fryer adaptation: Cook at 380°F for 20-25 minutes, flipping halfway through. Perfect for smaller batches or when you don’t want to heat up the whole oven.
Pro Chef Tips
The dry brine technique: For even juicier, more flavorful chicken, salt your drumsticks and refrigerate them uncovered on a wire rack overnight. This dry-brining process seasons the meat deeply and dries out the skin for extra crispiness. Just reduce the salt in the seasoning blend since the chicken will already be salted.
Room temperature chicken: Take your drumsticks out of the refrigerator 20-30 minutes before cooking. Room temperature chicken cooks more evenly and develops better browning. Cold chicken dropped into a hot oven tends to cook unevenly.
Double-coating method: For ultimate crispy skin, apply your seasoning in two stages. First coat with half the mixture, let it sit for 10 minutes, then apply the rest. This creates a more substantial crust.
Proper spacing matters: Think of it like this – if the drumsticks can’t see each other, they’ll get crispier. Crowding creates steam, and steam is the enemy of crispy skin. Give each piece its personal space!
Score thick skin: If your drumsticks have particularly thick patches of skin or fat, use a sharp knife to make a few shallow slashes. This helps the fat render out and the skin crisp up more effectively.
The bone tells you it’s done: When the chicken is fully cooked, you’ll notice the meat has pulled back from the bone slightly at the narrow end. This visual cue, combined with a thermometer reading, gives you confidence.
Save those drippings: The flavorful juices and crispy bits left on the pan make an incredible base for gravy. Don’t let them go to waste – deglaze with chicken broth and create a quick pan sauce.
Resting is mandatory: Those 5 minutes of resting aren’t optional. Cutting into chicken immediately causes all the juices to run out onto the plate. Resting allows the proteins to relax and reabsorb moisture, ensuring juicy meat.
Common Mistakes to Avoid
Using wet chicken: This is the number one mistake! If you skip the drying step, you’ll end up with rubbery, steamed skin instead of crispy, golden perfection. Take the extra minute to really pat those drumsticks dry with paper towels – it makes all the difference.
Overcrowding the pan: When drumsticks touch each other or are too close together, they steam instead of roast. This results in soggy skin and uneven cooking. Always arrange them with at least an inch of space between pieces, and use two pans if necessary.
Cooking at too low a temperature: Lower temperatures won’t render the fat from the skin properly, leaving you with flabby, rubbery skin. The 425°F temperature is specifically chosen to crisp the skin while keeping the meat juicy. Don’t be tempted to lower it.
Opening the oven door repeatedly: Every time you open that oven door, the temperature drops significantly and you release the hot, dry air that’s crisping up your chicken. Resist the urge to check constantly – set a timer and trust the process.
Skipping the baking powder: I know it seems like a weird ingredient for chicken, but this is your crispy-skin insurance policy. Without it, you’ll get decent chicken but not that restaurant-quality crunch. Don’t skip it!
Not using a thermometer: Guessing when chicken is done is risky – undercooked chicken is unsafe, and overcooked chicken is dry and disappointing. An instant-read thermometer takes the guesswork out completely and costs less than $15. It’s a game-changer.
Forgetting to rest: Cutting into the chicken immediately causes juice loss, resulting in drier meat. Those few minutes of patience yield significantly juicier results. Use that time to get side dishes on the table.
Storage & Meal Prep
Refrigerator storage: Let the drumsticks cool to room temperature (within 2 hours of cooking for food safety), then transfer them to an airtight container or wrap them tightly in aluminum foil. They’ll keep in the refrigerator for 3-4 days. Pro tip: Store them on a paper towel-lined plate to absorb any moisture and help maintain some crispness.
Reheating for crispy skin: The microwave will make your crispy skin soggy – avoid it if possible! The best reheating method is in a 375°F oven for 10-15 minutes until heated through. Place them on a wire rack over a baking sheet for even heat circulation. For even quicker reheating, use an air fryer at 350°F for 5-7 minutes.
Cold chicken is delicious too: Don’t overlook the appeal of cold drumsticks! They’re fantastic straight from the fridge for lunches, picnics, or snacks. Many people actually prefer cold fried or baked chicken – the flavors have had time to meld and develop.
Meal prep strategy: These drumsticks are meal prep gold. Bake a double batch on Sunday, and you’ve got protein ready for salads, lunch boxes, quick dinners, and snacks all week long. They’re portable, portion-controlled, and kid-friendly.
Stripping the meat: If you want to use the meat in other dishes (tacos, salads, pasta, wraps), let the drumsticks cool slightly, then pull the meat off the bones. Store the shredded meat separately in an airtight container for up to 4 days. This is perfect for quick meal assembly.
Food safety reminder: Never leave cooked chicken at room temperature for more than 2 hours (1 hour if the temperature is above 90°F). Get those leftovers refrigerated promptly to prevent bacterial growth.
Make-Ahead & Freezer Notes
Advance seasoning: You can season the drumsticks up to 24 hours in advance. In fact, this improves flavor! Pat them dry, apply the seasoning, then refrigerate uncovered on a wire rack over a baking sheet. The uncovered refrigeration further dries the skin for extra crispiness. Just bring to room temperature before baking.
Freezing raw seasoned chicken: Season the drumsticks completely, then freeze them in a single layer on a baking sheet until solid. Transfer to a freezer bag, removing as much air as possible. They’ll keep for up to 3 months. Thaw overnight in the refrigerator before baking as directed. This is perfect for having seasoned chicken ready to go anytime.
Freezing cooked drumsticks: Let them cool completely, then wrap individually in plastic wrap or aluminum foil. Place wrapped drumsticks in a freezer-safe container or bag. They’ll maintain quality for up to 3 months. This is excellent for meal prep – just pull out what you need.
Thawing frozen cooked chicken: The safest method is thawing overnight in the refrigerator. For quicker thawing, place the wrapped drumsticks in a sealed bag and submerge in cold water, changing the water every 30 minutes. Never thaw at room temperature.
Reheating from frozen: You can reheat frozen cooked drumsticks directly from the freezer. Place them on a baking sheet and heat at 350°F for 25-30 minutes until heated through. The skin won’t be quite as crispy as fresh, but it’s still delicious. An air fryer also works great – 380°F for 15-20 minutes.
Batch cooking strategy: Make this recipe in large batches when drumsticks go on sale. Freeze meal-sized portions, and you’ve got easy dinners ready whenever you need them. Label bags with the date and cooking instructions for foolproof meal planning.
Serving Suggestions
Baked chicken drumsticks are wonderfully versatile and pair beautifully with countless side dishes and accompaniments.
Classic comfort sides:
- Creamy mashed potatoes or garlic mashed potatoes
- Mac and cheese (homemade or the good boxed stuff)
- Buttered corn on the cob
- Fluffy buttermilk biscuits or cornbread
- Coleslaw (creamy or vinegar-based)
- Baked beans (a backyard barbecue essential)
Healthier vegetable sides:
- Roasted Brussels sprouts with bacon
- Garlic green beans or haricots verts
- Roasted sweet potatoes or butternut squash
- Grilled or roasted asparagus
- Sautéed spinach or kale with garlic
- Roasted broccoli or cauliflower
Fresh salads:
- Classic Caesar salad
- Garden salad with ranch dressing
- Cucumber and tomato salad
- Coleslaw with a tangy vinaigrette
- Arugula salad with lemon and Parmesan
Starchy favorites:
- Creamy risotto or rice pilaf
- Buttery egg noodles
- Baked potatoes loaded with toppings
- French fries or potato wedges
- Dinner rolls or garlic bread
Dipping sauces to serve alongside:
- Ranch dressing (the ultimate chicken companion)
- Honey mustard
- BBQ sauce (various styles – try Kansas City, Carolina, or Texas)
- Buffalo sauce with blue cheese dressing
- Garlic aioli or chipotle mayo
- Sweet chili sauce for Asian-inspired flavors
Complete meal ideas:
- Game day spread: Serve drumsticks with fries, onion rings, various dipping sauces, and cold beer
- Family dinner: Pair with mashed potatoes, gravy, green beans, and biscuits
- Summer picnic: Pack with coleslaw, potato salad, watermelon, and lemonade
- Meal prep bowls: Slice the meat off and serve over rice with roasted vegetables
FAQs Section
How do I know when the chicken drumsticks are done?
The most reliable way is using an instant-read thermometer inserted into the thickest part of the drumstick without touching the bone. Drumsticks are safe at 165°F but are actually more tender and juicy at 175-180°F since they’re dark meat. Visually, the juices should run clear (not pink), the meat should pull away slightly from the bone, and the skin should be deep golden brown and crispy.
Can I make this recipe without baking powder?
You can, but your skin won’t be nearly as crispy. The baking powder is what makes this recipe special – it raises the pH of the chicken skin, allowing it to brown better and become extra crispy. If you absolutely can’t use it, increase the oven temperature to 450°F and expect less crispy results. The chicken will still taste good, just without that restaurant-quality crunch.
Do I need to flip the drumsticks halfway through?
If you’re using a wire rack, flipping isn’t necessary – the elevated position allows hot air to circulate all around for even cooking and crisping. Without a rack, I recommend flipping them once halfway through (around the 20-minute mark) to ensure even browning on all sides. Use tongs to flip gently to avoid knocking off the seasoning.
Can I use this recipe for other chicken pieces?
Absolutely! This technique works beautifully for wings, thighs, and even bone-in, skin-on breasts. Adjust cooking times: wings take 35-40 minutes, thighs take 40-45 minutes (same as drumsticks), and breasts take 45-50 minutes. Always verify doneness with a thermometer rather than relying solely on time.
Why is my chicken skin not crispy?
The most common culprit is moisture. Make sure you’re thoroughly patting the chicken dry before seasoning. Also check that you’re not overcrowding the pan, using a high enough temperature (425°F), and avoiding opening the oven door repeatedly. The baking powder is also crucial for crispy skin – don’t skip it! Finally, make sure your oven is fully preheated before the chicken goes in.
Can I marinate the drumsticks before baking?
While you can marinate chicken before baking, wet marinades create moisture that prevents crispy skin. For the crispiest results, stick with a dry rub (like this recipe). If you want to marinate for flavor, do so for 2-4 hours, then pat the chicken completely dry and apply the dry seasoning mixture before baking. The drying step is crucial.
Is it better to bake at a higher or lower temperature?
For crispy-skinned baked chicken drumsticks, 425°F is the sweet spot. Lower temperatures (like 350°F) take longer and produce rubbery skin because the fat doesn’t render properly. Higher temperatures (450°F+) can cause the outside to burn before the inside is fully cooked. The 425°F temperature achieves the perfect balance of crispy exterior and juicy interior in a reasonable timeframe.
Conclusion
And there you have it – everything you need to make absolutely perfect, crispy baked chicken drumsticks in your own oven! This recipe takes an affordable, family-friendly cut of chicken and transforms it into something truly special. No fancy equipment, no complicated techniques, just straightforward steps that deliver incredible results every single time.
The beauty of these easy oven baked chicken legs is that they work for absolutely any occasion. Pack them for lunch, serve them for Sunday dinner, bring them to a potluck, or make them for meal prep – they’re always a hit. And once you master this basic technique, you can customize the flavors endlessly to suit your family’s preferences or whatever cuisine you’re craving.
Remember the key points: dry that chicken really well, don’t skip the baking powder, give the drumsticks space on the pan, and resist opening the oven door! Follow these simple rules, and you’ll have restaurant-quality crispy chicken that makes everyone think you’re a culinary genius.
Now it’s your turn to get cooking! I’d absolutely love to hear how your baked chicken drumsticks turn out. Did you try any of the flavor variations? What did you serve alongside them? Drop a comment below and let me know! And if this recipe becomes a favorite in your house (I’m betting it will), please share it with your friends and save it to your Pinterest boards. Your fellow home cooks will thank you!
Happy cooking, and enjoy every crispy, juicy bite! 🍗