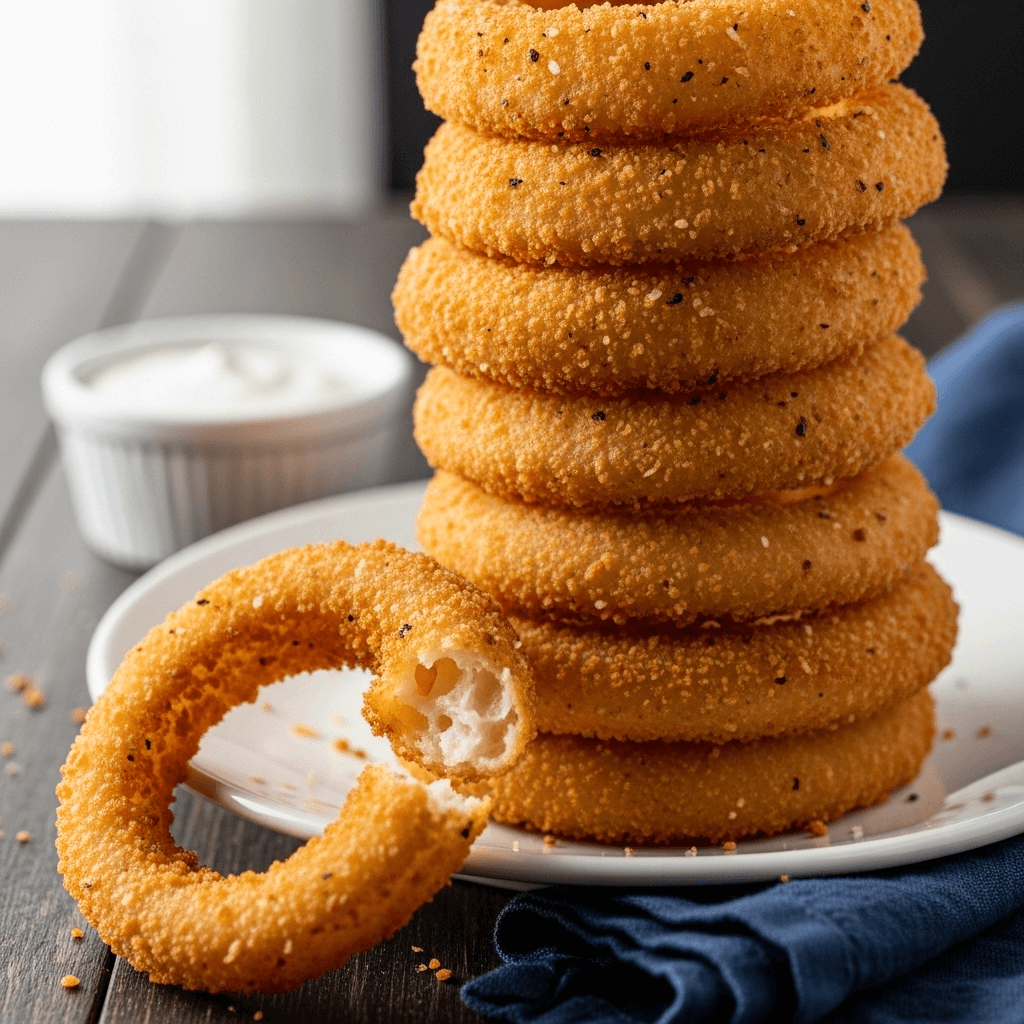

Is there anything more satisfying than biting into a perfectly crispy onion ring with that signature crunch followed by sweet, tender onion inside? Homemade crispy onion rings are one of those iconic American treats that bring pure joy to any meal – whether you’re serving them as a game day snack, alongside burgers at a backyard BBQ, or as the star appetizer at your next family dinner.
These golden, crunchy onion rings are lightyears better than anything you’ll find in the freezer aisle or even at most restaurants. The secret? A perfectly seasoned double coating technique and the right frying temperature that creates that irresistible crispy exterior while keeping the onion tender and sweet inside. Once you taste homemade onion rings, you’ll never want the store-bought version again.
This easy onion rings recipe is surprisingly simple to make at home, even if you’ve never deep-fried anything before. With just a few basic ingredients and some straightforward techniques, you’ll be serving up restaurant-quality crispy fried onion rings that’ll have everyone reaching for seconds (and thirds!). They’re perfect for game day parties, summer cookouts, family dinners, or anytime you’re craving something indulgent and absolutely delicious. Let’s get frying!
History / Background
Onion rings, while feeling quintessentially American today, have a somewhat murky origin story that food historians continue to debate. The concept of frying battered vegetables has ancient roots – tempura from Japan and pakoras from India both involve coating vegetables in batter and deep-frying them. However, the onion ring as we know it – thick-cut rings of onion coated in seasoned batter and fried to golden perfection – appears to be an American innovation.
The earliest known recipe for something resembling modern onion rings appeared in an 1802 English cookbook called “The Art of Cookery Made Easy and Refined” by John Mollard, which included instructions for “Fried Onions with Parmesan Cheese.” However, these weren’t quite the onion rings we know today – they were more like onion fritters.
The first documented American onion ring recipe appeared in a 1933 Crisco advertisement in The New York Times Magazine, suggesting they were becoming popular during the Depression era as an affordable and filling side dish. Around the same time, the Pig Stand restaurant chain in Texas claims to have invented onion rings in the 1920s, though this claim is disputed.
What’s certain is that onion rings exploded in popularity in the post-World War II era, particularly in the 1960s and 1970s, when drive-in restaurants and fast-food chains began featuring them prominently on menus. A&W, Burger King, and other chains made onion rings a staple of American fast food culture. The rise of frozen onion rings in grocery stores in the 1960s made them accessible to home cooks, though these never quite matched the appeal of fresh, made-to-order rings.
Regional variations emerged across America. Some Southern restaurants preferred a buttermilk-based batter, while others used beer batter for extra crispiness. Texas-style onion rings are often massive “bloomin’ onion” creations, while classic diner-style rings are simpler and more straightforward. The Vidalia onion rings from Georgia, made with sweet Vidalia onions, became particularly famous.
Today, onion rings remain a beloved American comfort food, served everywhere from casual diners to upscale gastropubs. They’ve become synonymous with American dining culture – the perfect accompaniment to burgers, hot dogs, and BBQ. Making them at home connects us to this rich tradition of American comfort food while allowing us to control the quality and create something truly special.
Why You’ll Love This Recipe
This isn’t just another onion ring recipe – it’s been perfected through countless batches to create the absolute best homemade onion rings you’ve ever tasted. The double-dredging technique ensures an extra-thick, super crunchy coating that stays crispy even as the rings cool, and the seasoning blend adds incredible flavor that makes these addictively delicious.
Here’s why these crispy onion rings will become your new favorite:
- Restaurant-quality crunch – That satisfying shattering crust that gives way to sweet, tender onion is absolutely perfection
- Incredibly flavorful coating – Seasoned with the perfect blend of spices that enhance rather than overpower the onion’s natural sweetness
- Double-coating method – Creates an extra-thick, crispy crust that stays crunchy longer than single-battered rings
- Easier than you think – No special equipment needed, and the technique is straightforward even for frying beginners
- Budget-friendly indulgence – Makes restaurant-quality appetizers for a fraction of the cost
- Customizable seasoning – Easy to adjust the spices to your taste or add heat for spicy onion rings
- Perfect for entertaining – Always the first appetizer to disappear at parties and gatherings
- Kid-approved – Even picky eaters love these golden, crunchy rings
- Versatile serving – Works as an appetizer, side dish, or burger topping
- Better than frozen – Once you taste homemade, you’ll never buy frozen onion rings again
- Fun to make – There’s something really satisfying about creating these crispy beauties from scratch
Ingredient Notes
The beauty of onion rings lies in their simplicity – just a handful of ingredients transform into something extraordinary. Here’s what you need to know about each component:
Large Yellow or Sweet Onions – The star of the show! Yellow onions are traditional and have a nice balance of sweetness and sharpness. Sweet onions like Vidalia or Walla Walla create milder, sweeter rings that are absolutely delicious. You want large onions (at least 3-4 inches in diameter) so you get nice, substantial rings. Avoid red onions as they’re too sharp and don’t have the right texture when cooked. You’ll need 2-3 large onions for this recipe.
All-Purpose Flour – Forms the base of both the dry dredge and the wet batter. It creates structure and helps the coating adhere to the onions. For gluten-free onion rings, use a 1:1 gluten-free flour blend.
Buttermilk – The secret ingredient for tender coating and amazing flavor! The acidity tenderizes the batter and adds a subtle tang that complements the sweet onion perfectly. It also helps the coating stick better. No buttermilk? Make your own by adding 1 tablespoon white vinegar or lemon juice to 1 cup of regular milk and letting it sit for 5 minutes.
Eggs – Bind the batter together and help create that golden color when fried. They also add richness and help the coating adhere.
Cornstarch – This is a key ingredient for extra crispiness! Cornstarch creates a lighter, crunchier texture than flour alone. The combination of flour and cornstarch gives you that perfect shatter-crisp coating.
Baking Powder – Creates tiny air pockets in the batter that make it lighter and crispier. It’s a crucial ingredient for that restaurant-style texture.
Seasonings – This recipe uses garlic powder, onion powder, paprika, cayenne pepper (optional), salt, and black pepper. These create layers of flavor in the coating that make these onion rings truly irresistible. You can adjust amounts to taste or add your favorite seasonings.
Vegetable Oil (for frying) – You need an oil with a high smoke point for deep frying. Vegetable, canola, or peanut oil all work perfectly. You’ll need about 6-8 cups depending on your pot size. The oil needs to reach 375°F for perfect frying.
Equipment Needed
Having the right tools makes frying onion rings much easier and safer. Here’s what you’ll need:
- Large heavy-bottomed pot or Dutch oven – For deep frying. You need something at least 4-5 quarts that can safely hold oil. Cast iron or enameled cast iron works beautifully because they maintain temperature well.
- Deep-fry or candy thermometer – Essential for monitoring oil temperature. Proper temperature is crucial for crispy (not greasy) onion rings.
- Three shallow bowls or pie plates – For your dredging station (flour, buttermilk mixture, and seasoned flour/cornstarch mixture)
- Sharp knife – For slicing onions into rings
- Cutting board – For onion prep
- Whisk or fork – For mixing the batter
- Wire rack set over a baking sheet – For draining the fried onion rings. Paper towels work but a rack is better as it allows air circulation.
- Slotted spoon or spider strainer – For safely removing onion rings from hot oil
- Tongs – For handling onions during the coating process
- Paper towels – For draining excess oil
Nice to have but optional:
- Kitchen timer
- Splatter screen for safer frying
- Second wire rack for holding coated rings before frying
Crispy Onion Rings Recipe
- Total Time: 40 minutes
- Yield: 4-6 servings 1x
- Diet: Vegetarian
Description
These crispy homemade onion rings feature a perfectly seasoned double coating that creates an irresistibly crunchy exterior and tender, sweet onion inside. Restaurant-quality results that are surprisingly easy to make at home!
Ingredients
For the Onions:
- 2–3 large yellow or sweet onions
- Vegetable oil for frying (6-8 cups)
For the Dredging Station:
- 1½ cups all-purpose flour (divided)
- ½ cup cornstarch
- 1 cup buttermilk
- 2 large eggs
- 1 tablespoon water
For the Seasoning Mix:
- 2 teaspoons garlic powder
- 2 teaspoons onion powder
- 1½ teaspoons paprika
- 1 teaspoon salt
- ¾ teaspoon black pepper
- ½ teaspoon cayenne pepper (optional, for heat)
- 1 teaspoon baking powder
For Serving:
- Ranch dressing, ketchup, or your favorite dipping sauce
Instructions
Step 1: Prepare the Onions
Peel the onions and slice them into ½-inch thick rounds. Separate the rounds into individual rings, discarding the very small center rings (save these for another use or fry them as “bonus bites”). Pat the rings dry with paper towels – removing excess moisture is important for coating adhesion. Set aside on a clean kitchen towel or paper towels.
Step 2: Set Up Your Dredging Station
Place three shallow bowls or pie plates in a row on your workspace. In the first bowl, add ½ cup of flour. In the second bowl, whisk together buttermilk, eggs, and water until smooth. In the third bowl, combine the remaining 1 cup flour, cornstarch, all the seasonings (garlic powder, onion powder, paprika, salt, pepper, cayenne if using), and baking powder. Whisk thoroughly to distribute the spices evenly.
Step 3: Heat the Oil
Pour oil into your large, heavy-bottomed pot or Dutch oven to a depth of 3-4 inches (the pot should be no more than halfway full for safety). Heat over medium-high heat until a deep-fry thermometer reads 375°F. This will take about 10-15 minutes. While the oil heats, you can start coating your onion rings.
Step 4: Double-Coat the Onion Rings
Working with 4-5 onion rings at a time, first dredge them in the plain flour (bowl #1), shaking off excess. Next, dip into the buttermilk mixture (bowl #2), letting excess drip off. Finally, coat thoroughly in the seasoned flour-cornstarch mixture (bowl #3), pressing gently to ensure it adheres well. Place coated rings on a wire rack or clean plate. Repeat until all rings are coated. This double-coating creates that extra-crispy texture!
Step 5: Fry in Batches
Once oil reaches 375°F, carefully add 4-6 onion rings to the hot oil using tongs or a slotted spoon (don’t overcrowd the pot). Fry for 2-3 minutes, flip with a slotted spoon or spider strainer, and fry for another 2-3 minutes until deep golden brown on both sides. The coating should look crispy and the onions should be tender inside.
Step 6: Drain and Season
Use a slotted spoon to carefully remove the onion rings from the oil, letting excess oil drip off. Transfer to a wire rack set over a baking sheet (or paper towels). While still hot, sprinkle with a pinch of salt. The salt sticks best when the rings are fresh from the oil.
Step 7: Maintain Oil Temperature & Repeat
Between batches, let the oil return to 375°F before adding more rings. This is crucial – if the oil is too cool, the onion rings will absorb oil and become greasy instead of crispy. Continue frying all the rings in batches.
Step 8: Serve Immediately
Onion rings are best served hot and fresh from the fryer! Pile them on a serving platter with your favorite dipping sauces and enjoy immediately while they’re at peak crispiness.
Notes
- Oil temperature is critical: Too hot (over 385°F) and the coating burns before the onion cooks. Too cool (under 360°F) and rings absorb oil and get soggy. Maintain 375°F for perfect results.
- Don’t overcrowd: Frying too many rings at once drops the oil temperature and creates soggy, greasy rings. Patience with batches pays off!
- Work in assembly-line fashion: Coat all rings before you start frying so you can fry continuously without stopping.
- Double coating is key: The plain flour layer helps the wet batter stick better, creating a thicker, crunchier coating.
- Serve immediately: Onion rings are at their best straight from the fryer. They lose crispiness as they cool and sit.
- Adjust seasoning: Taste your coating mixture before using – you can always add more spices to suit your preference.
- Prep Time: 20 minutes
- Cook Time: 20 minutes
- Category: Appetizer
- Method: Deep Frying
- Cuisine: American
Nutrition
- Serving Size: About 6-8 onion rings
- Calories: 285
- Sugar: 5g
- Sodium: 425mg
- Fat: 14g
- Saturated Fat: 2g
- Unsaturated Fat: 11g
- Trans Fat: 0g
- Carbohydrates: 35g
- Fiber: 2g
- Protein: 6g
- Cholesterol: 65mg
Tips & Variations
Flavor Variations:
- Spicy Onion Rings: Increase cayenne to 1 teaspoon, add ½ teaspoon chili powder, or mix hot sauce into the buttermilk
- Beer-Battered Onion Rings: Replace buttermilk with cold beer for a lighter, airier batter with more flavor
- Panko-Crusted: Add 1 cup panko breadcrumbs to your final coating for extra crunch
- Ranch Onion Rings: Mix 2 tablespoons ranch seasoning mix into the coating
- Cajun Style: Use Cajun seasoning in place of the individual spices
- Parmesan Onion Rings: Add ¼ cup grated Parmesan cheese to the final coating mixture
Onion Variations:
- Sweet Vidalia Rings: Use Vidalia onions for the sweetest, mildest flavor
- Red Onion Rings: More pungent and colorful, though stronger in flavor
- Mix of Sizes: Use various sized onions for visual interest and texture variety
Coating Options:
- Gluten-Free: Use gluten-free flour blend (1:1 substitution) and ensure your seasonings are certified gluten-free
- Lighter Version: Use an egg white wash and reduce the double coating to single for fewer calories
- Extra Crispy: Add ¼ cup cornmeal to the final coating for additional crunch
Baking Option (Healthier):
While not quite as crispy as fried, you can bake onion rings at 425°F for 20-25 minutes, flipping halfway. Spray coated rings generously with cooking spray before and after flipping. They won’t be as crunchy but are still delicious!
Dipping Sauce Ideas:
- Classic ketchup
- Ranch dressing
- Chipotle mayo or aioli
- BBQ sauce
- Honey mustard
- Comeback sauce
- Blue cheese dressing
- Sriracha mayo
Pro Chef Tips
Tip #1: Slice onions uniformly for even cooking – Use a sharp knife and aim for consistent ½-inch thickness. Rings that are too thin will overcook and burn before the coating crisps; rings that are too thick won’t cook through properly. Uniform slicing ensures everything cooks evenly and at the same rate.
Tip #2: Freeze the coated rings briefly before frying – This is a restaurant secret! After coating all your onion rings, place them on a baking sheet and freeze for 15-20 minutes before frying. The cold coating sets up and adheres better, preventing it from sliding off during frying. It also helps the coating crisp up faster before the onion overcooks. This extra step makes a noticeable difference in the final product.
Tip #3: Use a thermometer and maintain temperature – This cannot be stressed enough. Oil temperature is the single most important factor in crispy, non-greasy fried foods. Invest in a good deep-fry or candy thermometer and watch it like a hawk. The oil will drop when you add cold onion rings, which is normal, but let it recover to 375°F between batches. Professional chefs are religious about this because it makes all the difference.
Tip #4: Season the coating generously – Your seasoning gets diluted once mixed with flour and spread over many onion rings. Don’t be shy with spices – the coating should taste slightly over-seasoned on its own because it will mellow once it’s coating the onions and fried. Always taste your coating mixture and adjust before you start dredging.
Tip #5: Press the coating firmly – After dredging in the final seasoned flour mixture, press gently but firmly all over each ring to ensure the coating really adheres. This prevents bare spots and coating that falls off during frying. Think of it like you’re making the coating hug the onion ring.
Tip #6: Don’t disturb rings while frying – Once you add onion rings to the hot oil, resist the urge to move them around constantly. Let them sit undisturbed for at least 1.5-2 minutes before flipping. This allows the coating to set and crisp properly. Constant stirring can knock the coating off before it has a chance to set.
Tip #7: Drain on a rack, not paper towels – Wire racks allow air to circulate all around the onion rings, keeping both sides crispy. Paper towels trap steam underneath, which makes the bottom soggy. If you must use paper towels, stand rings on their side rather than laying them flat.
Tip #8: Keep finished rings warm in a low oven – If making multiple batches for a party, place fried rings on a wire rack set over a baking sheet in a 200°F oven. They’ll stay warm and crispy while you finish frying. Don’t cover them or stack them, as this creates steam and sogginess.
Tip #9: Filter and reuse the oil – Once cooled completely, strain the oil through a fine-mesh strainer or cheesecloth to remove any coating bits. Store in an airtight container in a cool, dark place. You can reuse it 2-3 times for frying (but don’t mix different food oils – keep onion ring oil for vegetables only).
Tip #10: Season immediately after frying – Salt and any additional seasonings should be applied the moment rings come out of the oil while they’re still glistening. The residual oil helps seasoning stick. Once they cool and dry, seasonings just bounce off.
Common Mistakes to Avoid
Mistake #1: Not drying the onions before coating – Wet onions prevent the coating from adhering properly, leading to bare patches and coating that slides right off during frying. Solution: After slicing onions into rings, pat them completely dry with paper towels or a clean kitchen towel. You can even let them air-dry on a towel for 10-15 minutes. The drier the onions, the better the coating sticks. This simple step makes an enormous difference in the final product.
Mistake #2: Frying at the wrong temperature – This is the #1 reason for greasy, soggy onion rings. Too-low oil temperature means the coating absorbs oil instead of crisping up; too-high temperature burns the coating before the onion cooks through. Solution: Invest in a deep-fry thermometer and maintain a steady 375°F. The oil will drop 25-50 degrees when you add cold onion rings (this is normal), but it should recover quickly. Wait for it to return to 375°F before adding the next batch. Don’t guess – always use a thermometer.
Mistake #3: Overcrowding the pot – Adding too many rings at once dramatically drops the oil temperature, and the rings steam instead of fry, resulting in a pale, soggy, greasy coating. Solution: Fry in small batches of 4-6 rings, leaving plenty of space between each ring. Yes, this takes more time, but the result is perfectly crispy rings. Think of it as an investment in deliciousness. Professional kitchens always fry in small batches for this exact reason.
Mistake #4: Skipping the double coating – A single coating of batter creates thin, less crispy onion rings that don’t have that restaurant-quality crunch. Solution: Always do the double dredge: plain flour, wet batter, then seasoned flour mixture. That initial flour coating creates a base layer that helps the wet mixture adhere better, and the final coating becomes extra thick and crunchy when fried. This technique is what separates mediocre onion rings from exceptional ones.
Mistake #5: Using onions that are too small or thin – Tiny rings or paper-thin slices cook too fast and burn before achieving good color, or they become too crispy and lose the sweet onion flavor. Solution: Use large onions (at least 3-4 inches in diameter) and slice them a full ½-inch thick. Thicker rings ensure you get tender, sweet onion inside that crispy coating. Discard or save the tiny center rings for another use – they’re too small to fry well.
Mistake #6: Not letting oil drain properly – Pulling onion rings straight from the oil onto a serving plate creates a pool of grease underneath and soggy bottoms. Solution: Always drain fried rings on a wire rack set over a baking sheet, never directly on a plate. The rack allows air circulation on all sides, keeping both top and bottom crispy. Let them drain for at least 30 seconds before transferring to a serving platter.
Storage & Meal Prep
Immediate Consumption (Best Option):
Let’s be honest – onion rings are absolutely at their best served hot and fresh from the fryer. The coating is at peak crispiness, the onion is perfectly tender, and everything is warm and delicious. If you’re making these for a party or gathering, try to time your frying so they’re served within 5-10 minutes of coming out of the oil.
Short-Term Storage (Same Day):
If you have leftover onion rings (though this rarely happens!), let them cool completely to room temperature on a wire rack. Store in an airtight container lined with paper towels (to absorb any moisture) for up to 2 hours at room temperature, or up to 4 hours in the refrigerator. Be aware that refrigeration will soften the coating significantly.
Reheating Leftover Onion Rings:
Forget the microwave – it will turn them into soggy disappointments. Instead:
Oven Method (Best): Preheat oven to 400°F. Place onion rings in a single layer on a wire rack set over a baking sheet. Bake for 5-8 minutes until heated through and the coating crisps up again. They won’t be quite as crispy as fresh, but this method comes closest.
Air Fryer Method (Excellent): Preheat air fryer to 375°F. Place onion rings in a single layer (don’t stack). Air fry for 3-4 minutes, shaking the basket halfway through. This method works remarkably well for reviving leftover onion rings.
Toaster Oven: Similar to oven method – use 400°F for 5-7 minutes on a rack.
Do Not Use: Microwave (makes them soggy), stovetop reheating (uneven heating), or leaving them covered (traps steam and ruins crispiness).
Realistic Expectations:
While these reheating methods help, it’s important to set realistic expectations – reheated fried foods will never be quite as crispy as fresh. The coating loses some of its shattering crunch and the onion can become slightly softer. This is why serving fresh is always preferred when possible.
Make-Ahead & Freezer Notes
Prep-Ahead Options:
Slice onions ahead: Cut onions into rings up to 24 hours in advance. Store in an airtight container in the refrigerator. Pat dry thoroughly before coating.
Mix dry ingredients: Combine all your seasoned flour mixture up to 1 week in advance. Store in an airtight container at room temperature. Whisk again before using.
Coat and freeze (Recommended):
This is the best make-ahead method! Coat all your onion rings following the double-dredging process, then arrange them in a single layer on a parchment-lined baking sheet. Freeze until solid (about 2 hours), then transfer to freezer bags or containers. Freeze for up to 2 months. When ready to cook, fry directly from frozen – don’t thaw! Add an extra 1-2 minutes to the frying time. The coating stays beautifully intact and they fry up almost as crispy as fresh.
Freezing Cooked Onion Rings (Not Ideal):
You can freeze cooked onion rings, but they won’t be as crispy when reheated. Let them cool completely, then freeze in a single layer on a baking sheet. Once frozen, transfer to freezer bags for up to 1 month. Reheat from frozen in a 400°F oven for 10-12 minutes or in an air fryer at 375°F for 5-7 minutes.
Why Freezing Raw Coated Rings Works Best:
Freezing the coated but uncooked rings actually improves them! The cold coating sets firmly onto the onion and the coating adheres even better during frying. Many restaurants use this technique for prep. It’s also incredibly convenient for entertaining – you can coat rings days ahead, then just pull them from the freezer and fry when guests arrive.
Party Prep Timeline:
- 1 week ahead: Make and store seasoned flour mixture
- 2-3 days ahead: Coat onion rings and freeze
- Day of party: Heat oil, fry frozen rings in batches, serve immediately
This strategy lets you be a relaxed host while still serving fresh, hot, crispy onion rings!
Serving Suggestions
Crispy onion rings are incredibly versatile and pair beautifully with so many dishes. Here are some delicious ways to serve them:
Classic Pairings:
- Burgers: The ultimate combination – pile onion rings on top of a juicy burger or serve alongside
- BBQ Platters: Serve with pulled pork, ribs, brisket, or smoked chicken
- Hot Dogs & Bratwurst: A classic American pairing for cookouts
- Sandwiches: Any sandwich becomes special with a side of onion rings
- Fried Chicken: Double the crispy goodness
- Fish & Chips: Swap or supplement fries with onion rings
Dipping Sauce Bar:
Create a sauce station with various options:
- Classic ketchup (the standard)
- Ranch dressing (most popular!)
- Chipotle mayo or sriracha aioli (spicy kick)
- BBQ sauce (sweet and tangy)
- Honey mustard (sweet-savory combo)
- Blue cheese or buttermilk dressing
- Comeback sauce (Southern favorite)
- Garlic aioli (elevated)
- Spicy remoulade
- Fry sauce (mayo + ketchup blend)
Complete Meal Ideas:
Game Day Spread: Onion rings, buffalo wings, nachos, loaded potato skins, beer
BBQ Cookout: Grilled burgers, onion rings, coleslaw, baked beans, corn on the cob, sweet tea
Diner-Style Dinner: Chicken fried steak, onion rings, mashed potatoes, gravy, green beans
Fish Fry: Beer-battered fish, onion rings, french fries, coleslaw, tartar sauce
Party Appetizer Platter: Onion rings, mozzarella sticks, jalapeño poppers, various dipping sauces
Beverage Pairings:
- Ice-cold beer (especially lagers or IPAs)
- Classic milkshakes (sweet and salty combo)
- Iced tea or lemonade
- Coca-Cola or root beer
- Craft sodas
As a Topping:
- Pile on burgers for extra crunch
- Top loaded fries or poutine
- Add to salads for texture contrast
- Crown a steak for “steakhouse style”
- Top mac and cheese for extra indulgence
Side Dish Companions:
- French fries (double the crispy goodness)
- Coleslaw (creamy contrast)
- Pickle spears (tangy complement)
- Corn on the cob
- Potato salad
- Mac and cheese
- Baked beans
FAQs Section
Q: Can I make onion rings in an air fryer?
A: Yes! Air fryer onion rings are a healthier alternative, though they won’t be quite as crispy as deep-fried. After coating your rings with the double-dredging method, spray them generously with cooking spray on all sides. Arrange in a single layer in your air fryer basket (don’t overlap). Air fry at 375°F for 10-12 minutes, flipping halfway through and spraying again with cooking spray after flipping. The coating won’t puff up quite as much and the texture will be crunchier rather than having that light, shattered-crisp texture of fried rings, but they’re still delicious and significantly lower in calories and fat.
Q: Why do my onion rings fall apart when I fry them?
A: This usually happens for one of three reasons. First, your onions might not have been dried properly before coating – excess moisture prevents the coating from adhering. Always pat rings completely dry. Second, you might be moving them around too much while frying. Let them sit undisturbed for at least 1-2 minutes before flipping so the coating can set. Third, your oil temperature might be too low, which prevents proper sealing of the coating. Make sure your oil is at a steady 375°F. Using the double-dredging method (plain flour, wet batter, seasoned flour) also helps the coating stick much better than a single coating.
Q: Can I use beer instead of buttermilk for the batter?
A: Absolutely! Beer batter creates wonderfully crispy, light onion rings with a slightly different flavor profile. Replace the buttermilk and eggs with 1 cup of cold beer (lager or pale ale works best). Mix it with 1 cup flour, the cornstarch, and all the seasonings to create a loose batter. The carbonation in beer creates extra-light, crispy coating, and the beer adds subtle flavor. Dip the flour-coated onion rings directly into the beer batter, letting excess drip off, then fry immediately. Beer-battered rings are a bit more delicate and should be fried right after coating (don’t let them sit), but they’re incredibly crispy and popular in many restaurants.
Q: Why are my onion rings greasy instead of crispy?
A: Greasy onion rings are almost always caused by oil that’s too cool. When oil temperature is below 360°F, the coating absorbs oil instead of immediately crisping up and sealing. Always use a thermometer and maintain 375°F. Other causes include overcrowding the pot (which drops the temperature), not letting oil recover between batches, or coating that’s too thick or wet. Make sure you’re shaking off excess flour and batter at each coating step. Also ensure you’re draining fried rings properly on a wire rack so excess oil can drip off. If your oil is at the right temperature and you’re frying in small batches, your onion rings should be crispy, not greasy.
Conclusion
There you have it – everything you need to create absolutely irresistible, restaurant-quality crispy onion rings right in your own kitchen! These golden beauties are so much better than anything you’ll find in the freezer aisle or even at most restaurants. The combination of that perfectly seasoned, extra-crunchy double coating and sweet, tender onion inside is pure magic.
The secret to onion ring success really comes down to just a few key techniques: keeping that oil temperature steady at 375°F, not overcrowding your pot, and using the double-coating method for extra crispiness. Once you nail these basics, you’ll be turning out batch after batch of perfectly golden, shatter-crisp onion rings that’ll disappear almost as fast as you can make them.
Whether you’re serving these for game day, alongside burgers at a summer cookout, as a party appetizer, or just because you’re craving something crispy and delicious, these homemade onion rings are guaranteed to be a hit. Kids love them, adults love them, and you’ll love how simple they actually are to make despite their impressive results.
The best part? Once you get the hang of making these, you can customize them endlessly – try different seasonings, experiment with various dipping sauces, or add some heat with extra cayenne. Make them your own and create your signature onion ring recipe that’ll have everyone asking for your secret!
I’d absolutely love to see your crispy onion rings! Snap a photo of your golden beauties and share it on Pinterest or Instagram – tag me so I can see your creations and celebrate your success. And please, drop a comment below letting me know how they turned out! Did you try any flavor variations? What dipping sauce was your favorite? Your feedback helps other home cooks and seriously makes my day.
Don’t forget to pin this recipe to your appetizers board or party food collection so you’ll have it ready whenever that onion ring craving hits (and trust me, it will!). Share it with your friends who love cooking or anyone who’s always looking for the perfect game day snack.
Now grab those onions, heat up that oil, and get ready to make the crispiest, most delicious onion rings ever. Your kitchen is about to smell amazing, and your taste buds are in for a serious treat! Happy frying, friends!