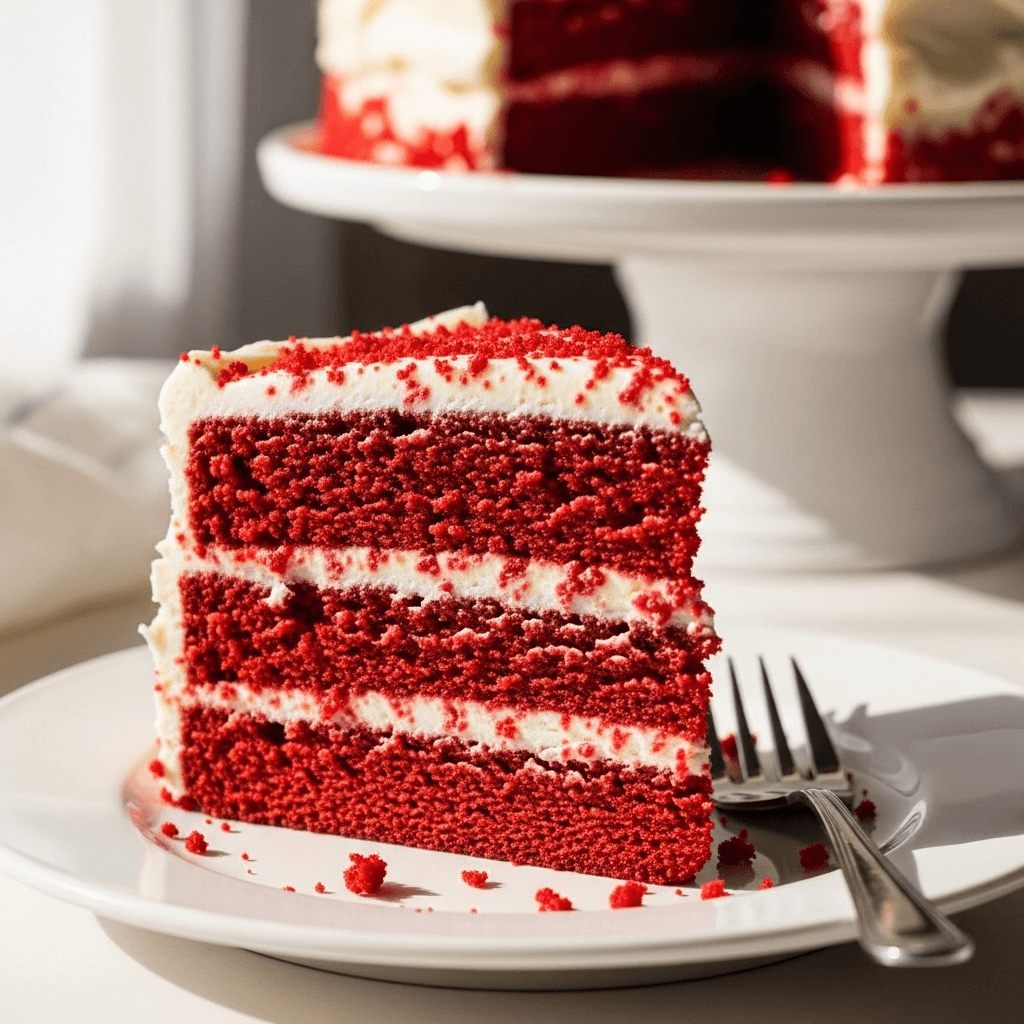

There’s something absolutely magical about slicing into a vibrant red velvet cake and revealing those gorgeous crimson layers beneath a cloud of cream cheese frosting. This isn’t just any chocolate cake – red velvet is a Southern icon that’s become America’s sweetheart dessert, perfect for Valentine’s Day, Christmas celebrations, birthdays, or honestly, any Tuesday that needs a little extra sparkle.
What makes red velvet cake so special? It’s the perfect marriage of subtle cocoa flavor, tangy buttermilk, and that signature tender crumb that practically melts on your tongue. The cream cheese frosting adds the perfect tangy-sweet balance that keeps you coming back for just one more slice (we won’t judge!). Whether you’re baking for a special occasion or just want to treat yourself to something spectacular, this homemade red velvet cake recipe will become your go-to showstopper dessert.
This classic red velvet cake recipe creates two beautifully moist layers that are easier to make than you might think. No fancy techniques required – just simple ingredients, clear instructions, and a little love mixed in. Let’s dive into creating the cake that’ll have everyone asking for your secret recipe!
History / Background
Red velvet cake has a fascinating history that’s as rich as its flavor. While many assume this iconic dessert is a modern creation, its roots actually stretch back to the Victorian era. The term “velvet cake” originally referred to cakes with an exceptionally fine, soft crumb texture, achieved through specific ingredient combinations.
The vibrant red color we associate with red velvet today has an interesting evolution. In the early 1800s, “velvet” cakes were made with almond flour, cocoa, or cornstarch to create that coveted soft texture. The reddish tint occurred naturally when cocoa powder (which was less processed back then) reacted with acidic ingredients like buttermilk and vinegar, creating a subtle reddish-brown hue.
The cake truly rose to fame during the Great Depression era, specifically thanks to the Adams Extract Company. In the 1930s and 1940s, this Texas-based company began selling red food coloring alongside a recipe for red velvet cake as a marketing strategy. The timing was perfect – during rationing, home bakers were looking for creative ways to make special desserts, and the dramatic red color made an affordable cake feel luxurious and festive.
Red velvet cake became a staple in Southern cuisine, particularly associated with special occasions and celebrations. The Waldorf-Astoria Hotel in New York City also claimed to have popularized the dessert, though this claim is debated by food historians. What’s undeniable is that red velvet cake became deeply embedded in American culinary culture, especially throughout the South.
By the 1950s and 1960s, red velvet cake with cream cheese frosting had become the standard we know today. The pairing of tangy cream cheese frosting with the subtle cocoa cake was a match made in dessert heaven. In recent decades, red velvet has experienced a major renaissance, appearing in everything from cupcakes to cookies to lattes, but the classic layer cake remains the gold standard that home bakers and professional pastry chefs alike continue to perfect.
Why You’ll Love This Recipe
This red velvet cake recipe strikes the perfect balance between impressive and achievable. It looks like you spent hours in the kitchen, but the actual hands-on time is surprisingly manageable, making it ideal for both experienced bakers and those just starting their baking journey.
Here’s why this recipe will become your favorite:
- Foolproof results every time – Clear measurements and step-by-step instructions ensure perfect layers, even if you’re a nervous baker
- Incredibly moist texture – The buttermilk and oil combination creates a tender crumb that stays soft for days
- Not overly sweet – The tangy cream cheese frosting balances the cake’s sweetness perfectly, so it’s never cloying
- Makes a stunning presentation – Those vibrant red layers look absolutely gorgeous when sliced, perfect for Instagram and Pinterest
- Uses everyday ingredients – No specialty items needed; everything is available at your regular grocery store
- Feeds a crowd – Makes 12-16 generous servings, perfect for parties, potlucks, and celebrations
- Make-ahead friendly – You can bake the layers in advance and assemble later, taking the stress out of party prep
- Classic flavor everyone loves – Even picky eaters adore red velvet cake, making it a crowd-pleasing choice
- Budget-friendly luxury – Costs a fraction of what you’d pay at a bakery but tastes just as amazing
Ingredient Notes
Understanding your ingredients is the secret to baking success. Here’s what you need to know about each component in this red velvet cake recipe and why they matter:
All-Purpose Flour – Creates the cake’s structure. Make sure to measure correctly by spooning flour into your measuring cup and leveling off, never scooping directly from the bag. Cake flour can be substituted for an even lighter texture.
Unsweetened Cocoa Powder – Provides that subtle chocolate undertone without making it a chocolate cake. Dutch-processed cocoa works beautifully, but natural cocoa powder is perfectly fine too. Don’t use hot cocoa mix!
Buttermilk – This is the magic ingredient that gives red velvet its signature tang and tender crumb. The acidity reacts with baking soda to create lift and also contributes to that velvety texture. No buttermilk? Make your own by adding 1 tablespoon of white vinegar or lemon juice to 1 cup of regular milk and letting it sit for 5 minutes.
White Vinegar – Works with the baking soda to create the cake’s light, airy texture. It also enhances the red color when combined with cocoa powder.
Vegetable Oil – Keeps the cake incredibly moist. Unlike butter, oil doesn’t solidify when cold, so your cake stays tender even when refrigerated. Canola or any neutral-flavored oil works great.
Granulated Sugar – Provides sweetness and helps create that fine, tender crumb we’re after.
Eggs – Add structure, richness, and help bind everything together. Room temperature eggs incorporate more easily into the batter.
Red Food Coloring – Creates that signature vibrant color. Liquid food coloring works, but gel food coloring gives more intense color with less liquid. You’ll need about 2 tablespoons of liquid or 1-2 teaspoons of gel. Some bakers use beet powder for natural coloring, though the color won’t be quite as dramatic.
Vanilla Extract – Enhances all the other flavors. Use pure vanilla extract, not imitation, for the best taste.
Cream Cheese – For the frosting, use full-fat block cream cheese (not spreadable). It must be softened to room temperature to avoid lumps.
Butter – Adds richness to the frosting. Again, make sure it’s properly softened.
Powdered Sugar – Creates a smooth, sweet frosting that pipes beautifully.
Equipment Needed
Having the right tools makes baking so much easier. Here’s what you’ll need to create your perfect red velvet cake:
- Two 9-inch round cake pans – For those classic double layers
- Parchment paper – Line the bottom of your pans for foolproof release
- Large mixing bowls – At least two for separating wet and dry ingredients
- Electric mixer (stand or hand) – Makes mixing the batter and frosting effortless
- Measuring cups and spoons – Accurate measurements are crucial in baking
- Whisk and rubber spatula – For combining ingredients gently
- Cooling racks – Allow air to circulate around cakes as they cool
- Offset spatula – Makes frosting the cake layers beautifully smooth
- Toothpick or cake tester – For checking doneness
- Sifter or fine-mesh strainer – For lump-free dry ingredients
- Cake stand or serving platter – For that gorgeous final presentation
Red Velvet Cake Recipe
- Total Time: 50 minutes
- Yield: 12-16 servings 1x
- Diet: Vegetarian
Description
This classic homemade red velvet cake features two tender, moist layers with a subtle cocoa flavor and stunning red color, topped with tangy cream cheese frosting. It’s the perfect showstopper dessert for any celebration!
Ingredients
For the Cake:
- 2½ cups all-purpose flour
- 2 tablespoons unsweetened cocoa powder
- 1 teaspoon baking soda
- 1 teaspoon salt
- 1½ cups granulated sugar
- 1½ cups vegetable oil
- 2 large eggs, room temperature
- 1 cup buttermilk, room temperature
- 2 tablespoons red food coloring (liquid) or 1-2 teaspoons gel food coloring
- 1 teaspoon white vinegar
- 2 teaspoons pure vanilla extract
For the Cream Cheese Frosting:
- 16 ounces (2 packages) cream cheese, softened to room temperature
- ½ cup (1 stick) unsalted butter, softened to room temperature
- 4 cups powdered sugar, sifted
- 2 teaspoons pure vanilla extract
- Pinch of salt
Instructions
For the Cake:
- Preheat and prep: Preheat your oven to 350°F (175°C). Grease two 9-inch round cake pans with butter or baking spray, then line the bottoms with parchment paper circles. Grease the parchment too. This ensures your cakes release perfectly.
- Mix dry ingredients: In a large bowl, sift together the flour, cocoa powder, baking soda, and salt. Whisking these together ensures even distribution and no lumps. Set aside.
- Combine wet ingredients: In another large bowl (or your stand mixer bowl), whisk together the sugar and oil until well combined. Add the eggs one at a time, beating well after each addition. The mixture should look smooth and slightly thick.
- Add buttermilk mixture: In a measuring cup, combine the buttermilk, red food coloring, vinegar, and vanilla extract. Stir to combine.
- Alternate additions: With your mixer on low speed, add the dry ingredients to the sugar-oil mixture in three additions, alternating with the buttermilk mixture, beginning and ending with the dry ingredients. Mix until just combined after each addition. Don’t overmix – stop as soon as you no longer see streaks of flour. The batter should be smooth and vibrant red.
- Divide and bake: Divide the batter evenly between your prepared pans. Tap the pans gently on the counter a few times to release any air bubbles. Bake for 28-32 minutes, or until a toothpick inserted in the center comes out with just a few moist crumbs (not wet batter). The tops should spring back when lightly touched.
- Cool completely: Let the cakes cool in their pans for 10 minutes, then carefully turn them out onto cooling racks. Remove the parchment paper and allow them to cool completely before frosting – this is crucial! Warm cake will melt your frosting.
For the Cream Cheese Frosting:
- Beat cream cheese and butter: In a large bowl with an electric mixer, beat the softened cream cheese and butter together on medium speed for 2-3 minutes until completely smooth, fluffy, and no lumps remain. Scrape down the sides of the bowl as needed.
- Add sugar gradually: With the mixer on low speed, gradually add the sifted powdered sugar, one cup at a time, beating well after each addition. Once all the sugar is incorporated, increase speed to medium-high and beat for 2 minutes until light and fluffy.
- Finish the frosting: Beat in the vanilla extract and a pinch of salt. If the frosting is too thick, add 1-2 tablespoons of heavy cream or milk. If it’s too thin, add a bit more powdered sugar.
Assembly:
- Level cakes (optional): If your cakes have domed tops, use a serrated knife to level them for more stable stacking.
- Frost the first layer: Place one cake layer on your serving plate or cake stand. Spread about 1 cup of frosting evenly over the top, going almost to the edges.
- Add second layer: Carefully place the second cake layer on top, pressing down gently to secure.
- Crumb coat: Spread a thin layer of frosting all over the cake (top and sides) to seal in any crumbs. Refrigerate for 15-20 minutes to set.
- Final frosting: Apply the remaining frosting generously over the top and sides of the cake, smoothing with an offset spatula. Create swirls or keep it smooth – it’s your masterpiece!
- Decorate (optional): Garnish with cake crumbs, fresh berries, or leave it beautifully simple.
Notes
- Room temperature ingredients are key: Cold eggs and buttermilk won’t incorporate as smoothly into the batter. Set them out 30-60 minutes before baking.
- Don’t overmix the batter: Mix just until the flour disappears to keep your cake tender. Overmixing develops gluten and creates a tough cake.
- Gel food coloring is stronger: If using gel, start with 1 teaspoon and add more for desired color intensity.
- Frosting consistency matters: The cream cheese and butter must be truly softened (not melted, not cold) for smooth, lump-free frosting.
- Store properly: Keep frosted cake covered in the refrigerator. Bring to room temperature 30 minutes before serving for best flavor.
- Prep Time: 20 minutes
- Cook Time: 30 minutes
- Category: Dessert
- Method: Baking
- Cuisine: American
Nutrition
- Serving Size: 1 slice (1/12 of cake)
- Calories: 645
- Sugar: 58g
- Sodium: 385mg
- Fat: 35g
- Saturated Fat: 12g
- Unsaturated Fat: 21g
- Trans Fat: 0g
- Carbohydrates: 78g
- Fiber: 1g
- Protein: 6g
- Cholesterol: 85mg
Tips & Variations
Flavor Variations:
- Red Velvet Cupcakes: Divide batter among 24 lined muffin cups and bake for 18-22 minutes. Perfect for parties!
- Chocolate Red Velvet: Increase cocoa powder to ¼ cup for a deeper chocolate flavor.
- Red Velvet Cheesecake Cake: Add a layer of baked cheesecake between your cake layers for ultimate decadence.
- Coconut Red Velvet: Add ½ cup shredded coconut to the batter and garnish with toasted coconut.
- Espresso Red Velvet: Add 1 tablespoon instant espresso powder to enhance the chocolate notes.
Frosting Variations:
- Whipped Cream Cheese Frosting: Fold in ½ cup whipped cream for an airier texture.
- Ermine Frosting: Try this traditional Southern frosting made with a cooked flour base for authentic vintage flavor.
- Chocolate Cream Cheese: Add ¼ cup cocoa powder to the frosting for chocolate lovers.
Dietary Modifications:
- Gluten-Free: Substitute with a 1:1 gluten-free flour blend (one containing xanthan gum).
- Dairy-Free: Use non-dairy buttermilk (plant milk + vinegar) and dairy-free cream cheese and butter alternatives.
- Lower Sugar: Reduce sugar to 1¼ cups in the cake (don’t go lower or texture will suffer).
Size Options:
- Three-Layer Cake: Divide batter among three 8-inch pans and reduce baking time to 23-26 minutes.
- Sheet Cake: Bake in a greased 9×13-inch pan for 35-40 minutes. Frost directly in the pan.
- Mini Bundts: Bake in mini bundt pans for 20-25 minutes for individual servings.
Pro Chef Tips
Tip #1: Temperature is everything – Room temperature ingredients emulsify better, creating a smoother, more evenly textured batter. Cold ingredients can cause the oil to seize up and create a lumpy batter. Set your eggs, buttermilk, cream cheese, and butter out an hour before you start baking.
Tip #2: Weigh your ingredients – Professional bakers weigh their flour for consistency. One cup of flour should weigh 120-125 grams. Scooping directly from the bag can pack in up to 25% more flour, resulting in dry, dense cake.
Tip #3: The vinegar-baking soda reaction creates lift – Add the vinegar right before baking for maximum rise. This acid-base reaction creates carbon dioxide bubbles that help your cake rise and creates that signature tender crumb.
Tip #4: Test for doneness early – Start checking your cake at 28 minutes. Overbaking is the number one cause of dry cake. The toothpick should have a few moist crumbs, not come out completely clean (that means it’s overdone).
Tip #5: Cool cakes completely upside down – After the 10-minute rest in the pan, flip cakes onto cooling racks upside down (flat bottom up). This prevents doming and makes leveling easier.
Tip #6: Freeze for easier frosting – Pop your cooled cake layers in the freezer for 30 minutes before frosting. Chilled cake is much easier to handle and creates fewer crumbs.
Tip #7: Create a dam for stability – Pipe a thick border of frosting around the edge of your first layer before filling the center. This “dam” prevents the filling from squishing out when you add the top layer.
Tip #8: Invest in an offset spatula – This simple tool makes frosting cakes 100 times easier. The angle lets you spread smoothly without your knuckles dragging through the frosting.
Tip #9: Hot water for smooth frosting – Dip your spatula in hot water, then dry it quickly before smoothing the frosting. The warmth helps create that professional bakery-smooth finish.
Tip #10: Let the cake rest before cutting – After frosting, refrigerate for at least 2 hours. This lets everything set and makes slicing infinitely cleaner. For the cleanest slices, dip your knife in hot water and wipe clean between each cut.
Common Mistakes to Avoid
Mistake #1: Using cold ingredients – This is the most common red velvet cake mistake. Cold eggs and buttermilk don’t incorporate properly, leading to a dense, uneven cake. Solution: Always bring ingredients to room temperature (about 70°F). In a hurry? Place eggs in warm water for 10 minutes and microwave buttermilk for 15 seconds.
Mistake #2: Overmixing the batter – Once you add the flour, you want to mix just until you don’t see white streaks anymore. Overmixing develops gluten, creating a tough, chewy cake instead of that tender velvet texture. Solution: Mix on low speed and stop as soon as ingredients are combined. A few small lumps are fine!
Mistake #3: Not sifting dry ingredients – Cocoa powder especially tends to clump, creating dark spots in your batter and uneven chocolate flavor. Solution: Always sift or whisk your flour, cocoa, baking soda, and salt together thoroughly before adding to wet ingredients.
Mistake #4: Lumpy cream cheese frosting – Nothing ruins a beautiful cake faster than chunky frosting. This happens when cream cheese or butter isn’t properly softened. Solution: Let cream cheese and butter sit at room temperature for at least an hour. They should be soft enough to leave a finger indent but not greasy or melting. Beat them together for a full 2-3 minutes before adding sugar.
Mistake #5: Frosting warm cake – This seems obvious, but impatience leads many bakers astray. Warm cake will melt your frosting into a soupy mess. Solution: Cool cakes completely (they should feel cool to the touch in the center), or better yet, refrigerate or freeze them before frosting.
Mistake #6: Not greasing the pan properly – Even with parchment paper, you need to grease both the pan and the paper. Solution: Butter and flour method works great, or use baking spray with flour. Get into all the corners and edges.
Mistake #7: Opening the oven too early – Every time you open the oven door, the temperature drops 25-50 degrees, which can cause cakes to fall or bake unevenly. Solution: Don’t peek until the minimum baking time is reached. Use your oven light to check progress.
Storage & Meal Prep
Room Temperature Storage: If your kitchen is cool (below 70°F) and you’ll be eating the cake within 24 hours, you can keep it covered at room temperature. However, the cream cheese frosting does contain dairy, so err on the side of caution.
Refrigerator Storage: This is the safest option for frosted red velvet cake. Store in an airtight container or covered with a cake dome for 4-5 days. The cake actually gets more moist and flavorful after a day in the fridge as the flavors meld together. Just bring it to room temperature about 30-60 minutes before serving for the best texture and flavor – cold cake can taste muted and the texture is firmer.
Unfrosted Cake Layers: Wrap each cooled layer tightly in plastic wrap, then again in aluminum foil. Store at room temperature for 2 days or refrigerate for up to 1 week. This is perfect for breaking up the work!
Individual Slices: Cut the cake into slices and wrap each individually in plastic wrap. Store in an airtight container in the refrigerator for up to 5 days. This makes for easy grab-and-go desserts and prevents the whole cake from drying out from repeated unwrapping.
Reheating Tips: Red velvet cake is delicious cold, at room temperature, or slightly warmed. To warm a slice, microwave for 10-15 seconds (no more or the frosting will melt). For the best experience, simply let refrigerated cake sit at room temperature for 30 minutes – the texture becomes perfectly tender and the flavors bloom.
Protecting the Cut Side: Once you’ve cut into your cake, press a piece of plastic wrap or parchment paper directly against the cut surface before covering. This prevents the cake from drying out on the exposed edge.
Make-Ahead & Freezer Notes
Freezing Unfrosted Cake Layers (Best Method):
Bake your cake layers completely and let them cool fully. Wrap each layer tightly in plastic wrap (two layers of wrap), then wrap again in aluminum foil or place in a freezer bag. Label with the date. Freeze for up to 3 months. When ready to use, thaw in the refrigerator overnight or at room temperature for 2-3 hours. Pro tip: You can actually frost cakes while they’re still slightly frozen – they create fewer crumbs!
Freezing Frosted Cake:
Yes, you can freeze a fully frosted red velvet cake! First, place the frosted cake in the freezer uncovered for 1-2 hours until the frosting is firm. Then wrap the entire cake in plastic wrap (carefully so you don’t damage your beautiful frosting), followed by aluminum foil. Freeze for up to 2 months. Thaw overnight in the refrigerator (still wrapped), then bring to room temperature before serving. The texture will be almost identical to fresh!
Freezing Individual Slices:
This is fantastic for portion control or future treats. Freeze the cake, then cut into slices. Wrap each slice individually in plastic wrap, then place all slices in a freezer bag or container. Freeze for up to 3 months. Thaw individual slices in the refrigerator for 2 hours or at room temperature for 30-45 minutes. You’ll always have cake ready when a craving strikes!
Make-Ahead Frosting:
Cream cheese frosting can be made up to 3 days ahead. Store in an airtight container in the refrigerator. Before using, let it come to room temperature, then beat with a mixer for 1-2 minutes to restore its fluffy texture. You can also freeze frosting in an airtight container for up to 3 months. Thaw in the refrigerator overnight and re-whip before using.
Make-Ahead Assembly Timeline:
For stress-free party prep, follow this timeline:
- Up to 3 months ahead: Bake and freeze cake layers
- Up to 3 days ahead: Make frosting and refrigerate
- 1 day ahead: Thaw cake layers, let frosting come to room temperature, frost and assemble cake, refrigerate
- 1-2 hours before serving: Remove cake from refrigerator to come to room temperature
- Just before serving: Add any fresh garnishes (berries, flowers, etc.)
Best Reheating Method After Freezing:
Thaw completely before attempting to warm. For best results, simply bring to room temperature – this preserves the texture better than microwaving. If you must warm it, microwave individual slices for no more than 10 seconds.
Serving Suggestions
Red velvet cake is stunning on its own, but the right accompaniments can elevate your dessert experience to the next level. Here are some delicious ways to serve this Southern classic:
Beverages:
- Hot coffee or espresso (the bitterness balances the sweetness perfectly)
- Cold milk (classic and kid-approved)
- Sweet tea or Southern-style iced tea
- Champagne or prosecco for celebrations
- Dessert wine like Moscato or Port
- Hot chocolate for winter celebrations
- Vanilla or cream liqueur for an adult treat
Ice Cream Pairings:
- Vanilla bean ice cream (let it melt slightly into the cake)
- Cream cheese ice cream (double the tangy goodness)
- Raspberry or strawberry sorbet (adds fruity brightness)
- Salted caramel ice cream (sweet and salty combination)
Fresh Fruit Additions:
- Fresh raspberries or strawberries (the tartness cuts through richness)
- Macerated berries (toss berries with a little sugar and let sit 30 minutes)
- Cherry compote (echoes the classic Southern cherry garnish)
- Sliced peaches (when in season, a true Southern pairing)
Whipped Cream Options:
- Classic sweetened whipped cream dollop
- Cream cheese whipped cream (fold softened cream cheese into whipped cream)
- Vanilla bean whipped cream
- Chocolate whipped cream for chocolate lovers
Plating Ideas:
- Drizzle plate with raspberry or chocolate sauce before adding slice
- Dust with cocoa powder or powdered sugar for elegance
- Add a small scoop of ice cream beside the slice
- Garnish plate with fresh mint leaves
- Create a berry coulis pool around the cake slice
- Add edible flowers for special occasions
Party Presentation:
- Serve on a white cake stand to make the red color pop
- Create a dessert bar with various toppings guests can choose from
- Pair with other red desserts (strawberries, raspberries) for a color-coordinated dessert table
- Add sparkler candles for birthday celebrations
- Surround the base with fresh rose petals for romantic occasions
Coffee/Tea Service: Serve alongside a dessert coffee bar with various creamers, syrups, and toppings. The combination of coffee and red velvet cake is particularly beloved in the South.
FAQs Section
Q: Why is my red velvet cake dense instead of fluffy?
A: Dense red velvet cake usually results from overmixing the batter or using cold ingredients. When you overmix, you develop too much gluten, creating a tough texture. Always mix just until ingredients are combined (stop when you don’t see flour streaks). Also, make sure your eggs, buttermilk, and other ingredients are at room temperature – cold ingredients don’t emulsify properly. Another cause can be too much flour; make sure you’re measuring correctly by spooning flour into your measuring cup rather than scooping, which packs it down.
Q: Can I make red velvet cake without food coloring?
A: Yes! You can make red velvet cake without artificial food coloring, though it won’t be as vibrantly red. For a natural alternative, use beet powder (about 2-3 tablespoons) or beet juice in place of some of the buttermilk. The result will be more of a reddish-brown than bright red. Some bakers embrace this natural approach for a more rustic look. Keep in mind that the original “red” in red velvet came from the natural reaction between cocoa and acidic ingredients, which only produces a subtle reddish tint.
Q: What’s the difference between red velvet cake and chocolate cake?
A: While both contain cocoa powder, red velvet cake uses much less – only 1-2 tablespoons compared to ½-1 cup in chocolate cake. Red velvet has a subtle cocoa flavor rather than being distinctly chocolatey. The real difference is in texture and tang: red velvet uses buttermilk and vinegar, creating a tender, moist crumb with a slightly tangy flavor. It’s traditionally paired with cream cheese frosting, while chocolate cake usually has chocolate buttercream. Red velvet is less sweet and more nuanced in flavor.
Q: Why did my cream cheese frosting turn out runny?
A: Runny frosting happens for a few reasons. First, your cream cheese or butter might have been too soft or melted – they should be softened but still hold their shape. If you over-beat the frosting, you can also break down the structure. To fix runny frosting, refrigerate it for 20-30 minutes, then beat again. If it’s still too soft, gradually add more powdered sugar (¼ cup at a time). You can also add 2-3 tablespoons of heavy cream whipped to stiff peaks to stabilize it. For future batches, make sure your cream cheese and butter are at true room temperature (not warm) and don’t over-beat.
Q: Can I use a different type of frosting besides cream cheese?
A: Absolutely! While cream cheese frosting is traditional and beloved, you have options. Ermine frosting (also called boiled milk frosting) is actually the original frosting for red velvet cake and has a lighter, less sweet flavor. Buttercream works beautifully if you prefer something sweeter and more stable at room temperature. Whipped cream frosting is lovely for a lighter option. Some people even use white chocolate frosting or mascarpone frosting. Just keep in mind that non-cream cheese frostings won’t have that signature tangy contrast.
Q: How do I keep my cake layers from sticking to the pan?
A: The key is proper pan preparation. Butter or spray your pans generously, making sure to get into all the corners and edges. Then line the bottom with a parchment paper circle (trace the pan, cut it out) and grease the parchment too. Some bakers also dust with flour after greasing. Let the cakes cool in the pan for exactly 10 minutes – this lets them set enough to handle but not so long that they stick. Then run a knife around the edges before inverting onto a cooling rack. The parchment should peel right off the bottom.
Q: My cake has a brown tint instead of red. What went wrong?
A: This usually means you either didn’t use enough food coloring or the type of cocoa powder affected the color. Dutch-processed cocoa is darker and can mute the red color more than natural cocoa. Make sure you’re using enough food coloring – don’t be shy! You need about 2 tablespoons of liquid food coloring or 1-2 teaspoons of gel. Gel food coloring provides more intense color. Also, overmixing or overbaking can cause the red to darken and turn brownish. Mix gently and don’t bake past the point where a toothpick comes out with moist crumbs.
Q: Can I make this recipe into cupcakes, and how do I adjust the baking time?
A: Yes! This recipe makes about 24 standard cupcakes. Fill lined muffin cups about ⅔ full with batter. Bake at 350°F for 18-22 minutes, or until a toothpick inserted in the center comes out with just a few moist crumbs. Start checking at 18 minutes – cupcakes can go from perfect to overbaked quickly. They’ll be done when the tops spring back when lightly touched. Let them cool in the pan for 5 minutes, then transfer to a cooling rack. Make sure they’re completely cool before frosting!
Conclusion
There you have it – everything you need to create a stunning, bakery-quality red velvet cake right in your own kitchen! This classic Southern dessert never goes out of style, and once you’ve mastered this recipe, you’ll be the designated cake baker for every celebration (and honestly, that’s a pretty great reputation to have).
The beauty of red velvet cake is that it looks incredibly impressive but doesn’t require any fancy techniques or hard-to-find ingredients. Just follow the steps, use room temperature ingredients, and don’t overmix – that’s really all there is to it! The tender, moist crumb and tangy cream cheese frosting create a flavor combination that’s been beloved for generations, and now you can bring that magic to your own table.
Whether you’re baking for Valentine’s Day, a birthday celebration, Christmas dinner, or just because it’s Tuesday and you deserve something special, this red velvet cake will deliver every single time. The gorgeous red layers never fail to impress when you slice into them, and that first bite of velvety cake with cream cheese frosting? Pure bliss.
I’d absolutely love to see how your red velvet cake turns out! Snap a photo of those beautiful red layers and share it on Pinterest – tag me so I can see your creation. If you loved this recipe, please leave a comment below and let me know how it went. Did you try any of the variations? What did your family think? Your feedback helps other bakers and makes my day!
Don’t forget to pin this recipe to your dessert board so you’ll have it saved for your next celebration. And if you’re feeling extra generous, share it with a friend who loves to bake – everyone needs a go-to red velvet cake recipe in their repertoire!
Happy baking, friends! May your cakes be moist, your frosting be smooth, and your kitchen be filled with the sweet smell of success. Now go forth and create some red velvet magic.