Description
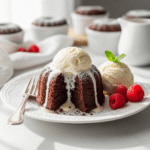
These individual mini chocolate cakes are rich, moist, and intensely chocolatey with a tender crumb that melts in your mouth. Perfect for date nights, dinner parties, or whenever you want a decadent single-serve dessert without baking an entire cake. They’re ready in just 25 minutes from start to finish!
Ingredients
- ½ cup all-purpose flour
- ⅓ cup unsweetened cocoa powder (Dutch-process preferred)
- ¾ cup granulated sugar
- ½ teaspoon baking powder
- ¼ teaspoon salt
- 1 large egg, room temperature
- ¼ cup whole milk, room temperature
- ¼ cup vegetable oil (or melted butter)
- 1 teaspoon vanilla extract
- ¼ cup hot water (or hot coffee for deeper flavor)
- Optional: ⅓ cup semi-sweet chocolate chips
Instructions
Step 1: Preheat and Prepare
Preheat your oven to 350°F (175°C). Generously grease 4 ramekins (6-ounce size) with butter or cooking spray, making sure to coat the bottoms and sides completely. For extra insurance against sticking, you can also dust the greased ramekins lightly with cocoa powder. Place the prepared ramekins on a baking sheet for easy handling.
Step 2: Mix Dry Ingredients
In a medium mixing bowl, whisk together the flour, cocoa powder, sugar, baking powder, and salt. Make sure to break up any lumps in the cocoa powder—sifting it first is ideal but not absolutely necessary if you whisk thoroughly. The dry ingredients should be evenly combined with no streaks of cocoa or flour visible.
Step 3: Add Wet Ingredients
Create a well in the center of your dry ingredients. Add the egg, milk, oil, and vanilla extract. Whisk together, starting from the center and gradually incorporating the dry ingredients from the edges. Mix until just combined—the batter will be thick at this point. Don’t overmix; a few small lumps are fine.
Step 4: Add Hot Liquid
Pour in the hot water (or hot coffee) and whisk until the batter is smooth and well combined. The batter will become quite thin—this is exactly what you want! The hot liquid blooms the cocoa powder and creates moisture that leads to incredibly tender cakes. If using chocolate chips, fold them in gently with a spatula at this stage.
Step 5: Fill and Bake
Divide the batter evenly among your prepared ramekins, filling each about ⅔ to ¾ full. This gives them room to rise without overflowing. The easiest way to do this is with a ladle or a ⅓ cup measuring cup. Place the baking sheet with the ramekins into your preheated oven.
Step 6: Bake to Perfection
Bake for 15-18 minutes, or until the tops look set and a toothpick inserted into the center comes out with just a few moist crumbs (not wet batter). The cakes should spring back lightly when touched. Don’t overbake—you want them moist and tender, not dry! Remember that they’ll continue cooking slightly from residual heat after you remove them from the oven.
Step 7: Cool and Serve
Remove from the oven and let the cakes cool in the ramekins for 5 minutes. This resting time allows them to set up so they won’t fall apart when you remove them. After 5 minutes, run a butter knife around the edges of each ramekin to loosen the cakes. Place a small plate upside down over each ramekin and carefully flip to unmold. The cakes should slide right out.
Step 8: Garnish and Enjoy
Serve your mini chocolate cakes warm, at room temperature, or chilled—they’re delicious any way! Dust with powdered sugar, top with whipped cream, add a scoop of vanilla ice cream, or garnish with fresh berries. Dig in and enjoy your perfect portion of chocolate bliss!
Notes
- Ramekin Size: These measurements are for 6-ounce ramekins. If using smaller 4-ounce ramekins, you’ll get 5-6 cakes and should reduce baking time by 2-3 minutes. For larger 8-ounce ramekins, you’ll get 3 cakes and may need to add 2-3 minutes to baking time.
- Greasing is Essential: Don’t skip greasing your ramekins thoroughly! These cakes need to release cleanly, and inadequate greasing is the main reason they stick. Use butter or cooking spray generously, getting into all the corners.
- Room Temperature Ingredients: Eggs and milk at room temperature mix more smoothly into the batter and create better texture. Take them out of the fridge 30 minutes before baking, or quick-warm the milk in the microwave for 15 seconds and place the egg in warm water for 5 minutes.
- Don’t Overbake: The single biggest mistake is overbaking mini cakes because they’re small and cook quickly. Set a timer for 15 minutes and check them. They’re done when a toothpick comes out with moist crumbs, not completely clean.
- Serving in Ramekins: If you prefer, you can serve these cakes right in their ramekins for a rustic presentation! Just let them cool for 5-10 minutes, then serve with a spoon for guests to dig in.
- Scaling the Recipe: This recipe doubles, triples, and quadruples beautifully! Just make sure you have enough ramekins and oven space.
- Prep Time: 10 minutes
- Cook Time: 15 minutes
- Category: Dessert
- Method: Baking
- Cuisine: American
Nutrition
- Serving Size: 1 mini cake
- Calories: 305
- Sugar: 38g
- Sodium: 180mg
- Fat: 15g
- Saturated Fat: 3g
- Unsaturated Fat: 11g
- Trans Fat: 0g
- Carbohydrates: 42g
- Fiber: 3g
- Protein: 4g
- Cholesterol: 47mg