Description
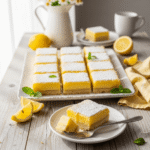
These classic lemon bars feature a buttery shortbread crust topped with a tangy-sweet lemon custard filling and dusted with powdered sugar. This easy lemon bar recipe delivers bakery-quality results with simple ingredients and straightforward steps. Perfect for potlucks, parties, or anytime you’re craving a bright, refreshing dessert that perfectly balances tart and sweet flavors.
Ingredients
For the Shortbread Crust:
- 2 cups (250g) all-purpose flour
- 1/2 cup (60g) powdered sugar
- 1 cup (2 sticks/226g) unsalted butter, softened
- 1/4 teaspoon salt
For the Lemon Filling:
- 4 large eggs, room temperature
- 1 1/2 cups (300g) granulated sugar
- 1/4 cup (30g) all-purpose flour
- 2/3 to 3/4 cup (160-180ml) fresh lemon juice (from 4–5 lemons)
- 2 tablespoons lemon zest (from 2–3 lemons)
- 1/4 teaspoon baking powder
For Topping:
- 2–3 tablespoons powdered sugar, for dusting
Instructions
Step 1: Prepare Your Pan and Preheat Oven
Preheat your oven to 350°F (175°C). Line a 9×13-inch baking pan with aluminum foil or parchment paper, leaving about 2 inches of overhang on the sides – this creates handles that make removing the bars much easier later. Lightly spray or butter the foil/parchment to prevent sticking. Having this overhang is crucial for getting clean cuts and easy removal, so don’t skip this step.
Step 2: Make the Shortbread Crust
In a medium mixing bowl, combine the 2 cups flour, 1/2 cup powdered sugar, and 1/4 teaspoon salt. Cut the softened butter into small cubes and add it to the flour mixture. Using an electric mixer on low speed (or your hands, or a pastry cutter), blend the butter into the dry ingredients until the mixture looks like coarse crumbs and starts to come together. It should be sandy and crumbly but hold together when pressed – think of the texture of wet sand. This usually takes about 2-3 minutes with a mixer.
Step 3: Press and Par-Bake the Crust
Pour the crumbly crust mixture into your prepared pan. Using your hands or the bottom of a flat measuring cup, press the mixture firmly and evenly across the entire bottom of the pan. You want to create a compact, even layer with no gaps or thin spots – press especially well into the corners and edges. The crust should be about 1/4 inch thick. Bake in the preheated oven for 18-20 minutes, until the crust is set and very lightly golden around the edges. It shouldn’t be brown, just lightly colored. This par-baking step is essential – it ensures your crust stays crisp even after adding the wet filling.
Step 4: Prepare the Lemon Filling
While the crust is baking, prepare your lemon filling. First, zest your lemons using a Microplane or fine grater – you need about 2 tablespoons of zest. Then juice the lemons to get 2/3 to 3/4 cup of fresh juice. In a large mixing bowl, whisk together the eggs and granulated sugar until well combined and slightly thickened, about 1 minute. Add the flour and baking powder, whisking until smooth with no lumps. Pour in the fresh lemon juice and lemon zest, and whisk everything together until completely smooth and uniform in color. The mixture should be thin and pourable, similar to a custard base.
Step 5: Pour and Bake
As soon as the crust comes out of the oven (while it’s still hot), give your lemon filling one final quick whisk, then carefully pour it over the hot crust. The hot crust helps the filling set properly. If you see any foam or bubbles on the surface, gently pop them with a toothpick or skim them off – this gives you a smoother finish. Immediately return the pan to the oven and bake for 22-25 minutes. The filling is done when it’s set around the edges but still slightly jiggly in the very center (like perfectly set Jell-O). It should not be liquid or sloshy. The filling will continue to set as it cools, so don’t overbake or it will become rubbery.
Step 6: Cool Completely
Remove the pan from the oven and place it on a cooling rack. Let the lemon bars cool at room temperature for about 30 minutes, then transfer the pan to the refrigerator and chill for at least 2 hours (or overnight for easiest cutting). The bars must be completely cold before cutting, or they’ll be messy and won’t hold their shape.
Step 7: Cut and Serve
Once completely chilled, use the foil or parchment overhang to lift the entire slab of lemon bars out of the pan and place it on a cutting board. Using a large, sharp knife (wipe it clean between each cut for the neatest edges), cut into 16-20 squares depending on your preferred size. Just before serving, dust generously with powdered sugar using a fine-mesh sieve. The powdered sugar adds the perfect finishing touch and classic bakery look.
Notes
- Lemon Juice Amount: The range of 2/3 to 3/4 cup allows you to adjust tartness. Use 2/3 cup for a sweeter bar, 3/4 cup for more tart. Taste your filling before baking if you’re unsure.
- Room Temperature Eggs: This is important! Cold eggs don’t incorporate as smoothly and can cause a less uniform texture. Set eggs out 30 minutes before baking, or place them in warm water for 5 minutes.
- Don’t Skip the Par-Baking: Baking the crust first ensures it stays crisp and doesn’t get soggy from the filling.
- Cooling is Essential: Patience is key! Cutting into warm lemon bars will result in a messy filling that doesn’t hold its shape. Always chill completely.
- Powdered Sugar Timing: Dust with powdered sugar right before serving, not in advance. The sugar will absorb moisture and dissolve if added too early.
- Altitude Adjustments: At high altitude (above 3,000 feet), reduce baking powder to 1/8 teaspoon and increase oven temperature by 15°F.
- Prep Time: 15 minutes
- Cook Time: 50 minutes
- Category: Dessert
- Method: Baking
- Cuisine: American
Nutrition
- Serving Size: 1 bar (based on 16 servings)
- Calories: 245
- Sugar: 24g
- Sodium: 75mg
- Fat: 12g
- Saturated Fat: 7g
- Unsaturated Fat: 4g
- Trans Fat: 0g
- Carbohydrates: 32g
- Fiber: 1g
- Protein: 3g
- Cholesterol: 75mg