Description
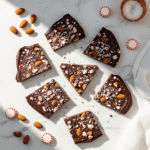
This easy chocolate bark recipe creates stunning, professional-looking chocolate candy in just 15 minutes of active time. Simply melt chocolate, spread it thin, add your favorite toppings, and let it harden. Perfect for homemade gifts, holiday treats, or satisfying chocolate cravings, this customizable recipe works with any chocolate type and topping combination you can imagine!
Ingredients
Base Recipe:
- 16 oz (about 3 cups) chocolate of choice (dark, milk, semi-sweet, or white chocolate)
- You can use chocolate bars chopped into small pieces or high-quality chocolate chips
- ½ teaspoon coconut oil (optional, helps chocolate melt smoothly)
Topping Ideas (choose 1-1½ cups total):
- ¾ cup chopped nuts (almonds, pecans, pistachios, walnuts)
- ½ cup dried fruit (cranberries, cherries, apricots, raisins)
- ½ cup crushed candy (peppermint, toffee bits, M&Ms)
- ½ cup crushed pretzels or cookies
- 2 tablespoons flaky sea salt
- ¼ cup shredded coconut
- ¼ cup mini chocolate chips (different color than base)
- Any combination of the above!
Popular Combinations:
- Classic Peppermint Bark: White chocolate + crushed candy canes + dark chocolate drizzle
- Sea Salt Dark Chocolate: Dark chocolate + toasted almonds + flaky sea salt
- Trail Mix Bark: Milk chocolate + mixed nuts + dried cranberries + mini chocolate chips
- Pretzel Crunch: Milk chocolate + crushed pretzels + sea salt + toffee bits
- Holiday Bark: White chocolate + crushed Oreos + candy cane pieces + red and green M&Ms
Instructions
Step 1: Prepare Your Workspace
Line a large baking sheet (approximately 13×18 inches or similar) with parchment paper or a silicone baking mat. Make sure the paper lies flat without wrinkles or bubbles. Gather all your toppings and have them ready to go—once you spread the chocolate, you’ll need to work quickly before it begins to set. If using nuts, toast them in a 350°F oven for 5-7 minutes until fragrant and lightly golden, then let them cool completely before using.
Step 2: Chop the Chocolate (if using bars)
If you’re using chocolate bars rather than chips, chop them into small, uniform pieces about the size of chocolate chips. Smaller pieces melt more evenly and quickly than large chunks. If using chocolate chips, skip this step.
Step 3: Melt the Chocolate
Microwave Method (easiest): Place chocolate and coconut oil (if using) in a microwave-safe bowl. Microwave on 50% power in 30-second intervals, stirring thoroughly between each interval. This prevents overheating and ensures smooth melting. Continue until about 75% of the chocolate is melted, then stir vigorously—the residual heat will melt the remaining pieces. This usually takes 2-3 intervals total.
Double Boiler Method (gentler): Fill a medium saucepan with 1-2 inches of water and bring to a gentle simmer. Place a heat-safe bowl on top (it should fit snugly without touching the water). Add chocolate and coconut oil, stirring frequently until completely smooth. Remove from heat immediately once melted.
Step 4: Spread the Chocolate
Pour the melted chocolate onto your prepared baking sheet. Using a rubber spatula or offset spatula, spread it into an even layer about ¼ inch thick. You can make it rectangular, free-form, or any shape you like. The thinner you spread it, the more brittle it will be; thicker creates more substantial pieces. Aim for consistent thickness so it sets evenly.
Step 5: Add Toppings
Working quickly before the chocolate begins to set, sprinkle your chosen toppings evenly over the surface. Gently press larger items (nuts, candy pieces) into the chocolate slightly so they’ll stick when it hardens. If you’re creating swirls or layers, drizzle melted chocolate of a different type over the top and use a toothpick or skewer to create swirl patterns. Don’t overwork it—messy swirls look more artisanal!
Step 6: Let It Set
For faster setting, place the baking sheet in the refrigerator for 30-45 minutes until completely firm. Alternatively, let it set at room temperature for 1-2 hours. The chocolate should be completely hard before breaking. If your kitchen is very warm, refrigeration is best.
Step 7: Break into Pieces
Once fully set, lift the parchment paper from the baking sheet and peel it away from the bark. Break the bark into irregular pieces with your hands or cut it into neat squares with a sharp knife if you prefer uniform pieces. The rustic, broken appearance is traditional and part of the charm!
Step 8: Store and Enjoy
Transfer broken pieces to an airtight container, layering with parchment paper between layers if stacking. Store at room temperature for up to 2 weeks, or refrigerate for up to 1 month.
Notes
- Chocolate Quality: Better chocolate creates better bark. Avoid “chocolate-flavored” candy coating or cheap chips with lots of additives.
- Don’t Overheat: Chocolate is delicate. Overheating makes it grainy, thick, and difficult to spread. Low, slow heat is key.
- Moisture is the Enemy: Even a single drop of water will cause chocolate to “seize” (become thick and grainy). Keep all utensils completely dry.
- Topping Amounts: Don’t overload with toppings—they should cover most of the surface but still show chocolate underneath.
- Room Temperature: If your chocolate seems too thick to spread smoothly, it may have cooled too much. Gently rewarm it briefly.
- Setting Time: Humid or warm environments take longer to set. Refrigeration speeds this up significantly.
- White Chocolate Tip: White chocolate is more finicky than dark or milk chocolate. Use lower microwave power (30-40%) and stir more frequently.
- Prep Time: 15 minutes
- Cook Time: 0 minutes
- Category: Dessert
- Method: No-Bake
- Cuisine: American
Nutrition
- Serving Size: 1 piece (about 1 oz)
- Calories: 145
- Sugar: 14g
- Sodium: 10mg
- Fat: 9g
- Saturated Fat: 5g
- Unsaturated Fat: 3g
- Trans Fat: 0g
- Carbohydrates: 16g
- Fiber: 2g
- Protein: 2g
- Cholesterol: 2mg