Description
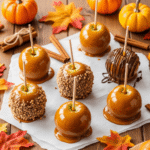
These classic homemade caramel apples feature crisp tart apples coated in smooth, buttery caramel that hardens to the perfect chewy texture. Easy to make using pre-made caramels, they’re perfect for fall celebrations, Halloween parties, or whenever you’re craving this nostalgic autumn treat. Customize with your favorite toppings for endless delicious variations!
Ingredients
For the Apples:
- 6–8 medium apples (Granny Smith, Honeycrisp, or Fuji)
- 6–8 wooden apple sticks or dowels
For the Caramel:
- 14 ounces (about 50) soft caramel candies, unwrapped
- 2 tablespoons heavy cream (or whole milk)
- 1 teaspoon vanilla extract
- Pinch of salt (optional)
Optional Toppings:
- 1 cup chopped nuts (peanuts, pecans, or walnuts)
- ½ cup mini chocolate chips
- ½ cup crushed pretzels or cookies
- Sprinkles or decorative candies
- Melted chocolate for drizzling
Instructions
Step 1: Prepare the Apples
Wash your apples thoroughly under cold running water to remove any wax coating—this is crucial for caramel adhesion! The wax prevents caramel from sticking properly. Scrub them gently with a vegetable brush if you have one. Dry the apples completely and thoroughly with paper towels or a clean kitchen towel. Any moisture will prevent the caramel from adhering. Remove the stems by twisting them off or cutting them out with a knife. Insert a wooden stick firmly into the stem end of each apple, pushing it about halfway through. Make sure the sticks are secure. Place prepared apples on a parchment-lined baking sheet and set aside.
Step 2: Prepare Your Workspace
Line a large baking sheet with parchment paper or a silicone baking mat—do not use waxed paper as caramel sticks to it! If using toppings, place them in shallow bowls or plates arranged near your workspace for easy access. Have everything ready before you start melting caramel because you’ll need to work quickly once it’s melted.
Step 3: Melt the Caramel
Unwrap all your caramel candies (enlist help—this takes a few minutes!). Place them in a medium saucepan along with the heavy cream. Heat over medium-low heat, stirring constantly with a wooden spoon or silicone spatula. The caramels will begin to melt and soften after 5-7 minutes. Keep stirring to prevent burning on the bottom. Once completely melted and smooth, remove from heat and stir in the vanilla extract and salt (if using). The caramel should be smooth and pourable but not too thin.
Step 4: Test the Consistency
Tilt the pan—the caramel should coat the spoon and fall in a thick ribbon. If it’s too thick, stir in another tablespoon of cream. If it seems too thin, let it cool for 1-2 minutes; it will thicken slightly as it cools. The temperature should be warm enough to be fluid but not so hot that it slides right off the apples.
Step 5: Dip the Apples
Working quickly but carefully (the caramel is hot!), tilt your saucepan to create a deeper pool of caramel. Hold an apple by its stick and dip it into the caramel, tilting the pan as needed to coat the apple completely. Rotate the apple to ensure even coverage, leaving just a small area around the stick uncoated. Lift the apple and let excess caramel drip back into the pan for a few seconds—you can swirl it gently to help the excess run off. Be patient here; too much caramel will puddle at the bottom.
Step 6: Add Toppings (Optional)
If using toppings, immediately roll the bottom half or entire caramel-coated apple in your chosen topping while the caramel is still soft and sticky. Work quickly as the caramel begins to set within 30-60 seconds. You can also drizzle melted chocolate over the set caramel later for layered decoration.
Step 7: Set the Apples
Place each dipped apple on your prepared parchment-lined baking sheet, stick side up. If caramel pools at the bottom, that’s normal—you can trim it off later with kitchen scissors once it hardens, or just embrace the rustic look! Space apples apart so they don’t touch each other as the caramel sets.
Step 8: Cool and Set
Let the caramel apples sit at room temperature for at least 30 minutes, or until the caramel is completely set and firm to the touch. You can refrigerate them for 10-15 minutes to speed up the setting process, but bring them back to room temperature before serving for the best texture. Once set, they’re ready to enjoy or wrap for gifting!
Notes
- Wax Removal is Critical: Store-bought apples often have a wax coating that prevents caramel from sticking. Wash thoroughly with warm water and scrub well, or dip apples briefly in boiling water for 5 seconds, then dry completely.
- Room Temperature Apples: Cold apples from the refrigerator cause caramel to harden too quickly and can crack. Use room temperature apples for best results.
- Caramel Temperature: The caramel should be warm enough to flow easily but not so hot that it’s thin and slides off. If it starts to thicken too much while dipping, return it to low heat briefly.
- Stick Placement: Insert sticks deep enough (about halfway through) that they’re secure but not so deep they poke out the bottom. Test by holding the apple by the stick—it shouldn’t wobble.
- Storage: Store finished caramel apples at room temperature for up to 3 days, or refrigerate for up to 1 week. Wrap individually in cellophane bags once completely set.
- Topping Timing: Add toppings immediately after dipping while caramel is still tacky. Once caramel sets, toppings won’t stick.
- Prep Time: 15 minutes
- Cook Time: 10 minutes
- Category: Dessert
- Method: Stovetop
- Cuisine: American
Nutrition
- Serving Size: 1 caramel apple
- Calories: 285
- Sugar: 52g
- Sodium: 95mg
- Fat: 5g
- Saturated Fat: 3g
- Unsaturated Fat: 2g
- Trans Fat: 0g
- Carbohydrates: 62g
- Fiber: 4g
- Protein: 2g
- Cholesterol: 12mg